Best Witch Hat Halloween Cookies

Introduction to Best Witch Hat Halloween Cookies
With leaves turning and refreshing coolness in the air, I always start to crave warm holiday baking sessions. And voila! Best Witch Hat Halloween Cookies. It’s not all rainbows and unicorns – sure these are holiday treats– but they do add a bit of cheer to your day. If you’re a mom trying to make sense of the jumble that is school events and work deadlines, this is total salvation. Quick, easy, and really quite popular – by both young and old, mind you! – these cookies will have your loved ones happily dancing for you this Halloween.
Why You’ll Love This Best Witch Hat Halloween Cookies
The Best Witch Hat Halloween Cookies are the revolution especially for moms just like me! They are put together fast so you do not have to spend hours in the kitchen, and that peanut butter taste with chocolate? Who can resist? Quick to whip up and decorate with more of your favorites making them the hit at any Halloween soiree- believe they are the show stopper at your spooky season celebration!
Ingredients for Best Witch Hat Halloween Cookies
To whip up these marvelous Best Witch Hat Halloween Cookies, you’ll need a delightful mix of ingredients. Here’s a quick rundown of what you’ll need:
- All-purpose flour: The backbone of the cookie, providing the structure and chewiness.
- Cornstarch: This little gem makes the cookies softer and helps them stay thick. A must-have for that perfect texture!
- Baking soda and baking powder: These leavening agents help your cookies rise just right, giving them a puffy, bite-sized charm.
- Sea salt: It amplifies the sweetness, balancing that delightful peanut butter flavor perfectly.
- Unsalted butter: Always choose unsalted for precise control over saltiness. It brings richness and helps create that fluffy texture.
- White sugar: This is your sweet touch; it gives the cookies that lovely crunchy exterior.
- Large egg: It binds everything together and adds moisture for a tender crumb.
- Smooth peanut butter: The star of the show! It provides a wonderful nutty flavor that marries beautifully with chocolate.
- Vanilla extract: A hint of vanilla adds depth and warmth to the overall flavor profile.
- Purple gel food coloring: To create that iconic witch hat look, adding an enchanting touch to your cookie dough.
- Halloween sprinkles or purple sanding sugar: Decorate these little beauties! They add that extra sparkle and fun.
- Chocolate kisses or Hugs: These will crown your cookies beautifully, giving them that witch hat shape everyone loves.
For exact measurements, don’t worry—they’re at the bottom of the article and easy to grab for those printing out the recipe!
How to Make Best Witch Hat Halloween Cookies
Now, let’s jump into the fun part—making our Best Witch Hat Halloween Cookies! Each step is straightforward, so you won’t feel overwhelmed. Just follow along, and soon you’ll have a tray of adorable, tasty cookies!
Step 1: Prepare Your Baking Sheet
First things first, line your sheet tray with parchment paper. This step helps the cookies bake evenly and makes cleanup a breeze. Set it aside for now; we’ll come back to it soon!
Step 2: Mix Dry Ingredients
In a large bowl, whisk together the all-purpose flour, cornstarch, baking soda, baking powder, and fine sea salt. This combination creates the structure we need. Mixing the dry ingredients well ensures they’re evenly distributed—nobody wants a salty surprise!
Step 3: Cream Butter and Sugar
In a separate bowl, cream together the softened unsalted butter and white sugar for about 2 minutes until it’s light and fluffy. This process incorporates air into the mix, which leads to the soft texture we crave in our cookies. You’ll know it’s ready when it looks pale and creamy!
Step 4: Combine Wet Ingredients
Next, add the large egg, smooth peanut butter, and vanilla extract to your butter mixture. Mix well until everything combines beautifully. The peanut butter makes the flavor absolutely divine while adding richness too!
Step 5: Combine Wet and Dry Ingredients
Now, it’s time to bring the two bowls together. Gradually incorporate the dry ingredients into the wet mixture, stirring until a uniform dough forms. Nobody likes lumpy dough, so make sure everything is mixed nicely!
Step 6: Color the Dough
Add some fun to your dough with purple gel food coloring! Do this a little at a time until you’ve achieved that enchanting hue. It’s like casting a spell on your cookies—getting that Halloween vibe just right!
Step 7: Chill the Dough
Using a 1-tablespoon cookie scoop, portion the dough into mounds. Place those mounds onto a plate and chill in the fridge for at least 2 hours or even overnight. Chilling is key for thick cookies that keep their shape when baked!
Step 8: Preheat the Oven
Once your dough is nice and chilled, it’s time to preheat the oven to 350°F (175°C). While the oven heats, prepare new sheet trays with parchment paper. We’re getting closer to cookie bliss!
Step 9: Coat and Shape the Dough
Roll each chilled dough mound into a smooth ball. Next, coat them in Halloween sprinkles or sanding sugar to give your cookies that festive sparkle. It’s like putting the icing on the cake—oops, I mean the sprinkle on the cookie!
Step 10: Bake the Cookies
Arrange the coated balls on the trays, ensuring they’re spaced about 2 inches apart. Bake your cookies for 9–11 minutes until slightly firm but still soft in the center. Your kitchen will smell heavenly while they bake!
Step 11: Add Chocolate Kisses
After pulling the cookies from the oven, let them cool for about 5 minutes. Then gently press a chocolate kiss or Hug into the center of each cookie. It’s the crowning touch for our witch hats!
Step 12: Chill to Set
Here’s a little trick to keep that chocolate kiss from melting all over. Transfer the tray to the freezer for 10 minutes. This brief chill helps the chocolate set and keeps it looking adorable on top!
Step 13: Finish Cooling
Finally, finish cooling the cookies on a wire rack. While you wait, feel free to bake the remaining dough if you have any left. Soon, you’ll have a delightful stack of delicious Best Witch Hat Halloween Cookies to enjoy!
Tips for Success
- Chill the dough! This ensures thick cookies that hold their shape during baking.
- If you prefer softer cookies, slightly underbake—they’ll continue to firm up as they cool.
- Let the chocolate kisses or Hugs set in the fridge to keep them from melting.
- Experiment with different colored sprinkles for a unique twist on your witch hats.
- Share your cookies! They make great treats for school parties or neighborhood gatherings.
Equipment Needed
- Baking sheets: Standard trays work best, but you can use a pizza stone in a pinch.
- Parchment paper: This helps prevent sticking. Aluminum foil can be another option.
- Mixing bowls: A large bowl for mixing and a smaller one for creaming works perfectly.
- Cookie scoop: A tablespoon or small cookie scoop ensures even portions; a spoon will work too.
- Wire rack: Perfect for cooling; a cutting board can serve as a quick alternative.
Variations
- Nut-Free Version: Substitute the peanut butter with sunflower seed butter for a nut-free cookie, perfect for school events!
- Gluten-Free Option: Use a gluten-free all-purpose flour blend to make these cookies accessible for those with dietary restrictions.
- Dark Chocolate Kisses: Swap traditional chocolate kisses for dark chocolate for a richer flavor profile that’s sure to impress.
- Fun Flavor Add-Ins: Add mini chocolate chips or toffee bits to the dough for an extra sweet surprise with every bite!
- Spooky Shapes: Roll the dough into different Halloween shapes—think bats and pumpkins—and decorate accordingly!
Serving Suggestions
- Pair these witch hat cookies with a warm glass of apple cider for a cozy fall treat.
- Serve alongside a spooky dessert platter featuring themed cakes and cupcakes.
- For a festive touch, display the cookies on a dark, decorative cake stand.
- Bring them to parties and watch your friends swoon with delight!
FAQs about Best Witch Hat Halloween Cookies
Can I use a different type of nut butter?
Absolutely! You can swap the peanut butter with almond butter or even sunflower seed butter for a nut-free option. Just keep in mind that each nut butter has its unique flavor and texture, which may slightly alter the final result.
How can I make these cookies ahead of time?
These Best Witch Hat Halloween Cookies can be made ahead of time! Just prepare the cookie dough, chill it, and freeze the mounds. When you’re ready to bake, simply pull them out, let them thaw for a bit, and follow the baking steps as usual.
What’s the best way to store leftover cookies?
To keep your cookies fresh, store them in an airtight container at room temperature. They’ll stay delicious for up to a week. If you want to keep them longer, freeze them in a single layer, then transfer to a container for up to 2 months!
Can I decorate the cookies differently?
Of course! Feel free to use other sprinkles or icing to customize your witch hats. You could even use colored chocolate or edible glitter for a magical touch that suits your Halloween theme.
What if I don’t have purple food coloring?
No worries! You can make light purple by mixing red and blue food coloring or simply omit it altogether. Your cookies will still be delicious, even if they lack that signature witch hat look.
Final Thoughts
Baking the Best Witch Hat Halloween Cookies is more than just preparing a treat; it’s about creating cherished family memories. The joy of watching your kids place chocolate kisses atop their cookies is heartwarming. Plus, the vibrant colors and fun shapes add a dash of whimsy to your holiday festivities. Whether you’re baking alone or involving the kids in the fun, these cookies are sure to become a favorite. Embrace the laughter, the chaos, and the deliciousness of this easy recipe. Trust me, they truly capture the magic of Halloween in every bite!
Print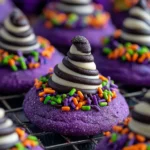
Best Witch Hat Halloween Cookies
- Total Time: 2 hours 30 minutes
- Yield: 33 cookies 1x
- Diet: Vegetarian
Description
These Best Witch Hat Halloween Cookies are fun, festive, and delicious, featuring a peanut butter cookie base topped with chocolate kisses and purple sprinkles.
Ingredients
- 1 1/2 cups all-purpose flour
- 2 tsp cornstarch
- 1/2 tsp baking soda
- 1/4 tsp baking powder
- 1/8 tsp fine sea salt
- 1/2 cup unsalted butter, softened
- 1 cup white sugar
- 1 large egg
- 3/4 cup smooth peanut butter
- 1 tsp vanilla extract
- Purple gel food coloring (as needed)
- Halloween sprinkles or purple sanding sugar (for decoration)
- 33 chocolate kisses or Hugs candies, unwrapped
Instructions
- Line a sheet tray with parchment paper and set aside.
- In a large bowl, whisk together the all-purpose flour, cornstarch, baking soda, baking powder, and fine sea salt until combined.
- In a separate large bowl, cream together the softened unsalted butter and white sugar for 2 minutes until light and fluffy.
- Add the large egg, smooth peanut butter, and vanilla extract to the butter mixture and mix well.
- Incorporate the dry ingredients from Step 1 into the wet mixture and stir until a uniform dough forms.
- Add purple gel food coloring a little at a time until desired shade is reached.
- Using a 1-tablespoon cookie scoop, portion the dough into mounds and chill in the fridge for at least 2 hours or overnight.
- Preheat the oven to 350°F (175°C) and prepare new sheet trays with parchment paper.
- Roll each chilled dough mound into a smooth ball and coat with sprinkles or sanding sugar.
- Arrange the coated balls on the trays, spacing them 2 inches apart, and bake for 9–11 minutes.
- Let the cookies cool for 5 minutes and press a chocolate kiss or Hug into the center of each cookie.
- Transfer the tray to the freezer for 10 minutes to prevent the chocolate from melting.
- Finish cooling on a wire rack while baking the remaining dough.
Notes
- Chilling the dough is essential for thick cookies.
- For a softer interior, slightly underbake the cookies.
- Ensure the chocolate kisses do not melt by chilling the cookies after baking.
- Prep Time: 20 minutes
- Cook Time: 10 minutes
- Category: Dessert
- Method: Baking
- Cuisine: American
Nutrition
- Serving Size: 1 cookie
- Calories: 120
- Sugar: 10g
- Sodium: 50mg
- Fat: 7g
- Saturated Fat: 3g
- Unsaturated Fat: 4g
- Trans Fat: 0g
- Carbohydrates: 13g
- Fiber: 1g
- Protein: 3g
- Cholesterol: 15mg