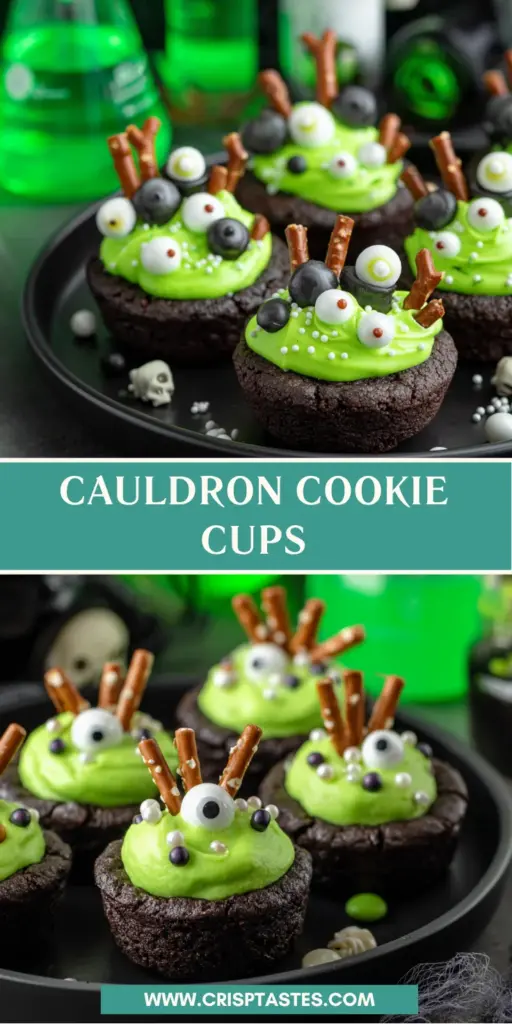
Cauldron Cookie Cups are the Ultimate Halloween Treat!

Introduction to Cauldron Cookie Cups
As autumn whispers in, our kitchens beckon for delightful Halloween treats. Just picture it: your little ones giggling with excitement as they dive into a sweet world of Cauldron Cookie Cups. These delicious gems are perfect for busy moms like us, combining ease and charm to impress at any Halloween bash. With a quick prep time and a sprinkle of creativity, you’ll create a magical dessert that even picky eaters won’t resist! Trust me, these cookie cups will soon become a cherished tradition in your home, bringing a sprinkle of joy and festivity to your family’s celebrations.
Why You’ll Love This Cauldron Cookie Cups
Cauldron Cookie Cups are a delightful treat that effortlessly combines taste and convenience. In just 30 minutes, you can whip up a batch that will steal the spotlight at any Halloween gathering. The chocolatey cookie base is not only scrumptious but also surprisingly easy to master. Plus, you’ll love the cheerful personalization options that invite everyone to join in the decorating fun. They truly capture the essence of Halloween magic while simplifying the busy season ahead!
Ingredients for Cauldron Cookie Cups
Creating these delightful Cauldron Cookie Cups requires a handful of simple ingredients. Most of these items are likely in your pantry, making it a cinch to whip them up!
- Devil’s Food Cake Mix: This chocolatey base brings rich flavor and is a fantastic shortcut for busy cooks.
- Large Eggs: These binders add moisture and a lovely texture to the cookies.
- Canola or Vegetable Oil: Using oil instead of butter ensures moist, tender cookie cups that won’t dry out.
- Black Food Coloring (optional): For that extra spooky flair, this adds depth to the dark chocolate base.
- Unsalted Butter: Softened to perfection, butter is the star ingredient for our luscious buttercream.
- Powdered Sugar: The sweet backbone of buttercream, ensuring every bite is just the right amount of sweet.
- Vanilla Extract: A splash of this adds a lovely aroma and enhances the flavor profile of the dessert.
- Salt: Just a pinch balances out the sweetness and elevates the cookie cups.
- Milk: A little goes a long way in helping achieve that smooth, pipeable buttercream consistency.
- Green Food Coloring: The ghoulish hue that gives the buttercream its fun and festive look!
- Round Green Sprinkles: These whimsical toppings resemble bubbling potion ingredients – perfect for our cauldrons!
- Halloween Sprinkles: Embrace the season with a spritz of color and an added crunch.
- Candy Eyeballs: These adorable decorations bring the spooky element to life, making every bite a playful adventure.
- Pretzel Sticks: Broken in half, they act as stir sticks, adding a fun, salty element to the sweet cookie cups.
Remember, the precise measurements are available at the bottom of the article for your convenience and printing needs.
How to Make Cauldron Cookie Cups
Making Cauldron Cookie Cups is a delightful adventure that’s both simple and fun. Let’s gear up and dive right in, so you can create these sweet treats in no time!
Step 1: Preheat the Oven and Prepare Muffin Pans
First things first, preheat your oven to 350°F. This step is crucial! Preheating ensures even baking, helping those cookie cups rise just right. Meanwhile, lightly grease three 12-count mini muffin pans to prevent any sticky situations. Trust me, a non-stick moment now means smooth sailing later!
Step 2: Mix the Cookie Dough
Now it’s time to combine our ingredients! In a large bowl, mix the Devil’s Food cake mix, eggs, canola oil, and any black food coloring if you’re feeling extra spooky. Stir until everything is nicely blended. The dough should be thick yet moldable. If it’s too dry, a splash of oil can help. Your cookie dough should resemble a chocolatey cloud, promising sweet bites ahead!
Step 3: Shape and Bake the Cookie Cups
Next, scoop about 1/2 tablespoon of dough into each greased muffin cup. Use your fingers to flatten the dough gently; this helps create that cuppy center we desire. Bake in your preheated oven for 8-10 minutes. You’ll know they’re done when the edges are set but the centers are soft. Remember, they will firm up as they cool. Trust the process; those delicious cookie cups are on their way!
Step 4: Cool the Cookie Cups
Once baked, it’s vital to let your cookie cups cool completely. This cooling phase allows them to firm up, making them easier to handle and fill later. Patience is key here, but consider this your moment to sip some coffee or tea while they cool!
Step 5: Prepare the Buttercream
While waiting, let’s whip up our creamy green buttercream! In a medium bowl, beat the softened unsalted butter until it’s light and fluffy. Gradually add in the powdered sugar, mixing well. Add vanilla extract and salt to enhance the flavor, then pour in the milk until it’s nice and smooth. Last but not least, add green food coloring until you reach a potion-perfect hue!
Step 6: Pipe the Buttercream
Time to get piping! Use a piping bag or a zip-top bag with a corner snipped off to fill your cookie cups. Start filling each cup generously, allowing the green buttercream to resemble a bubbling potion. Don’t be shy; the more, the merrier! Just think about those cute cauldrons bubbling over with glee.
Step 7: Decorate Your Cauldron Cookie Cups
Now for the fun part—decorating your Cauldron Cookie Cups! Sprinkle on the round green sprinkles for a magical touch and add candy eyeballs for that whimsical flair. Finish off with Halloween sprinkles for color and crunch. Break the pretzel sticks in half and insert one into each cookie cup as a stir stick. Voila! Your spooky treats are now ready to enchant everyone!
Tips for Success
- Keep your cookie dough chilled for easier handling if it feels too soft.
- Don’t skip the cooling phase; it ensures a sturdy cookie cup for filling.
- Feel free to experiment with different colors of food coloring to match your Halloween theme.
- Use a piping bag for smoother buttercream application but a zip-top bag works just as well.
- Have fun with decorations—let your kids get creative!
Equipment Needed
- 12-count mini muffin pans: Standard size for perfect cookie cups.
- Mixing bowls: A large one for the dough and a medium one for buttercream.
- Electric mixer: A hand mixer or stand mixer works great for beating buttercream.
- Piping bags: Alternatively, use zip-top bags for easy frosting.
- Spoon and spatula: For scooping and mixing ingredients.
Variations of Cauldron Cookie Cups
- Gluten-Free: Swap the Devil’s Food cake mix for a gluten-free chocolate cake mix. Ensure all other ingredients are certified gluten-free.
- Vegan Option: Replace eggs with flaxseed meal (1 tablespoon of flaxseed mixed with 2.5 tablespoons of water) and use a plant-based butter alternative for the buttercream.
- Flavor Twist: Experiment with different cake mixes like red velvet or carrot cake for a unique take.
- Nut Allergy-Friendly: Use a nut-free butter substitute if there are allergies in your household.
- Lower Sugar Version: Use sugar substitutes like erythritol or stevia in your buttercream to reduce sweetness.
Serving Suggestions for Cauldron Cookie Cups
- Pair these treats with a warm cup of apple cider for a cozy fall vibe.
- Serve alongside a fruit platter; the freshness balances the sweetness beautifully.
- Present on a spooky-themed platter with decorative bats and ghosts for added flair.
- Include a side of ice cream for an indulgent dessert experience.
- Offer milk or hot chocolate for a nostalgic touch that everyone loves!
FAQs about Cauldron Cookie Cups
Can I make these Cauldron Cookie Cups in advance?
Absolutely! You can prepare the cookie cups a day ahead. Just bake and cool them, then store in an airtight container. Fill them with buttercream the day of your gathering for the freshest taste.
What if I don’t have mini muffin pans?
No worries! You can use a regular muffin pan, but the cookie cups will be larger. Just adjust your baking time and serving size accordingly. Remember, bigger is sometimes better!
How do I store leftover Cauldron Cookie Cups?
To keep them fresh and delicious, store any leftovers in an airtight container at room temperature. They should stay tasty for up to three days, though I doubt they’ll last that long!
Can I use other cake mixes?
Absolutely! Feel free to experiment with different flavors, like red velvet or even funfetti. Just keep the baking time the same, and you’ll have a unique take on these delightful treats.
Is there a way to make these cookie cups more festive?
Yes! Besides the decorations, consider using holiday-themed sprinkles or add festive gel icing designs. You can even make color variations for other holidays!
Final Thoughts
Getting creative in the kitchen, especially with these Cauldron Cookie Cups, brings so much joy. I love how they blend imagination with deliciousness, enchanting both kids and adults alike. Watching the smiles of my family as they dig into these sweet creations truly warms my heart.
Whether you’re hosting a Halloween get-together or simply looking for a fun afternoon activity, these cookie cups spark joy and laughter in every bite. So grab your ingredients, unleash your inner wizard, and make some magical memories this Halloween season. Trust me; it’s a treat you won’t want to miss!
Print
Cauldron Cookie Cups
- Total Time: 30 minutes
- Yield: 36 cookie cups 1x
- Diet: Vegetarian
Description
Cauldron Cookie Cups are a delightful Halloween treat reminiscent of bubbling potions, made from chocolate cookie cups filled with creamy green buttercream and topped with fun decorations.
Ingredients
- 1 (15.25 ounce) box Devil’s Food cake mix
- 2 large eggs
- 1/2 cup canola or vegetable oil
- black food coloring (optional)
- 1 cup unsalted butter (softened)
- 3 cups powdered sugar
- 1 teaspoon vanilla extract
- 1/2 teaspoon salt
- 1–3 tablespoons milk
- green food coloring
- Round green sprinkles
- Halloween sprinkles
- Candy eyeballs
- Pretzel sticks
Instructions
- Preheat the oven to 350°F and lightly grease three 12-count mini muffin pans.
- In a large bowl, mix the cake mix, eggs, canola oil, and black food coloring (if using) until well combined.
- Scoop about 1/2 tablespoon of dough and place it in the mini muffin pans. Flatten the dough with your fingers.
- Bake for 8-10 minutes or until the edges are set. Remove from the oven and immediately press an indentation into each warm cookie using the back of a 1 tablespoon measuring spoon. Set aside to cool completely.
- While the cookie cups cool, make the buttercream. In a medium bowl, beat the butter until creamy. Gradually add powdered sugar, vanilla, and salt, beating until smooth.
- Add milk a little at a time until the buttercream is smooth and pipeable. Mix in green food coloring until the desired shade is reached.
- Pipe the buttercream into the cooled cookie cups, filling each to resemble a bubbling potion.
- Decorate with green sprinkles, candy eyeballs, and Halloween sprinkles. Break pretzel sticks in half and insert one into each cookie cup as a stir stick.
- Serve and enjoy!
Notes
- Store any leftover cookie cups in an airtight container.
- Use different colors of food coloring for a variety of themed treats.
- Feel free to customize toppings based on your Halloween theme.
- Prep Time: 20 minutes
- Cook Time: 10 minutes
- Category: Dessert
- Method: Baking
- Cuisine: American
Nutrition
- Serving Size: 1 cookie cup
- Calories: 150
- Sugar: 10g
- Sodium: 80mg
- Fat: 7g
- Saturated Fat: 3g
- Unsaturated Fat: 3g
- Trans Fat: 0g
- Carbohydrates: 20g
- Fiber: 0g
- Protein: 1g
- Cholesterol: 20mg