Cheesecake Stuffed Apple Pies: A Delicious Twist You’ll Love!

Introduction to Cheesecake Stuffed Apple Pies
When life’s chaos strikes, finding a little slice of comfort food can make all the difference. That’s where my beloved Cheesecake Stuffed Apple Pies come in! This delightful dessert is a harmonious blend of creamy cheesecake and spiced apple filling, cuddled in a crispy crust. Trust me, they’re perfect for busy days when you want something special yet quick to pull together. Whether you’re dazzling guests or treating your family, these little pies will steal hearts and tummies alike. Let’s dive into this delicious adventure of flavors!
Why You’ll Love This Cheesecake Stuffed Apple Pies
I promise, every bite of these Cheesecake Stuffed Apple Pies is worth its weight in gold! Their ease of preparation makes them a breeze for any busy mom or professional. Plus, they cook up super fast, so you won’t waste precious time in the kitchen. The warm, sweet aroma fills your home, wrapping everyone in a cozy embrace. Trust me, they’ll bring smiles to faces and joy to your gatherings!
Ingredients for Cheesecake Stuffed Apple Pies
Let’s gather what we need for these scrumptious Cheesecake Stuffed Apple Pies! Here’s a quick breakdown of the ingredients you’ll want to have on hand. Don’t worry; I’ll keep it concise!
- Apple Filling:
- Chopped apples: I love using Honeycrisp or Granny Smith for that perfect blend of sweetness and tartness.
- Melted butter: This adds rich flavor and helps the apples caramelize beautifully.
- Light brown sugar: It enhances the sweetness while adding that lovely molasses flavor.
- Ground cinnamon: A warm spice that makes everything cozy and inviting.
- Nutmeg (optional): Just a pinch can elevate the flavor profile for you spice lovers out there.
- Cornstarch and water mix: This helps to thicken the filling and keep it from getting too runny.
- Cheesecake Filling:
- Room temperature cream cheese: This provides a creamy and velvety base for the cheesecake filling.
- White sugar: Just a bit sweetens and balances the tanginess of the cream cheese.
- Vanilla flavoring: A touch of vanilla brings out the sweetness and rounds out the flavors.
- Assembly:
- Store-bought pie crusts or biscuit dough: Saves time! Feel free to use empanada wrappers if you’re in a pinch.
- Cooking oil for frying: Choose a neutral oil that can handle high heat without burning.
- Sweet coating: A delightful mixture of sugar and cinnamon to roll the hot pies in once they cool.
- Optional toppings: Get creative! A drizzle of caramel sauce or a dusting of powdered sugar always makes things extra special.
You can find exact measurements for all these ingredients at the bottom of the article, making it easy for you to print out the recipe!
How to Make Cheesecake Stuffed Apple Pies
Ready to dive into the deliciousness of Cheesecake Stuffed Apple Pies? Let’s break it down step by step. I promise it’s easier than it sounds, and you’ll have a mouthwatering treat in no time!
Step 1: Cook the Apple Filling
Start by melting the butter in a small saucepan over medium heat.
Once the butter is melted, toss in your chopped apple chunks, brown sugar, and cinnamon. If you like a kick of warmth, add a pinch of nutmeg as well. Stir it all together and let it cook until the apples soften, which should take around 5 to 7 minutes.
As the mixture bubbles and fills your kitchen with a soothing aroma, grab that cornstarch mix and add it in. Stir for another minute or so, letting it thicken up beautifully. Set aside to cool while we whip up our creamy cheesecake filling.
Step 2: Prepare the Cheesecake Filling
In a mixing bowl, combine the room temperature cream cheese, sugar, and vanilla flavoring.
Whip it all together until it’s smooth and there’s not a lump in sight. You want it to be dreamy and creamy, just like a perfect cheesecake should be!
To help it firm up a bit, pop it in the fridge while we assemble our pies. Don’t you love multi-tasking in the kitchen?
Step 3: Assemble the Pies
Now it’s time to bring everything together. Roll out your chosen dough on a clean surface.
Cut it into circles, about 4 to 5 inches across. It’s like making little edible canvases! Place a spoonful of the cheesecake filling right in the center, followed by a spoonful of your warm apple filling.
Now, fold the dough over to create a half-moon shape. Press the edges together firmly with your fingers or a fork to seal it all in. For added security, a little water or an egg wash around the edges will help them stick.
Step 4: Fry the Stuffed Pies
Time to bring the sizzle! In a large pan, heat about 1 to 2 inches of cooking oil to 350°F (175°C).
Carefully drop your pies into the hot oil, making sure not to crowd the pan. Fry them until they’re golden brown on both sides, which should take about 2 to 3 minutes each side.
As they cook, keep an eye out for that lovely golden color. It’s like watching your culinary dreams come to life!
Step 5: Coat the Pies
Once your pies are perfectly crispy, use a slotted spoon to lift them out of the oil and let them drain on paper towels.
While they’re still warm, roll them in that delightful cinnamon sugar mixture. The sugar will stick beautifully to the warm, crispy crust.
If you’re feeling indulgent, drizzle some caramel sauce on top or a light dusting of powdered sugar. Who can resist a little extra sweetness?
Tips for Success
- Use fresh apples for the best flavor and texture in your filling.
- Don’t skip chilling the cheesecake filling; it helps with assembly.
- Test the oil temperature with a small piece of dough before frying to ensure it’s just right.
- Make a few extra pies to freeze for a quick dessert later—simply fry from frozen!
- For a healthier option, bake the pies instead of frying.
Equipment Needed
- Medium saucepan: For cooking the apple filling. A large skillet can work too!
- Mixing bowl: Ideal for combining your cheesecake filling. Grab a whisk or hand mixer for smoothness.
- Rolling pin: Necessary for rolling out your dough. A wine bottle can be a makeshift alternative!
- Slotted spoon: Perfect for lifting out those golden pies. Tongs work in a pinch!
- Frying pan or deep fryer: Essential for frying. An air fryer can be a healthier option!
Variations
- Chocolate Lovers: Add chocolate chips to the cheesecake filling for a delightful twist!
- Fruit Fiesta: Swap the apples for other fruits like pears or peaches for a refreshing change of pace.
- Gluten-Free Option: Use gluten-free pie crusts or biscuit dough to make these treats suitable for everyone.
- Vegan Version: Substitute cream cheese with a plant-based alternative, and use coconut milk for a creamy filling.
- Cinnamon Roll Style: Drizzle the pies with cream cheese frosting instead of the traditional toppings for an extra indulgent treat!
Serving Suggestions for Cheesecake Stuffed Apple Pies
- Pair with a scoop of vanilla ice cream for an irresistible dessert duo.
- Serve warm alongside a drizzle of caramel sauce for a touch of decadence.
- Top with whipped cream and a sprinkle of cinnamon for an elegant finish.
- Enjoy with a warm cup of spiced chai or apple cider for a cozy experience.
- Arrange the pies on a rustic platter, dusted with powdered sugar for a lovely presentation!
FAQs about Cheesecake Stuffed Apple Pies
Got some burning questions about these delightful Cheesecake Stuffed Apple Pies? I’ve got you covered! Here are some commonly asked questions that might help you in your delicious journey.
Can I make Cheesecake Stuffed Apple Pies ahead of time?
Absolutely! You can prepare the filling and assemble the pies in advance. Store them in the fridge until you’re ready to fry or bake them. It’s a great way to save time on a busy day.
Can I bake the pies instead of frying them?
Yes, for a healthier option, you can bake the pies! Just preheat your oven to 375°F (190°C) and place the assembled pies on a baking sheet. Brush them lightly with oil or an egg wash and bake for about 15–20 minutes, or until golden brown.
What’s the best way to store leftover pies?
Store any leftover Cheesecake Stuffed Apple Pies in an airtight container in the fridge. They’ll stay fresh for about 2–3 days. If you want to freeze them, wrap them tightly and pop them in the freezer for up to a month.
How do I reheat the pies?
You can reheat them in a toaster oven or in the microwave. If you prefer that crispy texture, a quick bake in the oven at 350°F (175°C) for a few minutes is your best bet!
Can I customize the filling?
Definitely! Feel free to swap out the apples for other fruits you love, or even add spices like cardamom or ginger to the filling for a unique twist. This recipe is as flexible as it is delicious!
Final Thoughts
Creating Cheesecake Stuffed Apple Pies is more than just whipping up a dessert; it’s about crafting moments of joy and connection. The harmonious blend of creamy cheesecake and spiced apples tucks warmth into every bite, making it a treat that’s perfect for sharing with loved ones. Whether you’re celebrating a special occasion or simply indulging on a quiet night, these little pies bring a delightful touch of comfort. Best of all, they’re easy enough to make that even the busiest of moms can pull them off without a hitch. Enjoy every golden, crispy moment!
Print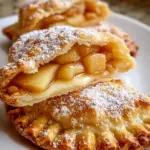
Cheesecake Stuffed Apple Pies
- Total Time: 45 minutes
- Yield: 12 pies 1x
- Diet: Vegetarian
Description
Delicious cheesecake stuffed apple pies, combining the flavors of creamy cheesecake and sweet apples in a crispy crust.
Ingredients
- Apple Filling
- 2 chopped apples (Honeycrisp or Granny Smith), skin removed and cut into chunks
- 2 tablespoons melted butter
- 2 tablespoons light brown sugar
- ½ teaspoon ground cinnamon
- Small bit of nutmeg (if you want)
- 1 teaspoon cornstarch stirred with 1 tablespoon water
- Cheesecake Filling
- 4 ounces room temperature cream cheese
- 2 tablespoons white sugar
- ½ teaspoon vanilla flavoring
- Assembly
- 1 package store-bought pie crusts, biscuit dough, or ready-made empanada wrappers
- Cooking oil for deep frying
- Sweet coating (¼ cup sugar mixed with 1 teaspoon cinnamon)
- Extra toppings if you like: caramel drizzle or sugar dust
Instructions
- Melt butter in a small saucepan over medium flame. Toss in apple chunks with brown sugar, cinnamon, and nutmeg if using. Cook till apples get soft, around 5–7 minutes. Add your cornstarch mix and stir for another minute or two until it thickens up. Set aside to cool down.
- Grab a bowl and combine cream cheese with sugar and vanilla. Mix until it’s smooth with no lumps. Pop it in the fridge so it firms up a bit.
- Stretch out your dough into circles about 4–5 inches across. Drop a spoonful of the cheese mix and then some apple filling in the middle. Fold the dough over to make half-moons and press edges with a fork. You can wet the edges with water or egg to help them stick together.
- Warm up 1–2 inches of oil in a pan until it reaches 350°F (175°C). Drop your pies in and fry them until they turn golden brown on both sides, about 2–3 minutes per side. Let them drain on some paper towels.
- While they’re still hot, roll the pies in your cinnamon sugar mix. Eat them plain or add some caramel sauce or powdered sugar on top if you’d like.
Notes
- For a richer flavor, use a mix of different apple varieties.
- Make sure the oil temperature is right for perfectly crispy pies.
- You can bake the pies instead of frying for a healthier option.
- Prep Time: 30 minutes
- Cook Time: 15 minutes
- Category: Dessert
- Method: Frying
- Cuisine: American
Nutrition
- Serving Size: 1 pie
- Calories: 200
- Sugar: 10g
- Sodium: 150mg
- Fat: 10g
- Saturated Fat: 5g
- Unsaturated Fat: 3g
- Trans Fat: 0g
- Carbohydrates: 25g
- Fiber: 2g
- Protein: 2g
- Cholesterol: 20mg