Cheesy crust pizza snacks

Introduction to Cheesy Crust Pizza Snacks
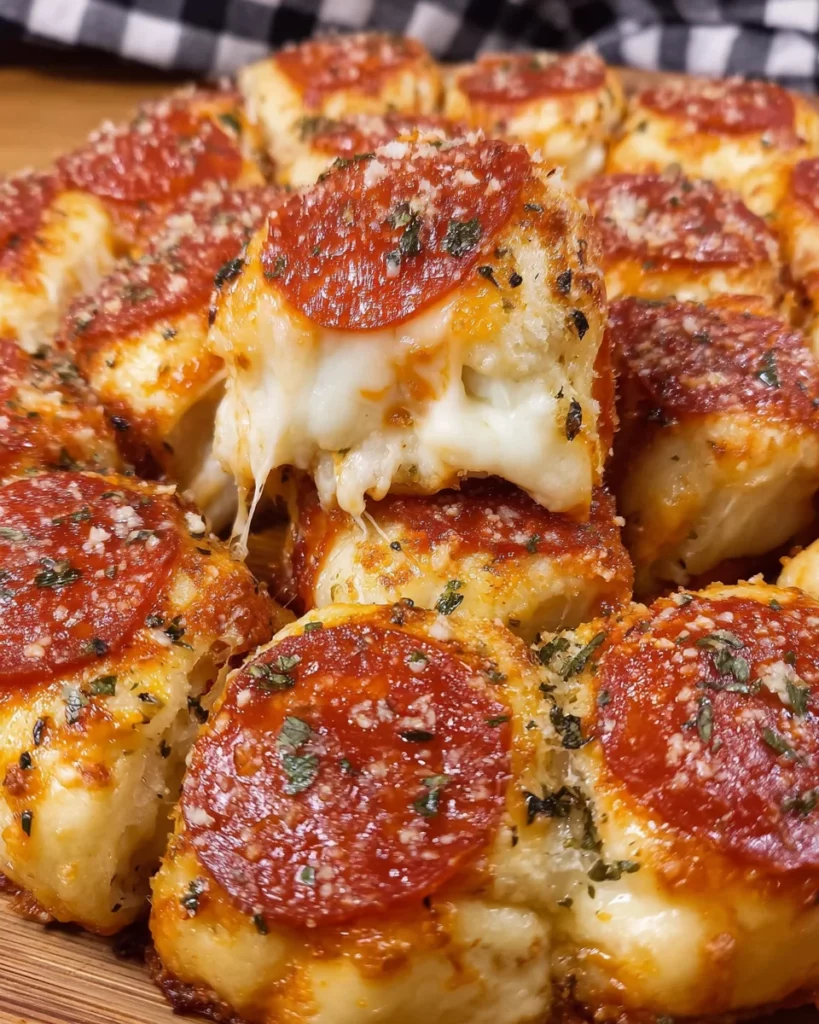
Have you ever found yourself in a pinch, needing a quick snack that will dazzle your guests? Let me introduce you to these cheesy crust pizza snacks! They’re not just a treat; they’re a fun, delicious solution for busy days when you want to impress loved ones without spending hours in the kitchen. Imagine melty cheese wrapped in a golden, savory crust, perfect for parties or family movie nights. Trust me, these little bites will have everyone coming back for seconds (and thirds!). Let’s dive into this easy recipe that’s sure to bring smiles all around!
Why You’ll Love This Cheesy Crust Pizza Snacks
These cheesy crust pizza snacks are a game-changer for busy moms and professionals alike. They come together in just under 30 minutes, which makes them perfect for last-minute gatherings or surprise cravings. Plus, who can resist the cheesy, savory goodness wrapped in a delightful crust? Whether you’re entertaining guests or enjoying a quiet night at home, these bites will have everyone raving about your culinary skills!
Ingredients for Cheesy Crust Pizza Snacks
Let’s gather our tasty ingredients for these cheesy crust pizza snacks. You’ll need a roll of refrigerated pizza dough, which is the magic base for our delicious bites. It saves time and gives that perfect crusty outer layer.
For the inside, get ready for some melty goodness with mozzarella cheese sticks. Each bite will ooze cheese, oh-so-satisfying!
Next up, we have pepperoni slices. They add a savory kick, making your snacks taste just like classic pizza. If you prefer a vegetarian twist, swap them out for olives or roasted red peppers, which can also add a delightful zing.
Don’t forget the unsalted butter; this will give the dough a lovely golden color and a buttery flavor when brushed on top. And to enhance that flavor even more, we’ll mix in dried oregano and garlic powder. These fragrant herbs really elevate the taste.
Finally, a sprinkle of finely grated parmesan cheese brings a little extra richness. If you’re dairy-free, you can skip the cheese or look for substitutes that fit your diet.
Optional but oh-so-delicious, a side of pizza sauce for dipping can turn this snack into a full-on pizza experience! You’ll find the exact measurements for all ingredients at the bottom of this article, where you can also print them out. Ready to get cooking?
How to Make Cheesy Crust Pizza Snacks
Prepare Your Oven and Tray
The first step is to preheat your oven to 400°F. This is essential for that perfect golden crust! While the oven warms up, grab a baking tray and cover it with aluminum foil. This not only makes cleanup easier but also gives your snacks a nice crisp. Next, lightly coat the foil with cooking spray. This prevents any sticking and ensures your cheesy crust pizza snacks slide right off after baking. If you’re like me and dislike scrubbing pans, you’ll appreciate this handy tip!
Prepare the Cheese
Now, let’s tackle the cheese! Carefully unwrap each mozzarella cheese stick. I find it easiest to slice them into three equal sections. This way, they’ll fit perfectly inside the dough bites. Use a sharp knife, and be sure to keep your fingers clear. Cheese sticks can be a bit slippery, so if you have any extra helpers around, now’s their time to shine! Just think of how delightful each cheesy burst will be once baked!
Make the Seasoning Mixture
In a small dish, mix together the finely grated parmesan cheese, garlic powder, and dried oregano. The aroma alone will have your taste buds dancing! This simple seasoning adds a little extra flair to your cheesy crust pizza snacks. Give it a good stir to ensure everything is combined well. Set it aside while we get back to the delicious dough.
Prepare the Pizza Dough
Let’s open that roll of refrigerated pizza dough! With scissors or your hands, peel back the packaging and place the dough flat on your work surface. Roll it out gently to make sure it’s not too thick. Now, cut the dough into 24 even portions. I like to use a pizza cutter for this—so fast and easy! Just remember, trying to work with sticky dough can be a little messy. Keep flour nearby if needed to easily handle the dough. You’re almost there, and soon your kitchen will smell heavenly!
Assemble the Snacks
Now, it’s assembly time! Lay each piece of cut dough on your work surface. Place one of the cheese sections in the center of each dough piece. It’s like wrapping a little present! Carefully fold the edges of the dough around the cheese, making sure to seal the edges well. If you don’t seal them tightly, the cheese might leak during baking, and we don’t want that. Line them up on the baking tray, seam-side down. This keeps them from unraveling. As you work, think about how excited your guests will be to indulge in these cheesy bites!
Add Finishing Touches
After assembling all the cheesy crust pizza snacks, it’s time for the finishing touches! Brush each dough roll generously with melted butter. This gives them a golden hue and enhances the flavor. Next, sprinkle that seasoning mixture you made earlier over the top. Just a light dusting will do! For an added pop of flavor, gently press one slice of pepperoni onto each snack. The melted pepperoni will make them even more irresistible once baked. Your kitchen will soon smell like a pizzeria!
Bake Your Cheesy Crust Pizza Snacks
It’s time for the big moment—baking! Carefully place your tray in the preheated oven and let them bake for about 10 to 12 minutes. Keep an eye on them; the goal is a beautiful golden brown color. Once done, remove them from the oven and let them cool for a minute. This may be the hardest part, but trust me; letting them cool slightly prevents burnt tongues! Serve your cheesy crust pizza snacks hot, with pizza sauce for dipping if desired. Everyone’s going to love these!
Tips for Success
- Ensure to seal the dough tightly around the cheese to avoid leaks.
- Feel free to prepare these snacks ahead of time and freeze them. Just bake them when you’re ready!
- Experiment with different fillings like vegetables or spices for unique flavors.
- Use a pizza cutter for quick, even slices of dough.
- Keep an eye on them while baking to achieve that perfect golden color!
Equipment Needed
- Baking tray – A regular cookie sheet works just as well if you don’t have one.
- Aluminum foil – Parchment paper is a great alternative for easy cleanup.
- Sharp knife or pizza cutter – Scissors can also do the trick for cutting dough.
- Small mixing bowl – Any small bowl will work if you’re in a pinch!
- Brush for butter – Use a spoon if you don’t have a brush on hand.
Variations
- Add a twist to the filling by incorporating diced jalapeños, giving your cheesy crust pizza snacks a spicy kick.
- For a healthier option, swap out regular dough for whole wheat or cauliflower crust.
- Try using different types of cheese, like cheddar or pepper jack, for a unique flavor profile.
- Include a variety of vegetables, such as bell peppers or spinach, for added nutrition and color.
- Experiment with different herbs like basil or thyme in place of oregano for a fresh taste.
Serving Suggestions
- Pair these cheesy crust pizza snacks with a cool ranch or garlic dipping sauce for added flavor.
- Serve alongside a crisp garden salad to balance the richness of the snacks.
- Offer sparkling water or a fruity mocktail to complement the savory bites.
- Arrange the snacks on a colorful platter for an eye-catching presentation.
- Add fresh herbs as a garnish to enhance the visual appeal!
FAQs about Cheesy Crust Pizza Snacks
Can I make these cheesy crust pizza snacks ahead of time?
Absolutely! You can prepare the snacks in advance, assemble them, and then freeze them before baking. When you’re ready, just pop them in the oven—it’s a lifesaver for busy days!
What can I use instead of pepperoni?
If you’re looking for alternatives, try chopped olives, diced bell peppers, or even cooked sausage. Feel free to customize according to dietary preferences or what you have on hand!
How do I store leftovers?
Store any leftover cheesy crust pizza snacks in an airtight container in the refrigerator. They’ll keep well for 2 to 3 days. Reheat in the oven or microwave when you’re ready to enjoy them again.
Can I bake them in an air fryer?
Yes! Air frying is a fantastic option for these cheesy treats. Cook them at 375°F for about 8-10 minutes, checking for that golden exterior!
What dipping sauces pair well?
These snacks pair wonderfully with marinara or ranch dressing. Experiment with garlic sauce or even salsa for a fun twist!
Final Thoughts
Making cheesy crust pizza snacks is more than just whipping up a quick treat; it’s about creating memorable moments around the table. With their gooey, melty goodness and golden crust, these little bites are sure to steal the show at any gathering. Whether you’re entertaining friends or enjoying a cozy night in with the family, these snacks bring joy and deliciousness in every bite. Plus, the fun of assembling them can turn into a delightful activity for you and your loved ones. So, roll up your sleeves and indulge in the comforting embrace of these cheesy delights!
Print
Cheesy crust pizza snacks
- Total Time: 27 minutes
- Yield: 24 snacks 1x
- Diet: Vegetarian
Description
These cheesy crust pizza snacks are a fun and delicious treat that will impress your guests with their melty cheese and flavorful crust.
Ingredients
- 1 roll of refrigerated pizza dough (14 ounces)
- 24 pepperoni slices
- 8 cheese sticks, mozzarella
- 4 tablespoons melted butter, unsalted
- 1 teaspoon oregano, dried
- 1/2 teaspoon garlic powder
- 2 tablespoons parmesan, finely grated
- Optional: pizza sauce for dipping
Instructions
- Turn your oven to 400°F. Cover a tray with foil, then coat it lightly with cooking spray.
- Take the cheese sticks out of their wrappers. Slice each one into three equal sections.
- In a small dish, mix parmesan with garlic powder and oregano.
- Pop open the dough container and spread the crust flat on your work surface. Cut it into 24 even-sized portions.
- Set one cheese piece in the center of each dough piece. Wrap the dough securely around the cheese and seal the edges. Line them up seam-side down on the baking tray.
- Brush the dough rolls with melted butter. Sprinkle on the seasoning mixture, then press one slice of pepperoni onto the top of each.
- Put the tray in the oven and bake for about 10-12 minutes, or until they turn golden.
- Serve hot and pair with pizza sauce for dipping, if you’d like.
Notes
- Make sure to seal the edges of the dough well to prevent leakage during baking.
- These snacks can be prepared ahead of time and frozen before baking for a quick appetizer later.
- Feel free to customize with other toppings like sliced olives or jalapeños.
- Prep Time: 15 minutes
- Cook Time: 12 minutes
- Category: Appetizer
- Method: Baking
- Cuisine: American
Nutrition
- Serving Size: 2 snacks
- Calories: 150
- Sugar: 1g
- Sodium: 300mg
- Fat: 9g
- Saturated Fat: 4g
- Unsaturated Fat: 3g
- Trans Fat: 0g
- Carbohydrates: 13g
- Fiber: 1g
- Protein: 6g
- Cholesterol: 15mg