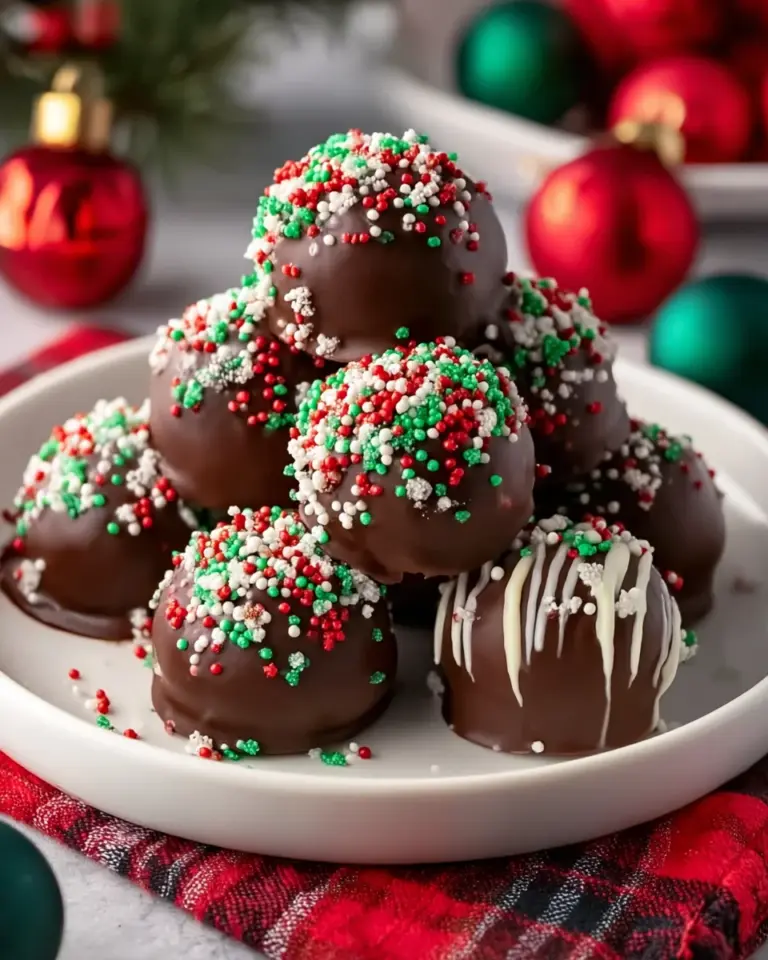
Cherry Mash Truffles: Indulge in This Sweet Delight!

Introduction to Cherry Mash Truffles
Let me take you on a delectable journey with Cherry Mash Truffles! These delightful chocolate-covered treats are the perfect way to indulge yourself—or impress your loved ones. I know how hectic life can get, especially as a busy mom or professional. That’s why this recipe is a lifesaver. It’s quick, no-bake, and requires just a handful of ingredients. Picture this: sweet maraschino cherries mingling with creamy peanut butter, all wrapped in rich chocolate. This sweet treat is not only a satisfying dessert but also a nostalgic pick-me-up that’s bound to bring smiles all around.
Why You’ll Love This Cherry Mash Truffles
Cherry Mash Truffles encapsulate bliss in every bite. They’re easy to whip up, making them a perfect solution for busy days. Plus, the sweet, creamy combination is nothing short of heavenly! You won’t need hours in the kitchen, yet the flavor will impress family and friends alike. These truffles satisfy both your sweet tooth and your love for simple, delightful recipes, all while keeping your cravings at bay.

Ingredients for Cherry Mash Truffles
Gathering the right ingredients is the first step to creating these scrumptious Cherry Mash Truffles. Here’s what you’ll need:
- Creamy peanut butter: This velvety base gives our truffles their rich flavor and creamy texture.
- Maraschino cherries: These sweet cherries provide a burst of fruity flavor, making the truffles unforgettable.
- Powdered sugar: Sweetness and a smooth finish come from this fine sugar, helping to bind everything together.
- Rice cereal: For that perfect crunch! It adds texture while balancing the creaminess of the peanut butter.
- Almond extract (optional): A splash of this fragrant extract can elevate the flavor to new heights if you feel adventurous!
- Dark or milk chocolate chips: The truffles are dipped in your choice of chocolate, encasing them in a decadent coating.
- Vegetable oil: This helps the chocolate melt smoothly, giving it that glossy finish we all love.
- Extra chopped maraschino cherries (optional for garnish): A sprinkle on top adds color and extra flavor for those who can’t get enough cherry goodness.
- Sprinkles or chopped nuts (optional for garnish): Get creative and personalize each truffle with fun toppings!
These ingredients come together seamlessly, transforming your kitchen into a haven of sweet decadence. You can find exact measurements at the bottom of the article, ready for printing. So, let’s get started on this delicious creation!

How to Make Cherry Mash Truffles
Combine Peanut Butter and Cherries
To kick off your Cherry Mash Truffles, grab a large bowl. Combine the creamy peanut butter with the finely chopped maraschino cherries. Mix them until just blended; you’ll know it’s ready when you see swirls of pink and rich tan in your bowl. The texture should be smooth yet slightly chunky from the cherries. I recommend using a sturdy spatula for this—it’s perfect for getting into those nooks and crannies. Once you see that lovely marbled finish, you’re on the right track!
Fold in Sugar and Cereal
Next, gently fold in the powdered sugar and rice cereal. This step is all about achieving even coating. Use a spatula to carefully incorporate the sugar first—it’s like a sweet snowy blanket wrapping around each ingredient. Then, add the rice cereal for that satisfying crunch. Be kind to your mixture; you don’t want to crush the cereal or overmix. Just enough folding will leave you with a lovely blend of sweetness and texture, perfect for rolling into truffles.
Shape the Truffle Balls
Now comes the fun part: shaping your mixture into truffle balls! Scoop out portions with your hands or a cookie scoop and roll them into 1-inch balls. This size is ideal for popping in your mouth—who doesn’t love bite-sized treats? Place each ball on a parchment-lined baking sheet. This lining not only prevents sticking but also makes cleanup a breeze. Take your time here; the shape doesn’t have to be perfect, but uniform sizes will ensure even coating later!
Refrigerate Truffles
Once all your truffle balls are rolled, it’s time to chill. Pop them in the refrigerator for about 30 minutes; this helps them firm up nicely. Chilling is vital because it makes dipping in chocolate so much easier. Trust me, after a stint in the fridge, they’ll hold their shape beautifully in the warm chocolate bath. Plus, that cool treat on a busy day is simply delightful!
Melt Chocolate
Next, let’s melt your chocolate. In a microwave-safe bowl, combine the chocolate chips and vegetable oil. Heat in 20-30 second intervals, stirring in between. It’s crucial to take your time here; chocolate can seize up if overheated. Keep an eye on it and stir until you achieve a smooth and glossy consistency. This melted chocolate will be the delicious coating that transforms your truffles into a rich chocolatey treat!
Dip and Coat Truffles
Now it’s time for the dipping! Use a fork or a toothpick to dip each chilled truffle into the melted chocolate, ensuring it’s entirely coated. Work quickly to avoid letting the chocolate cool too much; you want a nice glossy finish. Lift it out and let the excess chocolate drip away before placing it back on the parchment-lined sheet. It’s like giving each truffle a luxurious bath—who could resist such indulgence?
Garnish Truffles
Before the chocolate sets, let’s add some pizzazz with garnishes! While the chocolate is still wet, sprinkle extra chopped maraschino cherries, colorful sprinkles, or even chopped nuts on top. This adds not only a delicious kick but also a visually appealing touch that makes your truffles pop. Get creative! Your truffles are like little canvases ready for your culinary artistry.
Final Chill
Once all your truffles are dipped and garnished, return them to the refrigerator. Let them chill for at least another 30 minutes until the chocolate coating is firmly set. This is also a great time to plan how you’re going to store these beauties. Keep them in an airtight container, and they’ll stay fresh for up to a week—if they last that long! Trust me, you’ll want to savor each delightful morsel.

Tips for Success
- Use room temperature peanut butter for easier mixing.
- Be gentle when folding in ingredients to keep that rice cereal crunchy.
- Experiment with different types of chocolate for a unique flavor boost.
- Incorporate mini marshmallows or coconut flakes for extra texture.
- Consider chilling the truffles longer if the chocolate seems too soft.
Equipment Needed
- Mixing bowl: A large bowl for combining ingredients—any bowl will do, but a sturdy one makes mixing easier.
- Spatula: Perfect for folding ingredients without overmixing; a wooden spoon can work too!
- Cookie scoop or spoon: Helps shape uniform truffle balls for consistency.
- Parchment paper: Essential for lining your baking sheet—wax paper works as an alternative.
- Microwave-safe bowl: Use this for melting chocolate—a regular bowl can be used, but it may take longer.
Variations for Cherry Mash Truffles
- Nut Butter Swap: Switch the creamy peanut butter for almond or cashew butter for a delightful twist!
- Fruit Flavors: Experiment with dried cranberries or raisins in place of maraschino cherries for a different fruity kick.
- Dark Chocolate Lovers: Use dark chocolate chips for a richer taste that pairs beautifully with the sweetness of the cherry.
- Vegan Option: Replace the powdered sugar with coconut sugar and use vegan chocolate chips for a plant-based treat.
- Gluten-Free Delight: Ensure your rice cereal is certified gluten-free to make this treat suitable for gluten-sensitive friends.
- Festive Finishes: Add a dash of peppermint extract during mixing for a refreshing holiday version!
Serving Suggestions
- Pair with Coffee: Serve these delightful Cherry Mash Truffles alongside a steaming cup of coffee or espresso for a sweet afternoon pick-me-up.
- Presentation Platter: Arrange the truffles on a decorative platter, garnishing with fresh mint leaves or additional cherries for a pop of color.
- Gift Idea: Package the truffles in a decorative box as a thoughtful homemade gift for friends or family.
- Dessert Table: Add them to a dessert table at celebrations for a fun and festive touch that guests will love!
FAQs about Cherry Mash Truffles
Can I use natural peanut butter for Cherry Mash Truffles?
Absolutely! Natural peanut butter can be used, but keep in mind it may be a little more runny than creamy peanut butter. This could affect the texture slightly, but it’ll still taste amazing.
How long will these truffles stay fresh?
Cherry Mash Truffles can be stored in an airtight container in the fridge for up to a week. If you don’t finish them by then, they might still be good but could lose some of their freshness.
Can I freeze the truffles?
You can freeze the truffles! Just ensure they’re in an airtight container or freezer bag. They’ll keep well for about three months. Thaw them in the fridge before enjoying!
What can I use instead of maraschino cherries?
If maraschino cherries aren’t your thing, dried cranberries or chopped fresh cherries are great alternatives. Each option will give your Cherry Mash Truffles a different flavor profile!
How can I make these truffles more chocolatey?
For an extra chocolatey treat, consider adding cocoa powder to the peanut butter mix or doubling the chocolate coating when dipping. You might even try drizzling melted chocolate over the finished truffles for a decadent touch!
Final Thoughts
Making Cherry Mash Truffles is more than just following a recipe—it’s about creating moments of joy and sweet indulgence in your busy life. As you roll those delightful balls and dip them in chocolate, you’ll feel a sense of accomplishment and creativity. Each truffle embodies love and warmth, perfect for sharing with family or friends. The flavor of creamy peanut butter combined with sweet cherries is irresistible! Whether they’re a treat for yourself or a gift for someone special, these truffles will undoubtedly bring smiles and sweet memories. Enjoy every bite of your delicious creation!
Print
Cherry Mash Truffles
- Total Time: 1 hour 15 minutes
- Yield: Approx. 24 truffles
- Diet: Vegetarian
Description
Cherry Mash Truffles are delightful chocolate-covered treats that combine creamy peanut butter and maraschino cherries for a sweet indulgence.
Ingredients
- 1 cup creamy peanut butter
- 1 cup maraschino cherries, drained and finely chopped
- 2 cups powdered sugar
- 1 cup rice cereal
- 1/4 teaspoon almond extract (optional)
- 1 1/2 cups dark chocolate chips (or milk chocolate)
- 2 tablespoons vegetable oil
- Extra chopped maraschino cherries (optional for garnish)
- Sprinkles or chopped nuts (optional for garnish)
Instructions
- In a large bowl, combine the peanut butter with the finely chopped maraschino cherries.
- Gently fold in the powdered sugar and rice cereal until evenly coated.
- Scoop out small portions and roll them into 1-inch balls on a parchment-lined baking sheet.
- Refrigerate truffle balls for about 30 minutes.
- Melt dark chocolate chips with vegetable oil in a microwave-safe bowl in 20-30 second intervals until smooth.
- Dip each chilled truffle into the melted chocolate, then place back on the parchment-lined sheet.
- Sprinkle with additional chopped cherries, sprinkles, or nuts while the chocolate is still wet.
- Refrigerate the chocolate-coated truffles for at least 30 minutes until the coating is firm.
- Remove from the refrigerator and serve. Store in an airtight container for up to a week.
Notes
- Feel free to customize the truffles with different types of chocolate.
- Use the optional almond extract for added flavor.
- Store in the fridge for extended freshness if not consumed immediately.
- Prep Time: 15 minutes
- Cook Time: 30 minutes
- Category: Dessert
- Method: No-bake
- Cuisine: American
Nutrition
- Serving Size: 1 truffle
- Calories: 130
- Sugar: 10g
- Sodium: 50mg
- Fat: 7g
- Saturated Fat: 3.5g
- Unsaturated Fat: 2.5g
- Trans Fat: 0g
- Carbohydrates: 16g
- Fiber: 1g
- Protein: 2g
- Cholesterol: 0mg