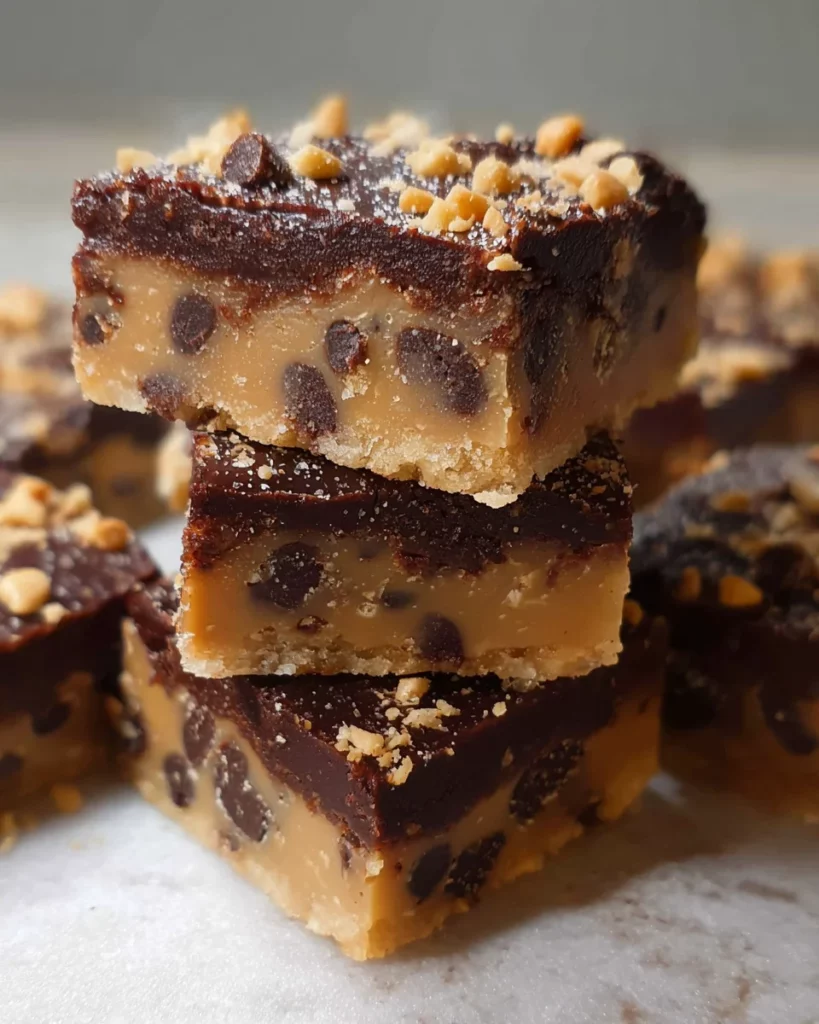
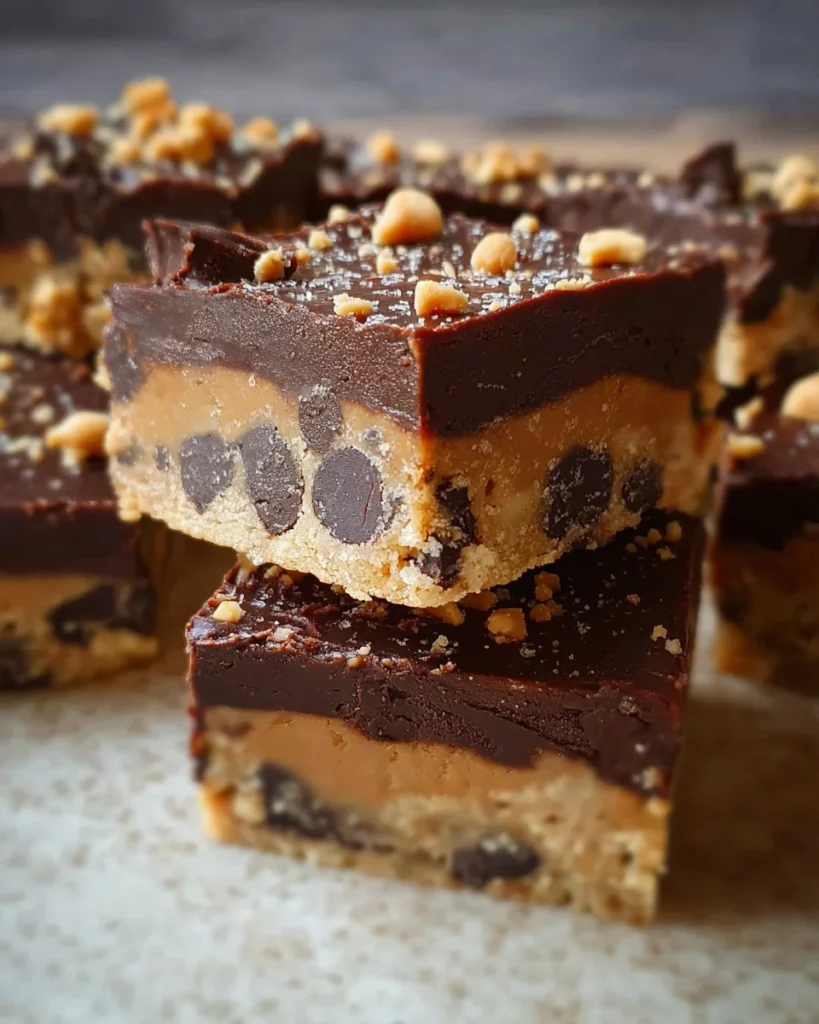
Chocolate Cookie Bars (No-Bake)

Introduction to Chocolate Cookie Bars (No-Bake)
Life can sometimes feel like a race against the clock, especially as a busy mom or professional. That’s why I’m thrilled to share my recipe for Chocolate Cookie Bars (No-Bake). These delightful treats offer the perfect solution for those hectic days when you crave something sweet without the fuss of baking. Just throw a few ingredients together, and in under two hours, you’ll have a luscious dessert ready to impress your family or guests. Believe me, nothing beats a homemade treat that’s both simple and irresistibly delicious!
Why You’ll Love This Chocolate Cookie Bars (No-Bake)
Let’s face it; sometimes life is just too chaotic for traditional baking. With these Chocolate Cookie Bars (No-Bake), you’ll discover how simple and delightful dessert-making can be. They come together with minimal effort and require no oven time! Plus, their rich, chocolatey flavor is sure to satisfy any sweet tooth. Whether it’s a last-minute family gathering or a quiet evening treat, these bars will have everyone coming back for more.
Ingredients for Chocolate Cookie Bars (No-Bake)
Gathering the right ingredients is key to crafting these delightful Chocolate Cookie Bars (No-Bake). Here’s what you’ll need:
- Cookies: Any type of cookies you love will work, whether it’s classic chocolate chip, graham crackers, or even Oreos. Feel free to get creative!
- Finely Chopped Peanuts: These add a nice crunch and rich flavor. If nuts aren’t your thing, you can use crushed pretzels for a salty twist.
- Sugar: Depending on your taste, you can use plain granulated sugar or opt for a sweeter profile with the addition of vanilla-flavored sugar.
- Cocoa Powder: This is essential for that deep chocolate flavor. Make sure to use unsweetened for a balanced taste.
- Heavy Cream: It lends a luxurious richness to the creamy base. You can also swap it with dairy-free alternatives for a vegan option.
- Softened Butter: This binds everything together and brings moisture. You can substitute with coconut oil for a dairy-free alternative.
- Milk Chocolate & Dark Chocolate: The mix of these two gives a beautiful chocolatey depth. Choose high-quality chocolate for the best flavor.
- Vegetable Oil: Adding this to melted chocolate helps achieve a smooth, glossy finish.
- Crushed Peanuts for Sprinkling: Extra texture on top is always a good idea! Feel free to switch these for other toppings like shredded coconut or mini chocolate chips.
For precise quantities of each ingredient, you can refer to the bottom of the article where you’ll find a printable version.
How to Make Chocolate Cookie Bars (No-Bake)
Step 1: Prepare the Cookie Mixture
The secret to these Chocolate Cookie Bars (No-Bake) lies in the cookie mixture. Start by placing your favorite cookies into a food processor. Pulse them until they turn into fine crumbs, reminiscent of sand on a beach. Don’t worry about achieving perfection; some bigger bits add a nice texture.
Next, toss those crumbs into a large mixing bowl. Add the finely chopped peanuts, sugar, and cocoa powder. This blend needs a good stir! You want everything to combine just like a well-rehearsed dance. Once mixed, it should resemble a dry paste that holds together when pressed. If it feels too crumbly, don’t hesitate to add a touch more cream later on!
Step 2: Make the Creamy Base
This step is where the magic happens. Grab a small pan and melt the butter over low heat. Keep an eye on it; no one wants burnt butter ruining our sugary creation! Once melted, remove the pan from the heat and whisk in the heavy cream. Stir until it’s smooth; think of it like a soothing embrace for your cookie mixture.
Now, pour this luscious creamy base over the cookie mixture. Use a spatula to fold it in gently. You’re aiming for a clumping texture that sticks together when you squeeze it. It should feel cohesive and oh-so-satisfying. If it’s still dry, drizzle in a bit more cream and mix it together again. Trust your instincts; they know flour from fluff!
Step 3: Form the Bars in Pan
Get ready to make things official! Line a 9×13-inch rectangular pan with parchment paper, allowing it to drape over the sides like a cozy blanket. This will help with lifting the bars out later. Take your cookie mixture and transfer it into the prepared pan.
Now, here’s where your muscles come into play. Press the mixture firmly into an even layer. This step is crucial—an even base ensures even chilling. Give it your all; you want it tightly packed for that divine crunch later. When it’s just about right, cover the pan and slide it into the fridge for half an hour. Patience pays off!
Step 4: Melt the Chocolates
While your bars chill, let’s turn our attention to the chocolate. In a heatproof bowl, add the milk and dark chocolate, broken into chunks. The combination of both creates a symphony of flavors. Melt the chocolate using steam or a microwave. If using a microwave, heat in short bursts, stirring in between. This prevents any chocolate disaster!
Once melted and smooth, drizzle in the vegetable oil. This magical ingredient gives your chocolate that shiny sheen, making it oh-so-tempting. Mix it until you’ve got a glossy surface that’ll look divine atop your cookie bars. Set this aside for a moment, allowing the aroma to waft through the kitchen like sweet music.
Step 5: Final Assembly
It’s time for the grand finale! Remove your chilled cookie base from the fridge. Pour the melted chocolate over the top and use a spatula to spread it evenly. You want every corner to be draped in that rich chocolate goodness.
Now for the fun part! Sprinkle crushed peanuts over the chocolaty layer as if you’re showering confetti at a party. This adds delightful crunch and makes the bars look stunning. Afterward, return the pan to the fridge for at least another hour to set. The wait will be worth it, I promise!
Step 6: Cutting and Serving
Once your bars have set firmly in the fridge, it’s time to shine! Grab the edges of the parchment paper and lift the entire dessert out of the pan. Use a sharp knife to slice them into neat bars or squares. Wet the knife with warm water between cuts for that clean edge finish—nobody wants a messy presentation!
Arrange them on a beautiful platter, and watch as smiles appear all around. These Chocolate Cookie Bars (No-Bake) are best served chilled. They make for a delightful treat at family gatherings or a cozy movie night. Enjoy the satisfaction of having created something so delicious!
Tips for Success
- Keep your ingredients at room temperature for easier mixing.
- Double-check that butter is completely melted for a smooth mix.
- Use a firm hand when pressing the mixture into the pan for that perfect bar shape.
- Experiment with different types of cookies for unique flavors.
- Make sure to chill your bars long enough for a firm set.
Equipment Needed for Chocolate Cookie Bars (No-Bake)
- Food Processor: Great for crushing cookies. A rolling pin works too!
- Mixing Bowl: Any large bowl will do—just needs space for mixing!
- Small Pan: Use any small saucepan or a microwave-safe bowl for melting.
- Parchment Paper: Helpful for easy removal. You can use plastic wrap if needed.
- Spatula: Perfect for spreading chocolate. A butter knife can also work!
Variations of Chocolate Cookie Bars (No-Bake)
- Nut-Free Version: Substitute chopped peanuts with sunflower seeds or omit nuts entirely for a kid-friendly twist.
- Vegan Delight: Use dairy-free butter and coconut cream in place of heavy cream for a completely plant-based treat.
- Gluten-Free Option: Swap regular cookies with gluten-free alternatives, like almond flour cookies or gluten-free Oreos.
- Minty Fresh: Add a few drops of peppermint extract to the chocolate layer for a refreshing mint chocolate flavor.
- Fruit Twist: Top the bars with freeze-dried strawberries or raspberries before chilling for a fruity flair.
Serving Suggestions for Chocolate Cookie Bars (No-Bake)
- Pair with a scoop of vanilla ice cream for an indulgent dessert.
- Serve alongside a warm cup of coffee or chilled milk for a comforting treat.
- Present on a decorative platter and garnish with fresh mint leaves for an elegant touch.
- Drizzle with caramel sauce or sprinkle with sea salt for an extra flavor boost.
- Cut into different shapes using cookie cutters for fun, festive presentations.
FAQs about Chocolate Cookie Bars (No-Bake)
Can I use different types of cookies for Chocolate Cookie Bars (No-Bake)?
Absolutely! One of the best things about this recipe is its versatility. You can use graham crackers, vanilla wafers, or even your favorite flavored cookies. Each type will give a unique taste to your bars, so feel free to experiment!
How long will these Chocolate Cookie Bars (No-Bake) last?
If stored properly in an airtight container in the fridge, these bars will generally stay fresh for up to a week. However, I bet they won’t last that long once your family gets a taste!
Can I make these bars ahead of time?
Definitely! These Chocolate Cookie Bars (No-Bake) can be made a day or two in advance. Just keep them chilled in the fridge and slice them fresh when you’re ready to serve. It’s an excellent way to save time!
Are these Chocolate Cookie Bars (No-Bake) suitable for dietary restrictions?
Yes! You can adjust the recipe based on dietary needs. Opt for gluten-free cookies, dairy-free substitutes, or nut-free alternatives to create a dessert that everyone can enjoy. Make it yours!
What’s the best way to cut and serve these bars?
For clean cuts, use a sharp, warm knife to slice the bars. Wipe the knife between cuts to maintain neat edges. Serve them chilled and watch as everyone raves about your no-bake creation!
Final Thoughts
Making these Chocolate Cookie Bars (No-Bake) brings such joy, especially when you see loved ones enjoy your creations. They’re a beautiful reminder that sweet moments don’t always require hours in the kitchen. Just a handful of ingredients and a little creativity can yield something truly delicious. Whether it’s a family gathering or a simple treat after dinner, these bars are bound to be a hit. So, roll up your sleeves, gather those ingredients, and dive into this easy dessert adventure. Trust me, the smiles you receive will be your sweetest reward!
Print
Chocolate Cookie Bars (No-Bake)
- Total Time: 1 hour 30 minutes
- Yield: 12 bars 1x
- Diet: Vegetarian
Description
Delicious chocolate cookie bars that require no baking, perfect for a quick dessert.
Ingredients
- 12.3 oz (350g) of cookies, crushed
- 1 cup (3 oz / 85g) finely chopped peanuts
- ½ cup (3 oz / 85g) plain sugar
- 1 packet of vanilla-flavored sugar (10g), optional
- ½ cup (1.6 oz / 45g) cocoa powder
- ¾ cup (6 fl oz / 180ml) heavy cream
- ½ cup (3.9 oz / 110g) softened butter
- 90g (3.2 oz) milk chocolate
- 30g (1 oz) dark chocolate
- 2 tablespoons (1 oz / 30g) vegetable oil
- ¾ cup (2.5 oz / 70g) crushed peanuts for sprinkling
Instructions
- Pulverize your cookies into a crumb-like texture using a food processor. Toss the crumbs into a big mixing bowl, add ground peanuts, sugar, optional vanilla sugar, and cocoa powder. Stir until well blended.
- On low heat, melt the butter in a small pan. Mix in sweet cream until smooth. Pour this creamy mixture over the cookie mix and stir until it clumps together when pressed. Adjust texture with more cream or crushed cookies as needed.
- Cover a 9×13-inch rectangular pan with parchment paper. Press the cookie mixture firmly and evenly into it. Chill in the fridge for half an hour.
- In a heatproof bowl, combine milk and dark chocolate. Melt using steam heat or microwave, stirring to prevent burning. Add vegetable oil and stir until shiny and smooth.
- Spread melted chocolate on top of the chilled cookie layer using a spatula. Sprinkle crushed peanuts over the top immediately. Return to the fridge for at least an hour until firm.
- Once firm, lift out the dessert using the parchment paper. Slice into bars or squares with a sharp knife, wiping the knife between cuts for clean edges.
Notes
- Ensure the butter is fully melted for a smooth mixture.
- For a richer flavor, use high-quality chocolate.
- You can substitute peanut toppings with other nuts or ingredients as desired.
- Prep Time: 20 minutes
- Cook Time: 10 minutes
- Category: Dessert
- Method: No-Bake
- Cuisine: American
Nutrition
- Serving Size: 1 bar
- Calories: 250
- Sugar: 15g
- Sodium: 50mg
- Fat: 15g
- Saturated Fat: 8g
- Unsaturated Fat: 5g
- Trans Fat: 0g
- Carbohydrates: 30g
- Fiber: 2g
- Protein: 3g
- Cholesterol: 20mg