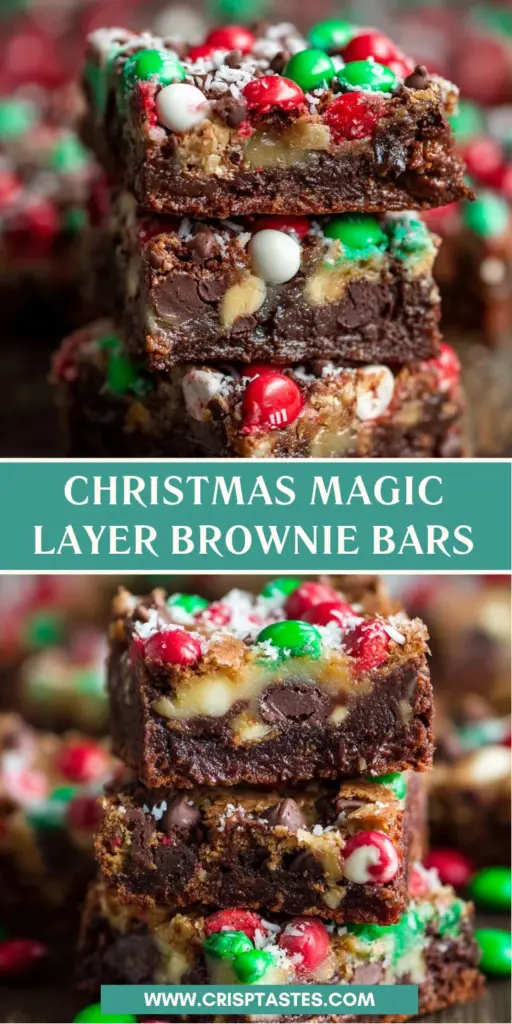
Christmas Magic Layer Brownie Bars

Introduction to Christmas Magic Layer Brownie Bars
Ah, the holiday season! It’s a magical time filled with twinkling lights, joyous gatherings, and, of course, mouthwatering treats. One dessert that never fails to make an impressive statement is my Christmas Magic Layer Brownie Bars. These delightful bars bring together rich chocolate, inviting toppings, and just the right festive flair. Perfect for busy moms or workers like us, they don’t require hours in the kitchen. Just a little love, and you’ll have a delicious treat that’s sure to steal the spotlight at any holiday gathering. Trust me, your loved ones will be begging for seconds!
Why You’ll Love This Christmas Magic Layer Brownie Bars
These Christmas Magic Layer Brownie Bars are the ultimate holiday treat! They’re incredibly easy to whip up, making them perfect for busy schedules. With just a handful of ingredients, you can create something that tastes gourmet without the fuss. The rich layers coupled with festive flavors bring joy to every bite, making them not only a dessert but a way to spread holiday cheer among friends and family.
Ingredients for Christmas Magic Layer Brownie Bars
Gather your ingredients and let’s get ready to create the magic! Here’s what you’ll need:
- Semi-sweet chocolate chips: Essential for that rich, chocolaty flavor.
- Salted butter: Adds creaminess and moisture to the bars.
- Granulated sugar: Sweetens the mix to perfection.
- Eggs: Two large eggs plus an extra yolk create a fudgy texture.
- All-purpose flour: Holds everything together while providing structure.
- Vanilla extract: A splash of vanilla elevates the flavor.
- Nuts (optional): Chopped walnuts or pecans add a delightful crunch.
- Mini holiday M&Ms: These cute candies sprinkle a pop of color and sweetness.
- Regular holiday M&Ms: A fun twist that makes your bars even more festive.
- Sweetened flaked coconut: Adds a chewy texture and mild sweetness.
- Sweetened condensed milk: This provides moisture and richness, binding everything beautifully.
- Holiday sprinkles: For that final touch of cheer!
For exact measurements, you can find a detailed list at the bottom of the article, which is perfect for printing. Personalize your bars with your favorite toppings! The beauty of these Christmas Magic Layer Brownie Bars is that they can be adjusted to suit your preference. Don’t hesitate to get creative!
How to Make Christmas Magic Layer Brownie Bars
Ready to bring some holiday cheer to your kitchen? Making Christmas Magic Layer Brownie Bars is a breeze when you follow these simple steps. Let’s get started!
Step 1: Prepare the Baking Pan
First things first, preheat your oven to 350 degrees F.
Line a 9-inch baking pan with foil or parchment paper. This makes lifting your brownies out later a piece of cake.
Don’t forget to spray it with nonstick cooking spray. No one likes their delicious creation stuck to the pan!
Step 2: Melt Butter and Chocolate
Grab a large, microwave-safe mixing bowl.
Add your salted butter and semi-sweet chocolate chips to it.
Microwave the mixture on high for 30 seconds. Give it a good stir!
Continue microwaving and stirring at 30-second intervals until the chocolate is smooth and melty.
You want it as smooth as hot fudge on a sundae!
Step 3: Mix Ingredients
Next, add in your granulated sugar, vanilla extract, and eggs to the chocolate mixture.
Use a whisk or an electric mixer to combine everything nicely.
Make sure each ingredient is well incorporated before moving on.
Then, stir in the all-purpose flour until just combined.
I usually start with the flour on low to avoid a cloud of dust. Trust me!
Step 4: Bake the Brownie Base
Pour your brownie batter into the prepared baking dish.
Spread it out evenly, ensuring nice edges.
Now, pop it in the oven and bake it for about 20 minutes.
The brownies will jiggle slightly but look set on top.
That’s your cue to start adding those magical layers!
Step 5: Layer the Toppings
Once your brownie base is ready, it’s time for toppings!
Remove the dish from the oven and layer in this order: nuts (if you’re using them), half of the chocolate chips, and half of the M&Ms.
Then, sprinkle all that shredded coconut over the top.
Finally, pour sweetened condensed milk evenly on top.
Spread it gently for even coverage, then add the remaining chocolate chips, M&Ms, and some festive sprinkles. Your bar is really coming together now!
Step 6: Final Bake
Return the pan to the oven for an additional 25 minutes.
You’ll know it’s done when the edges are golden and the middle looks set with just a hint of browning.
If you notice the top browning too quickly, cover it loosely with foil. We want a beautifully baked top, not a burnt one!
Step 7: Cool and Cut
Here comes the hardest part—waiting to dig in!
Let the bars cool completely in the pan.
Once cooled, grab a sharp knife and cut them into squares.
Place them in an airtight container, where they can stay fresh for up to a week.
Or just try not to eat them all at once! But no promises, right?
Tips for Success
- Always use fresh ingredients for the best flavor.
- Let the brownie base cool before adding toppings for better layer separation.
- Use a sharp knife to cut clean squares; a warm knife makes this easier!
- Experiment with toppings based on your family’s favorites; the sky’s the limit!
- Store them in an airtight container to keep them soft and chewy.
Equipment Needed
- 9-inch baking pan: A regular pan works, but one with a removable bottom makes for easier serving.
- Mixing bowls: Glass or metal bowls both work well.
- Whisk or electric mixer: Whisking by hand is great for a workout!
- Sharp knife: A good quality knife gives the cleanest cuts.
- Microwave: Don’t microwave? A double boiler works too!
Variations for Christmas Magic Layer Brownie Bars
- Nut-Free Option: Skip the nuts entirely or replace them with seeds like pumpkin or sunflower for a delightful crunch.
- Gluten-Free Version: Substitute all-purpose flour with a gluten-free blend to make these bars accessible to everyone.
- Fruit Twist: Add dried cranberries or chopped cherries for a touch of tartness among the sweet layers.
- Minty Fresh: Take it up a notch by mixing in crushed peppermint candies, especially during the holidays!
- Dark Chocolate Delight: Use dark chocolate chips instead of semi-sweet for a richer flavor that chocolate lovers will adore.
- Vegan-Friendly: Replace eggs with a flax or chia egg, and use dairy-free chocolate chips for a scrumptious vegan alternative.
Serving Suggestions
- Pair these brownie bars with a scoop of vanilla ice cream for a delicious contrast.
- Serve with a dollop of whipped cream and a sprinkle of extra holiday sprinkles for flair.
- Complement with a cup of rich hot cocoa or spiced chai for a cozy touch.
- Present them on a festive platter, garnished with fresh berries to brighten the table.
- Wrap individual bars in clear cellophane, tied with a ribbon, for charming gifts!
FAQs about Christmas Magic Layer Brownie Bars
Can I make these Christmas Magic Layer Brownie Bars ahead of time?
Absolutely! These bars can be made a day or two in advance. Just make sure to store them in an airtight container to keep them fresh and chewy.
How can I customize the toppings for my brownie bars?
Feel free to get creative! You can use different types of nuts, a variety of chocolate chips, or even seasonal candies. The mix-and-match possibilities are endless!
What’s the best way to store leftover bars?
Keep your Christmas Magic Layer Brownie Bars in an airtight container at room temperature for up to a week. For longer storage, pop them in the fridge, but I doubt they’ll last that long!
Can I freeze these brownie bars?
Yes! You can freeze the bars for up to three months. Just wrap them well in plastic wrap or foil, and then store them in a freezer-safe bag. Let them thaw at room temperature before indulging.
What’s the secret to cutting these bars without a mess?
Let the bars cool completely before cutting them into squares. Using a sharp knife, warmed slightly under hot water, will help you get those clean, pretty edges!
Final Thoughts
There’s just something so joyful about baking, especially during the holidays.
Making Christmas Magic Layer Brownie Bars brings back sweet memories of family gatherings and laughter echoing through the kitchen.
These delightful treats are more than just a dessert; they’re a way to connect with loved ones and create unforgettable moments.
As you savor each layer of chocolatey goodness, you’ll feel the magic of the season envelop you.
I hope this recipe becomes a cherished part of your holiday traditions.
With every bite, may it spark joy and warmth, just like the spirit of Christmas itself!
Print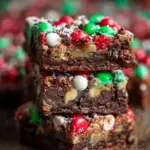
Christmas Magic Layer Brownie Bars
- Total Time: 1 hour 5 minutes
- Yield: 24 squares 1x
- Diet: Vegetarian
Description
Christmas Magic Layer Brownie Bars are a delightful dessert combining layers of brownies, toppings, and chocolate for a festive treat.
Ingredients
- 1½ cups semi-sweet chocolate chips
- ½ cup salted butter (1 stick)
- 1 cup granulated sugar
- 2 large eggs
- 1 large egg yolk
- 1 cup all-purpose flour
- ½ teaspoon vanilla
- ¾ cup nuts (optional, divided)
- ¼ cup mini holiday M&Ms (divided)
- ¾ cup regular Holiday M&Ms (divided)
- ½ cup semi-sweet chocolate chips (divided)
- 1 cup sweetened flaked coconut
- ¾ cup sweetened condensed milk (from a 14 ounce can)
- ¼ cup holiday sprinkles
Instructions
- Preheat oven to 350 degrees F. Line a 9-inch baking pan with foil or parchment paper and spray with nonstick cooking spray.
- Place butter and chocolate chips in a large, microwaveable mixing bowl. Microwave on high for 30 seconds. Stir, and continue microwaving and stirring in 30 second intervals until chocolate is melted and smooth.
- Beat in sugar, then vanilla and eggs, until well combined.
- Stir in flour until just combined. Pour into the prepared baking dish.
- Bake in the preheated oven for 20 minutes.
- Remove from the oven (brownies will jiggle a little but be done on top). Layer as follows: nuts, half of the chocolate chips, half of the M&Ms, and finally all of the shredded coconut. Pour sweetened condensed milk evenly over the top and spread gently to make sure it is evenly distributed. Sprinkle on remaining chocolate chips, M&Ms, and finally the sprinkles.
- Bake for an additional 25 minutes, or until the edges are golden and the middle is set and just starting to brown. If the top is browning too quickly, tent loosely with foil.
- Cool completely before cutting into squares with a sharp knife.
- Store in a tightly sealed container for up to one week.
Notes
- These bars are great for holiday parties and can be customized with different toppings.
- Make sure to let the bars cool completely for cleaner cuts.
- Prep Time: 20 minutes
- Cook Time: 45 minutes
- Category: Dessert
- Method: Baking
- Cuisine: American
Nutrition
- Serving Size: 1 square
- Calories: 200
- Sugar: 18g
- Sodium: 150mg
- Fat: 10g
- Saturated Fat: 6g
- Unsaturated Fat: 4g
- Trans Fat: 0g
- Carbohydrates: 28g
- Fiber: 1g
- Protein: 2g
- Cholesterol: 30mg