Christmas Oreo Balls: Enjoy this Easy, Delicious Recipe!
Introduction to Christmas Oreo Balls
Ah, the holiday season! A time for festivity, family gatherings, and, of course, delicious treats like Christmas Oreo Balls. These little bites of joy are the perfect answer for busy moms and professionals looking to sprinkle some sweetness into their celebrations. With very little prep time, you can whip up a batch that’s sure to impress both old friends and new faces. Trust me, these no-bake delights will bring smiles to everyone’s faces while allowing you to bask in the joy of the moment without spending hours in the kitchen.
Why You’ll Love This Christmas Oreo Balls
What’s not to adore about Christmas Oreo Balls? They’re incredibly easy to make, requiring no oven and minimal mess. Plus, they come together in just about 15 minutes! The rich chocolate coating paired with the creamy, dreamy inside creates a flavor explosion in every bite. These treats are not just delightful but also versatile—perfect for parties, gifting, or simply indulging after a long day. You’ll keep coming back for more!
Ingredients for Christmas Oreo Balls
Let’s gather what we need for these delicious Christmas Oreo Balls. Most of these ingredients are pantry staples, making it super convenient for busy schedules.
- Oreos: The star of the show! These creamy, crunchy cookies give our treats that classic flavor everyone loves.
- Cream Cheese: This softens the texture and adds a delicious richness. Make sure it’s at room temperature for easy mixing!
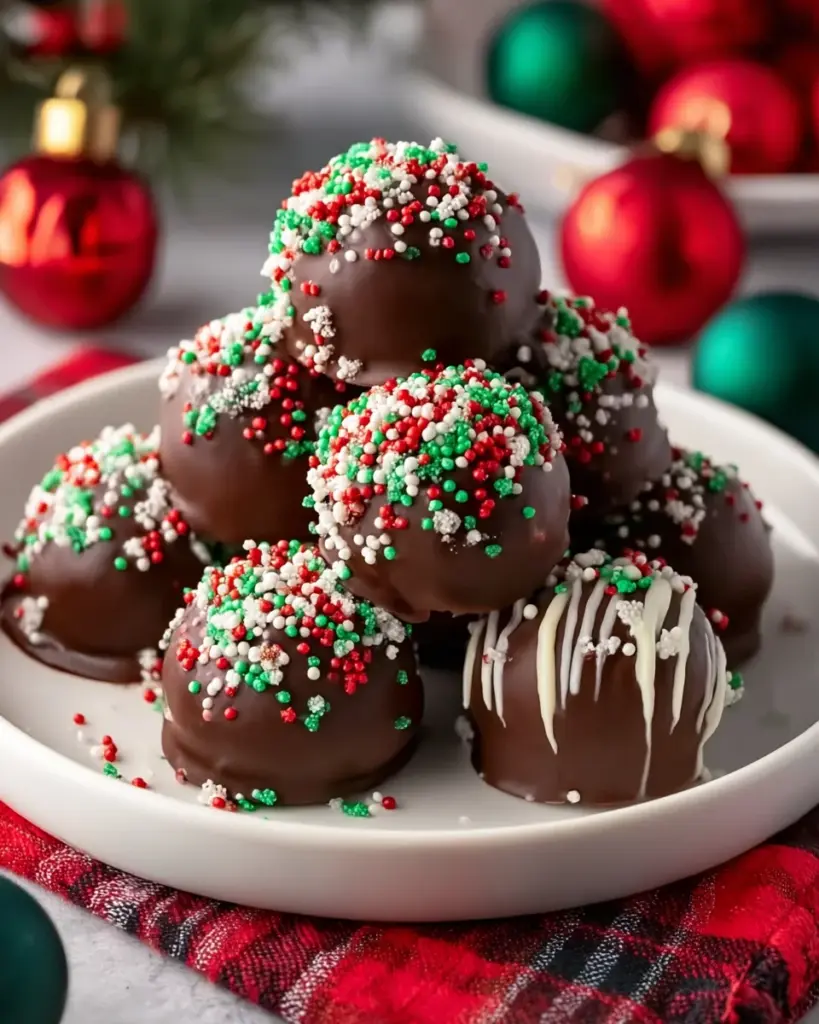
- Sprinkles or Decorations: These are your chance to unleash creativity. Use festive colors for holidays or mix it up with chocolate chips for a twist!
- Chocolate: Good quality chocolate is essential for that luxurious coating. You can pick dark, milk, or even white chocolate based on your taste.
- Cooking Oil (optional): This helps thin the chocolate if it’s too thick. It’s not essential but can be handy, especially for smoother coating.
Exact quantities for these ingredients are listed at the bottom of the article for your convenience and easy printability. So, let’s get ready to create these holiday delights!

How to Make Christmas Oreo Balls
Now that we’ve gathered our ingredients, it’s time for the fun part: assembling these Christmas Oreo Balls! Follow these simple steps, and you’ll have a festive treat ready in no time.
Step 1: Crush the Oreos
To start, take 36 Oreos and crush them into fine crumbs. You can do this using a food processor for quick work or place them in a large Ziploc bag and crush them with a rolling pin. The key is to break them down to a texture that’s fine yet still a bit coarse. This gives your Oreo Balls that perfect combination of creaminess and crunch.
Step 2: Mix with Cream Cheese
Next, grab your bowl and add the crushed Oreos to 8 oz of softened cream cheese. Using a spatula or your hands, mix everything until it’s thoroughly combined. Aim for a dough-like consistency; it should feel moist and hold together easily. This mixture is where the magic happens, blending the flavors into something irresistibly delicious!
Step 3: Form the Balls
Now comes the rolling! Use your hands to scoop out a portion of the Oreo mixture and roll it into 1-inch balls. Make sure they’re uniform in size for even coating later. Place each ball on a parchment-lined baking sheet. If your hands get sticky, a little cooking spray or damp hands can help keep the mixture from sticking.
Step 4: Freezing the Balls
Once your balls are formed, it’s time to freeze them. Place the tray in the freezer for about 30 minutes. This step is crucial because it helps the balls set properly, making the chocolate coating process much easier. Plus, the chilling makes each bite refreshing!
Step 5: Melt the Chocolate
Now, let’s melt the good quality chocolate. You can do this in the microwave by heating it in 30-second intervals, stirring in between, until smooth. Alternatively, use a double boiler for a more controlled melt. If the chocolate is too thick, add a 1/2 tsp of cooking oil to achieve that silky coating. Timing is important here; we want the chocolate warm and melted but not too hot that it burns!
Step 6: Coat the Oreo Balls
Time to indulge! Dip each chilled Oreo ball into the melted chocolate, ensuring they’re fully coated. Use a fork to lift them out, letting the excess chocolate drip off before placing them back on the baking sheet. This is where you can get creative—sprinkle on festive decorations while the chocolate is still melty for that extra wow factor!
Step 7: Set the Chocolate
Finally, return the coated Oreo balls to the freezer for 10-15 minutes or until the chocolate is fully set. This hardening gives each ball that perfect crunch when you take a bite. And there you have it! A festive treat that pairs beautifully with your holiday cheer.
Tips for Success
- Always use softened cream cheese for easy mixing and a smoother texture.
- If your chocolate gets too thick, add a bit of cooking oil to thin it out.
- Keep your hands slightly damp when rolling the balls to prevent sticking.
- For a crunchier texture, consider adding chopped nuts or crushed candy canes.
- Label your storage container with the date; they can last up to a week in the fridge!
Equipment Needed
- Large Mixing Bowl: For combining the cookie mixture. A deep plate can also work.
- Food Processor or Rolling Pin: For crushing Oreos. A heavy bottomed pot can do the job too.
- Parchment Paper: To line your baking sheet. Silicone mats are a great alternative.
- Microwave or Double Boiler: For melting chocolate. A glass bowl over a pot of simmering water also works.
- Fork or Skewers: To help dip the balls into chocolate. Using a toothpick can also be handy!
Variations for Christmas Oreo Balls
- Mint Chocolate: Use mint-flavored Oreos and incorporate a hint of peppermint extract into the cream cheese for a refreshing twist.
- Peanut Butter Bliss: Add a few tablespoons of creamy peanut butter to the mixture for a rich, nutty flavor that pairs perfectly with chocolate.
- White Chocolate Lavender: Coat the balls in white chocolate and sprinkle with lavender flowers for an elegant touch.
- Nut Free Options: Substitute standard Oreos with nut-free alternatives and use dairy-free chocolate for a delicious safe treat.
- Rainbow Oreo Balls: Use colorful sprinkles or crushed candy for a festive pop of color, perfect for a lively holiday party!
Serving Suggestions for Christmas Oreo Balls
- Serve on a decorative platter for a stunning holiday centerpiece.
- Pair them with a warm cup of hot cocoa or a festive holiday punch for a delightful treat.
- Place the Oreo Balls in festive cupcake liners for an added touch of charm.
- Consider giving them as gifts, packaged beautifully in a holiday tin.
- Drizzle some extra melted chocolate over the top before serving for an elegant finish.
FAQs about Christmas Oreo Balls
As you embark on your sweet adventure making Christmas Oreo Balls, you might have a few questions. Don’t worry—I’ve got you covered with some common queries!
Can I make Christmas Oreo Balls ahead of time?
Absolutely! These treats can be made a few days in advance. Just store them in an airtight container in the refrigerator, and they’ll stay fresh and delicious.
How do I keep the chocolate coating smooth?
To achieve that perfect, smooth coating on your Oreo Balls, make sure your chocolate is melted properly. If it gets thick, just add a splash of cooking oil to help thin it out for a silky finish.
What can I use instead of cream cheese?
If you’re looking for a dairy-free option, try using a soft vegan cream cheese. It works well and keeps the delightful creaminess of the treat intact!
Can I freeze the finished Oreo Balls?
Yes! You can freeze the completed Oreo Balls for up to three months. Just make sure to store them in an airtight container and separate layers with parchment paper to prevent sticking.
What other flavors can I experiment with?
The sky’s the limit! You can add flavors like almond extract, swap in different types of chocolate, or even incorporate spices like cinnamon for a festive spin. Get creative and have fun!
Final Thoughts on Christmas Oreo Balls
Making Christmas Oreo Balls is more than just a dessert; it’s about creating those cozy moments with family and friends. The joy of rolling each ball and coating them in chocolate can turn a simple day into a festive celebration. Plus, they make for perfect last-minute treats or gifts—what’s not to love? Watching everyone savor these sweet bites fills my heart with warmth. Whether you’re hosting a gathering or indulging solo, these little delights spread happiness no matter the occasion. I hope your holiday season is as sweet and memorable as these delicious Oreo Balls!
Print
Christmas Oreo Balls
- Total Time: 45-60 minutes
- Yield: Approximately 24 balls 1x
- Diet: Vegetarian
Description
Delicious and easy-to-make Christmas Oreo Balls, perfect for holiday celebrations.
Ingredients
- 36 Oreos crushed
- 8 oz package of cream cheese softened
- Sprinkles/Decorations of your choice
- 10 oz good quality chocolate
- 1/2 tsp cooking oil to thin chocolate if needed (optional)
Instructions
- Crush the Oreos in a large Ziploc bag or a food processor until you have coarse crumbs.
- Add them to a large bowl with the cream cheese and mix until well combined.
- Roll into 1-inch balls and place on a parchment-lined baking sheet.
- Freeze for 30 minutes.
- Melt the chocolate in the microwave or double boiler until smooth.
- Place each Oreo ball into the melted chocolate and coat well. Top with sprinkles.
- Put the tray back into the freezer for 10-15 minutes or until the chocolate is set.
Notes
- Make sure the cream cheese is fully softened for easy mixing.
- You can use different types of chocolate for coating for a variety of flavors.
- Store in an airtight container in the refrigerator for up to a week.
- Prep Time: 15 minutes
- Cook Time: Moderate time, depending on chocolate melting method
- Category: Dessert
- Method: No-bake
- Cuisine: American
Nutrition
- Serving Size: 1 ball
- Calories: 120
- Sugar: 10g
- Sodium: 50mg
- Fat: 7g
- Saturated Fat: 4g
- Unsaturated Fat: 2g
- Trans Fat: 0g
- Carbohydrates: 14g
- Fiber: 1g
- Protein: 2g
- Cholesterol: 15mg

