Classic Cannoli Squares

Introduction to Classic Cannoli Squares
Ah, Classic Cannoli Squares! These delightful treats are like a warm hug on a busy day. As a passionate home cook, I know how important it is to have a go-to dessert that’s quick and easy yet impressive enough to wow your family and friends. With just a handful of ingredients, you can whip up these luscious squares filled with smooth ricotta and a touch of chocolate. Whether it’s a sweet end to a hectic weeknight dinner or a charming dessert for a gathering, these cannoli squares are sure to brighten up any occasion.
Why You’ll Love This Classic Cannoli Squares
These Classic Cannoli Squares are a lifesaver for busy moms and professionals alike. They’re incredibly easy to make, taking just about 15 minutes of your time. The delightful combination of creamy ricotta and chocolate makes every bite a taste of Italy right in your home. Plus, they can easily impress your guests, making them perfect for any gathering. Who doesn’t love a beautiful dessert that requires minimal effort but delivers maximum flavor?

Ingredients for Classic Cannoli Squares
Gather these delightful ingredients to create your Classic Cannoli Squares. You’ll love how simple yet flavorful everything is!
- Ricotta Cheese: This creamy cheese forms the delicious base for your filling. I recommend using whole milk ricotta for rich flavor.
- Powdered Sugar: It sweetens the ricotta filling. For a healthier twist, consider coconut sugar as an alternative.
- Vanilla Extract: A splash of pure vanilla brightens the flavors. Always choose pure over artificial for the best taste.
- Cinnamon (optional): A hint of cinnamon adds warmth, though you can leave it out for a more traditional cannoli flavor.
- Mini Chocolate Chips: These sprinkle joy throughout your filling. They add little bursts of chocolatey goodness in every mouthful.
- Pre-made Pie Crusts: Conveniently save time! You can opt for homemade crusts if you have more time on your hands.
- Egg: Used for the egg wash, it gives the top crust a lovely golden color.
- Sugar: A little sugar sprinkled on top before baking creates a beautiful, sweet crunch.
- Chopped Pistachios (for garnish): These add a pop of color and a delightful crunch on top.
- Maraschino Cherries (for garnish): A classic touch that brings charm and a burst of sweetness.
- Extra Chocolate Chips (for garnish): Because you can never have too much chocolate when it comes to desserts!
Exact measurements for each ingredient can be found at the bottom of the article for your convenience. Happy baking!
How to Make Classic Cannoli Squares
Creating Classic Cannoli Squares is like performing a little dance in your kitchen. Trust me; it’s easier than it looks. Let’s get started!
Step 1: Prepare the Ricotta Filling
First, grab a mixing bowl and combine 2 cups of ricotta cheese, 1 cup of powdered sugar, 1 teaspoon of vanilla extract, and if you wish, ½ teaspoon of cinnamon for that extra warmth. Then, fold in ½ cup of mini chocolate chips for a sweet surprise. Whisk everything together until it’s smooth and creamy. The texture should resemble a cloud of deliciousness.
Step 2: Preheat the Oven
While you’re whisking away, it’s time to preheat your oven to 375°F (190°C). Preheating is crucial because it ensures even baking. You want your cannoli squares to bake uniformly, creating that beautiful golden crust!
Step 3: Assemble the First Pie Crust
Unroll your first pre-made pie crust and lovingly fit it into a 9×9-inch baking dish. Press it gently against the bottom and up the sides, ensuring there are no tears. This crust will cradle your delicious filling, so treat it with care!
Step 4: Add the Ricotta Mixture
Now comes the fun part! Spoon your smooth ricotta mixture evenly over the crust. Use a spatula to spread it to the edges, making sure every corner gets that delightful filling. Imagine every delicious bite you’ll have—it’s magical!
Step 5: Cover with Second Pie Crust
Time to seal in all that goodness! Place the second pie crust over the ricotta. Press the edges together to seal, preventing any filling from escaping during baking. Brush the top with a beaten egg for that glorious golden finish, and then sprinkle some sugar on top to create a lovely crunch.
Step 6: Bake to Perfection
Slide your baking dish into the preheated oven and bake for 30 to 35 minutes. Keep an eye on it—the colors should turn beautifully golden brown. You can check for doneness by inserting a toothpick; it should come out clean. Your kitchen will start smelling heavenly!
Step 7: Cool and Cut
Patience is key here! Let your cannoli squares cool for at least 30 minutes before cutting them into delightful squares. Cooling allows the filling to set, ensuring that each square holds its shape beautifully when served. Plus, it’s hard to resist that rich aroma wafting through your home—but trust me, waiting will be worth it!
Tips for Success
- Use whole milk ricotta for a richer flavor.
- Consider chilling the ricotta before mixing to enhance its texture.
- Don’t overbake; golden brown is your goal!
- Experiment with different toppings like crushed nuts or fruit.
- For a twist, add a splash of limoncello to the filling.
- Use a pizza cutter for clean, even squares when cutting.
- Store leftovers in an airtight container for up to three days.
Equipment Needed
- 9×9-inch baking dish: A classic choice, but an 8×8 inch works too.
- Mixing bowl: Any size accommodates your filling; make it big enough to whisk.
- Spatula: Essential for spreading the ricotta; a rubber one works wonders.
- Whisk: Handy for mixing ingredients smoothly; a fork can do the job too!
- Pastry brush: Perfect for applying the egg wash; a clean paintbrush can substitute.
Variations on Classic Cannoli Squares
- Chocolate Hazelnut: Swap half of the ricotta for chocolate hazelnut spread for a nutty twist that chocolate lovers will adore.
- Fruit-Filled: Add diced strawberries or raspberries to the filling for a fruity burst that brightens each bite.
- Nut-Free Alternative: Omit the pistachios and cherries, and consider adding chopped almonds or walnuts for a different kind of crunch.
- Gluten-Free Option: Use gluten-free pie crusts to accommodate those with gluten sensitivities while enjoying the same delightful treat!
- Vegan Version: Substitute ricotta with a vegan alternative made from blended tofu or cashews and replace the egg wash with almond milk.
- Spice it Up: Add a dash of nutmeg or cardamom to the filling for an exotic flair that will surprise your guests!
Serving Suggestions for Classic Cannoli Squares
- Serve with a dusting of extra powdered sugar for a beautiful presentation.
- Add fresh berries on the side for a burst of color and flavor.
- Pair with a scoop of vanilla ice cream for indulgence.
- Drizzle with chocolate sauce for a decadent touch.
- Enjoy with a cup of espresso or your favorite coffee to elevate the experience!
FAQs about Classic Cannoli Squares
Can I make Classic Cannoli Squares ahead of time?
Absolutely! You can prepare these squares a day in advance and store them in the fridge. Just remember to let them cool completely before covering them. They’ll taste just as delicious the next day!
How do I store leftovers?
Store any leftover Classic Cannoli Squares in an airtight container in the fridge. They’ll keep well for up to three days, but trust me, they likely won’t last that long!
Can I freeze the cannoli squares?
Yes, you can freeze them! Just wrap pieces tightly in plastic wrap, then place them in a freezer-safe container. They can be frozen for up to three months. Thaw in the fridge before serving.
What can I substitute for ricotta cheese?
If you’re looking for alternatives, consider using mascarpone cheese or a dairy-free ricotta made from cashews or almonds. Both options give a lovely creamy texture, although flavors will slightly differ from the traditional cannoli.
Are there any ways to make these squares healthier?
Sure! You can use low-fat ricotta and substitute coconut sugar for powdered sugar. Adding fresh fruit or nuts in place of some chocolate chips can also boost nutrition while keeping it delicious!
Final Thoughts
Making Classic Cannoli Squares is not just about creating a dessert; it’s about crafting moments of joy for yourself and your loved ones. Each square offers a delightful bite of creamy ricotta paired with crisp, flaky crust, transporting you straight to an Italian café. I love how this recipe fits perfectly into a busy lifestyle, requiring minimal effort but yielding maximum satisfaction. Whether enjoyed with family after dinner or shared at a gathering, these squares create sweet memories. So, roll up your sleeves and indulge in this easy treat—your taste buds will thank you!
Print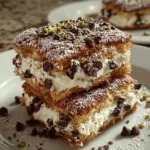
Classic Cannoli Squares
- Total Time: 45-50 minutes
- Yield: 16 squares 1x
- Diet: Vegetarian
Description
Delicious and easy-to-make cannoli squares filled with a rich ricotta filling and topped with a flaky crust.
Ingredients
- 2 cups Ricotta Cheese (preferably whole milk)
- 1 cup Powdered Sugar (or coconut sugar)
- 1 teaspoon Vanilla Extract (preferably pure)
- 1/2 teaspoon Cinnamon (optional)
- 1/2 cup Mini Chocolate Chips
- 2 pre-made pie crusts (or homemade)
- 1 large Egg (for egg wash)
- Sugar (for sprinkling)
- 1/4 cup Chopped Pistachios (for garnish)
- 3 pieces Maraschino Cherries (for garnish)
- 1/4 cup Extra Chocolate Chips (for garnish)
Instructions
- In a mixing bowl, combine 2 cups of ricotta cheese, 1 cup of powdered sugar, 1 teaspoon of vanilla extract, ½ teaspoon of cinnamon, and ½ cup of mini chocolate chips. Whisk until smooth.
- Preheat your oven to 375°F (190°C).
- Unroll one pre-made pie crust and fit it into a 9×9-inch baking dish.
- Spoon the ricotta mixture over the pie crust evenly.
- Place the second pie crust over the filling, sealing the edges. Brush with beaten egg and sprinkle with sugar.
- Bake for 30-35 minutes until golden brown.
- Allow to cool for at least 30 minutes before cutting into squares.
Notes
- For a richer filling, use whole milk ricotta.
- You can substitute powdered sugar with coconut sugar for a healthier option.
- Feel free to omit cinnamon for a traditional cannoli flavor.
- Garnishes can be adjusted according to personal taste.
- Prep Time: 15 minutes
- Cook Time: 30-35 minutes
- Category: Dessert
- Method: Baking
- Cuisine: Italian
Nutrition
- Serving Size: 1 square
- Calories: 180
- Sugar: 12g
- Sodium: 120mg
- Fat: 8g
- Saturated Fat: 3g
- Unsaturated Fat: 5g
- Trans Fat: 0g
- Carbohydrates: 23g
- Fiber: 1g
- Protein: 4g
- Cholesterol: 30mg