Classic Paper Plate Pumpkins: Fun and Mess-Free Craft!

Introduction to Classic Paper Plate Pumpkins
With the changing of the leaves and more crisp air, thoughts turn to all the fun ways to celebrate the season, and for that, I absolutely adore these Classic Paper Plate Pumpkins! Super easy to make, they require no mess but make room for tons of creativity from the kiddos – far beyond simple triangle-eyes pumpkin carving.
Perfect for busy moms like us, the craft allows a nice break without the fuss. And it’s an instant solution to keeping those little hands busy so you can have more time to enjoy your pumpkin spice latte in peace!
Why You’ll Love This Classic Paper Plate Pumpkins
These Classic Paper Plate Pumpkins are a total cinch time-saver when the schedule gets crazy. No carving means no mess, just pure fun…and a way for the kids to show sharp tools just who’s boss in the art game. And these pumpkins won’t go bad, so your little ones can keep and enjoy their handiwork for as long as possible. Kind of a sweet deal, huh?
Ingredients for Classic Paper Plate Pumpkins
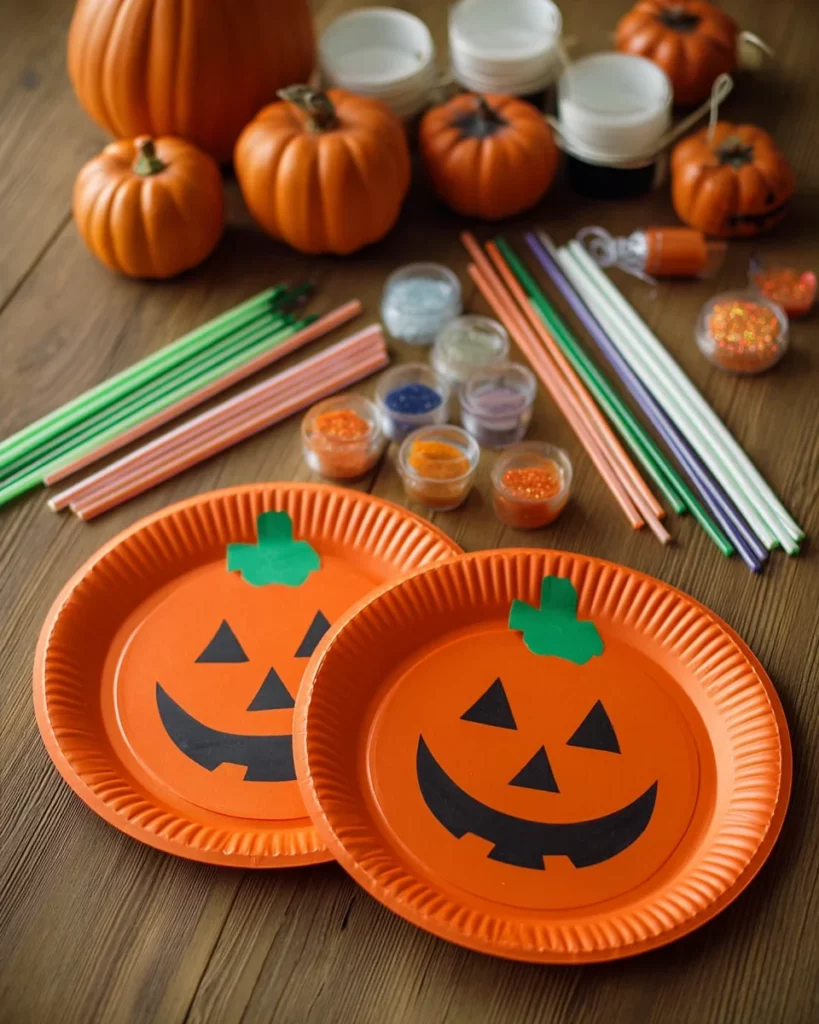
Gathering your supplies is half the fun! Here’s what you’ll need to create your Classic Paper Plate Pumpkins:
- White paper plates: These serve as the canvas for your colorful creations. Sturdy enough to hold your decorations but light enough for little hands to manage!
- Orange paint, markers, or crayons: Choose your favorite medium! The bright orange color brings these pumpkins to life and lets kids express their artistic style.
- Black construction paper: This paper provides a perfect contrast for cutting out spooky faces. It’s easy to work with, and the options for expressions are endless.
- Scissors: A handy tool for any crafting session. Just ensure younger kids are supervised while handling these.
- Glue stick: A must-have for sticking on those delightful faces and securing the decorative stem!
- Green pipe cleaners or green paper: These are the ideal finishing touches to give your pumpkins that classic pumpkin look. Pipe cleaners add a fun twist, while paper can be cut to any desired shape.
Feel free to mix up the colors and materials! You can even add glitter for some sparkle or stickers for extra flair. For exact quantities, check the details at the bottom of the article.
How to Make Classic Paper Plate Pumpkins
Let’s dive into making these adorable Classic Paper Plate Pumpkins! Just follow these simple steps, and you’ll have a delightful craft in no time.
Step 1: Prepare Your Plate
Begin by taking a white paper plate and placing it flat on the table. It’s your blank canvas, so make sure it’s clean and ready for some colorful transformation!
Step 2: Color with Orange
Hand your kids orange paint, markers, or crayons and encourage them to color the entire plate. Let them go wild! No rules here; the more vibrant, the better. This is where their creativity shines.
Step 3: Create the Face
While they’re busy with orange, grab some black construction paper. Help them cut out fun shapes for eyes, a nose, and a mouth to form a jack-o’-lantern face. Encourage different expressions! A goofy grin or spooky scowl, it’s all up to them!
Step 4: Assemble Your Pumpkin
Now it’s time to glue those spooky features onto the orange plate. A glue stick works wonders here! Apply the glue evenly, and press down those face pieces firmly. Watch as their creations come to life before your eyes!
Step 5: Finish with a Stem
Grab some green pipe cleaners or green paper for the pumpkin stem. If using paper, cut it into a tall rectangle, or twist the pipe cleaner into a fun shape. Glue or poke it into the top of the pumpkin. This little detail makes a huge difference!
Step 6: Hanging Option (optional)
If you’d like to hang these cuties as decorations, punch a hole at the top of the plate. Then thread a piece of string through the hole and tie a knot. It’s a great way to show off their hard work!
There you go! These Classic Paper Plate Pumpkins are ready to brighten up your space, and they’ll be proud to display their creative achievements!
Tips for Success
- Choose washable paint to make clean-up a breeze.
- Cover your work surface with newspaper or an old tablecloth to catch any drips and spills.
- Encourage your kids to mix colors for more interesting shades of orange!
- Pre-cut some shapes from the black paper to speed up the process.
- Set aside a “pumpkin gallery” space to display their artistic masterpieces!
Equipment Needed
- Craft scissors: Safety scissors are perfect for kids; they’ll get the job done without sharp edges.
- Glue stick: A straightforward choice for easy, mess-free application.
- Paintbrushes: If using paint, have some brushes handy; fingers can get messy!
- Paper towel: Great for quick clean-ups during the crafting fun.
Variations of Classic Paper Plate Pumpkins
- Glittery Pumpkins: Add some sparkle by sprinkling glitter on the wet paint! Just make sure to let it dry thoroughly to avoid a glittery mess everywhere.
- Textured Pumpkins: Use crumpled tissue paper instead of flat coloring. Kids can glue it down for a fun, bumpy texture!
- Rainbow Pumpkins: Instead of just orange, let kids use multiple colors to create a rainbow effect or even a mixed media project with different materials!
- Theme Pumpkins: For a fun twist, encourage kids to create their favorite characters or animals as pumpkins. A vampire pumpkin or a pumpkin unicorn could be a hit!
- Seasonal Variations: Change up the colors according to the season. Pink and green for spring or red and gold for winter themes can keep their creativity flowing year-round!
Serving Suggestions for Classic Paper Plate Pumpkins
- Display them: Use colorful string lights to hang your pumpkins for a festive look.
- Create a pumpkin family: Make different sizes for a charming centerpiece on your dining table.
- Pair with seasonal treats: Enjoy some apple cider or pumpkin muffins while crafting!
- Craft corner: Set up a designated display area with other fall crafts to showcase your kids’ creativity.
FAQs about Classic Paper Plate Pumpkins
What ages are Classic Paper Plate Pumpkins suitable for?
These paper plate pumpkins are fantastic for kids aged 3 and up! Younger kids might need more assistance, but everyone can enjoy the fun, mess-free crafting!
Can we use other colors besides orange?
Absolutely! While orange is traditional, let your kids explore their imagination. Pink, blue, or even a mix of colors can make whimsical pumpkins that sparkle and stand out!
How long do these pumpkins last?
One of the best parts about these Classic Paper Plate Pumpkins is their durability! They won’t spoil as real pumpkins do, so they can last for weeks, even months, as long as they’re kept away from moisture.
Can I make these pumpkins with a large group?
Yes! These pumpkins are perfect for group crafting sessions, like birthday parties or classroom activities. Just set up multiple stations with supplies; it’s a fun way for kids to bond!
What’s the best way to clean up after crafting?
For easy cleanup, use washable paints and cover your workspace with newspapers. Have wet wipes handy for quick finger clean-ups, and don’t forget to have fun!
Final Thoughts
Creating Classic Paper Plate Pumpkins brings joy that lasts far beyond the actual craft. Watching my kids’ faces light up as they unleash their imagination fills my heart with happiness. Each pumpkin reflects their unique personality, making them wonderfully special.
Plus, there’s no mess to dread—just good, clean fun! These pumpkins not only brighten our home but also create memories that we’ll cherish for years to come. So grab your supplies, gather the family, and dive into this delightful crafting experience. Trust me, it’s the perfect way to celebrate fall without the fuss!
Print
Classic Paper Plate Pumpkins: Fun and Mess-Free Craft!
- Total Time: 15 minutes
- Yield: As many pumpkins as desired
- Diet: N/A
Description
Classic Paper Plate Pumpkins are a safe and fun alternative to traditional pumpkin carving, allowing kids to create their own unique designs without the mess.
Ingredients
- White paper plates
- Orange paint, markers, or crayons
- Black construction paper
- Scissors
- Glue stick
- Green pipe cleaners or green paper
Instructions
- Start with a white paper plate.
- Hand your kids orange paint, markers, or crayons and let them color it completely.
- Cut jack-o’-lantern faces from black paper.
- Glue the face pieces onto the pumpkin.
- Add a green paper stem or pipe cleaner on top.
- Punch a hole and add string if you’d like to hang them up.
Notes
- Kids enjoy designing their own pumpkin face without sharp knives.
- No pumpkin guts, no carving mess involved.
- Paper plate pumpkins last longer than real pumpkins.
- Prep Time: 15 minutes
- Cook Time: 0 minutes
- Category: Craft
- Method: Crafting
- Cuisine: N/A
Nutrition
- Serving Size: N/A
- Calories: N/A
- Sugar: N/A
- Sodium: N/A
- Fat: N/A
- Saturated Fat: N/A
- Unsaturated Fat: N/A
- Trans Fat: N/A
- Carbohydrates: N/A
- Fiber: N/A
- Protein: N/A
- Cholesterol: N/A