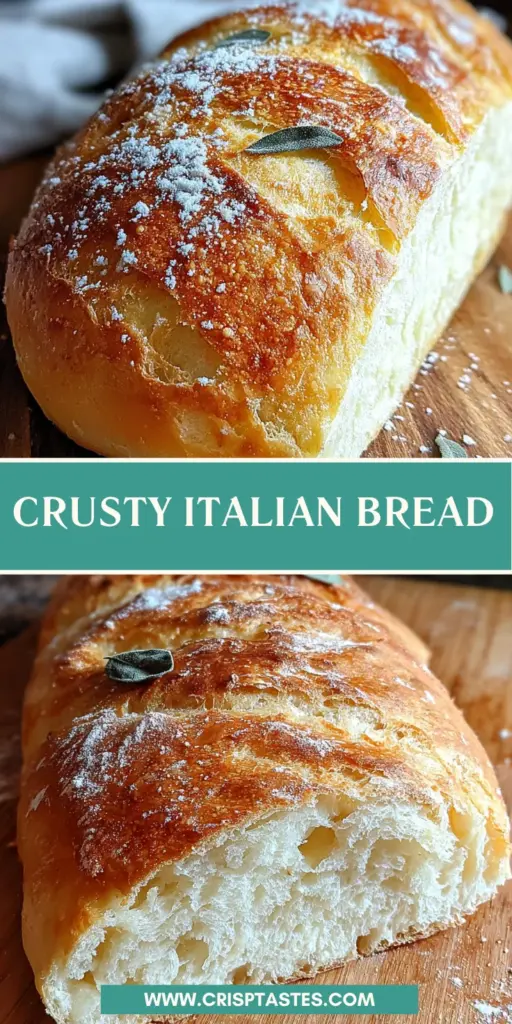
Crusty Italian Bread: Discover the Secret Recipe Today!

Introduction to Crusty Italian Bread
There’s something magical about the smell of freshly baked bread wafting through your kitchen. Crusty Italian bread is that special recipe that brings comfort and warmth, perfect for busy days. Whether you’re dashing from work to home or planning a cozy family dinner, this homemade delight is both a quick solution and a gourmet touch.
I remember my first attempt at this recipe, with flour dust on my nose and laughter echoing in the kitchen. It’s a joy to create and share, making every meal feel like a celebration.
Why You’ll Love This Crusty Italian Bread
This crusty Italian bread is a dream come true for busy cooks like me. With its easy prep and minimal ingredients, you can whip up this gorgeous loaf without stressing out. The golden-brown crust and soft, chewy interior make every bite delightful. Plus, it pairs beautifully with soups and salads or stands alone as a comforting snack. Trust me, your family will be reaching for seconds, if not thirds!
Ingredients for Crusty Italian Bread
Let’s dive into the ingredients that make this crusty Italian bread truly fantastic. Each one plays a vital role in crafting that perfect loaf. You can find the exact measurements at the bottom of the article, ready for printing.
- All-purpose flour: The foundation of your bread, giving it structure and chewiness. You can swap it with bread flour if you fancy a little more bounce.
- Salt: It enhances the flavor and controls yeast activity. A pinch too much could make things a bit salty.
- Active dry yeast: This little powerhouse makes the bread rise and gives it that airy texture. Ensure it’s fresh for maximum fluffiness!
- Warm water: Activates the yeast, bringing everything together. Make sure it’s around 110°F, so you don’t kill those tiny yeasty soldiers.
- Sugar: Just a teaspoon helps to feed yeast and adds a hint of sweetness. You could use honey as a natural alternative.
- Cornmeal: Sprinkled on the baking sheet, it prevents sticking and adds a delightful crunch to the crust.
Gather these ingredients, and you’ll be well on your way to creating a loaf that not only looks stunning but also tastes unbelievably good!
How to Make Crusty Italian Bread
Prepare the Oven and Ingredients
Start by preheating your oven to 450°F (232°C). This high temperature is crucial for creating that perfect, crusty exterior. While your oven heats up, place a shallow pan filled with water on the lowest rack. This little trick creates steam during baking, giving the bread its delightful crust. I can tell you, it’s worth every bit of effort! Before you know it, the aroma of warm Italian bread will fill your kitchen.
Combine Dry Ingredients
In a large mixing bowl, combine your all-purpose flour and salt. I like to whisk them together to ensure they’re blended well. This step is vital because salt can inhibit yeast activity if it’s mixed directly with it. So, having the dry ingredients combined first allows the yeast to work its magic later. Make sure there are no lumps; a smooth base leads to an even texture in your loaf.
Activate the Yeast
Next, let’s wake up the sleepy yeast! In a separate bowl, combine warm water (around 110°F), sugar, and the active dry yeast. Stir gently and let it sit for about 5 to 10 minutes. You’ll know it’s ready when the mix is bubbly and frothy. This indicates that your yeast is alive and kicking, ready to make your bread rise beautifully. The excitement of seeing that froth is just one of my favorite moments in baking!
Mix the Dough
Now, it’s time to unite the dry ingredients with the activated yeast mixture. Pour the bubbly yeast mixture into the bowl with flour and salt. Stir until a rough dough begins to form. Don’t worry; it doesn’t need to be perfect at this stage. Just ensure everything is well-incorporated. I love how mixing the dough feels; it’s like bringing the ingredients to life. It’s fun to see the transformation from powder to dough!
Let It Rise
Once your dough is ready, it’s time for the first rise. Lightly grease a bowl and place your dough inside, covering it with a damp towel. Find a warm spot in your kitchen and let it rise for 1 to 2 hours. You’ll know it’s ready when it doubles in size. During this quiet time, your dough is working its magic, creating all those lovely air pockets that make the bread soft inside. It’s like a little nap for your bread!
Shape the Dough
After the dough has risen, it’s time to squeeze the air out gently. Deflate the risen dough by pressing it down. Then shape it into either a round or oval loaf, depending on your preference. Next, place the shaped dough onto a baking sheet that’s dusted with cornmeal. This prevents sticking while adding a little crunch to the crust. I always think of shaping dough like molding clay; it’s a creative process that lets your personality shine through!
Make Ventilation Cuts
Grab a sharp knife, my best friend in the kitchen! Carefully make a few shallow cuts on the top of the loaf. These cuts help the bread expand as it bakes, preventing it from bursting in unexpected places. Plus, they add a rustic charm to the final look, making your crusty Italian bread so inviting. It’s the final touch that turns your loaf into a masterpiece!
Bake the Bread
Now comes the exciting part! Place your loaf in the preheated oven on the middle rack. Bake for 25 to 30 minutes, listening for that beautiful crackling sound. You’ll know it’s done when the crust is golden brown, and tapping the bottom gives you a hollow sound. It’s hard to resist peeking inside the oven! The anticipation builds, and trust me, the wait is totally worth it! Your kitchen will soon smell heavenly.
Cooling Time
Once the baking time is up, remove your beautiful loaf from the oven. Allow it to cool completely on a wire rack. This step is crucial. Cutting into warm bread can make the texture gummy. So, practice a little patience. I know it’s tempting, but trust me, that cooler temperature will lead to a lovely slicing experience later on. Enjoy the view of your golden crusty Italian bread as it cools—it’s a sight to behold!
Tips for Success
- Always measure your ingredients accurately for consistent results.
- For best flavor, consider using fresh yeast.
- Keep your kitchen warm during the rising process to help the dough rise perfectly.
- Experiment with different flours for varied textures.
- Don’t rush the cooling time; it truly affects the bread’s texture.
Equipment Needed
- Mixing bowl: Any large bowl will do, even a sturdy plastic one.
- Measuring cups and spoons: Use standard kitchen measuring tools for accuracy.
- Baking sheet: A regular sheet works, but a pizza stone can enhance crust.
- Wire rack: A cooling rack is ideal; otherwise, a plate will suffice.
- Sharp knife: A serrated knife helps make those lovely cuts.
Variations
- Herb-Infused Bread: Add fresh herbs like rosemary or thyme to the dough for an aromatic twist.
- Garlic Bread: Incorporate minced garlic into the dough before rising to create a flavorful treat.
- Olive and Cheese: Fold in chopped olives and grated cheese for a Mediterranean flair.
- Whole Wheat Option: Substitute half of the all-purpose flour with whole wheat for added fiber and nutrition.
- Gluten-Free Version: Use a gluten-free flour blend to make this bread suitable for those with dietary restrictions.
Serving Suggestions for Crusty Italian Bread
- Pair with Soup: A warm bowl of minestrone or tomato soup complements the bread beautifully.
- Perfect with Salads: Serve with a fresh Caprese or Caesar salad for a balanced meal.
- Toast It: Enjoy slices of bread toasted, topped with olive oil and a sprinkle of sea salt.
- Cheese Board: Add to a cheese platter with assorted cheeses and olives for a delightful appetizer.
- Serve Warm: Place the bread in a basket lined with a cloth for an inviting presentation.
FAQs about Crusty Italian Bread
Many of you might have questions as you embark on your journey to make crusty Italian bread. No worries! Here are answers to some common queries that I’ve encountered along the way.
Can I use instant yeast instead of active dry yeast?
Absolutely! Instant yeast can be used in place of active dry yeast without any changes to the recipe. Just mix it with the flour and salt instead of dissolving it in water first. Your bread will still be fluffy!
What should I do if my dough doesn’t rise?
If your dough fails to rise, check that your yeast is fresh and the water temperature is around 110°F. Sometimes, environmental factors play a role. Try placing the dough in a warmer spot next time; that may do the trick!
How can I store leftover bread?
Wrap any leftover crusty Italian bread in plastic wrap or foil, and store it at room temperature for up to three days. For longer preservation, consider slicing it and freezing, allowing you to enjoy fresh slices later!
Can I make this bread ahead of time?
Yes! You can prepare the dough ahead and store it in the refrigerator for up to 24 hours after the first rise. Just bring it back to room temperature before shaping and baking.
What are some good toppings for crusty bread?
Endless possibilities await! You can spread butter or olive oil on warm slices. Topping it with your favorite jam or cheese elevates the experience. For a savory kick, try bruschetta or fresh tomatoes!
Final Thoughts
Making crusty Italian bread is more than just whipping up a loaf; it’s an experience steeped in warmth and joy. As the fragrant aromas fill your kitchen, it transforms a regular day into something special. Sharing this rustic bread with loved ones creates memories, from the laughter around the dinner table to the satisfied smiles after every bite. I find happiness in the simple act of baking, and I hope this recipe brings you the same joy. So roll up your sleeves and bake away; you’re crafting not just bread, but moments that matter and flavors that linger.
Print
Crusty Italian Bread
- Total Time: 2 hours 15 minutes
- Yield: One loaf
- Diet: Vegetarian
Description
A classic recipe for making crusty Italian bread with a golden brown crust and soft inner texture.
Ingredients
- 1 1/2 teaspoons salt
- 3 1/2 cups all-purpose flour
- 1 1/2 cups warm water (about 110°F)
- 2 1/4 teaspoons active dry yeast
- 1 teaspoon sugar
- Cornmeal, as needed to sprinkle
Instructions
- Turn on the oven to 450°F (232°C). Put a shallow pan filled with water on the lowest rack to create steam during baking.
- In a bowl, stir together the flour and salt. Add in the water, sugar, and yeast mixture. Keep mixing until a rough dough takes shape and everything’s blended well.
- Cover the shaped loaf with a cloth. Let it sit for 30 to 45 minutes until it looks puffy.
- Grab a sharp knife. Make a few shallow cuts on top of the loaf. This helps it to expand while baking.
- In a big bowl, mix the warm water, sugar, and yeast. Let it sit for 5 to 10 minutes until the top appears bubbly.
- Put the dough on a floured surface. Knead it with your hands for 8 to 10 minutes until it’s soft and stretchy.
- Put the dough in a lightly greased bowl. Cover it with a damp towel and put it in a warm spot for 1 to 2 hours, or until it’s about double the size.
- Deflate the risen dough. Form it into a round or oval shape and set it on a baking sheet that’s dusted with cornmeal.
- Place the loaf in the oven on the middle rack. Bake for 25 to 30 minutes until the crust turns golden brown and sounds hollow when you tap the bottom.
- Take the bread out of the oven and set it on a wire rack. Let it cool down completely before slicing it up.
Notes
- Ensure the water temperature is around 110°F for optimal yeast activation.
- Use a sharp knife for making cuts on the dough to avoid tearing.
- Let the bread cool completely before slicing to maintain its texture.
- Prep Time: 15 minutes
- Cook Time: 30 minutes
- Category: Baking
- Method: Baking
- Cuisine: Italian
Nutrition
- Serving Size: 1 slice
- Calories: 120
- Sugar: 0.5g
- Sodium: 200mg
- Fat: 1g
- Saturated Fat: 0g
- Unsaturated Fat: 0.5g
- Trans Fat: 0g
- Carbohydrates: 24g
- Fiber: 1g
- Protein: 4g
- Cholesterol: 0mg