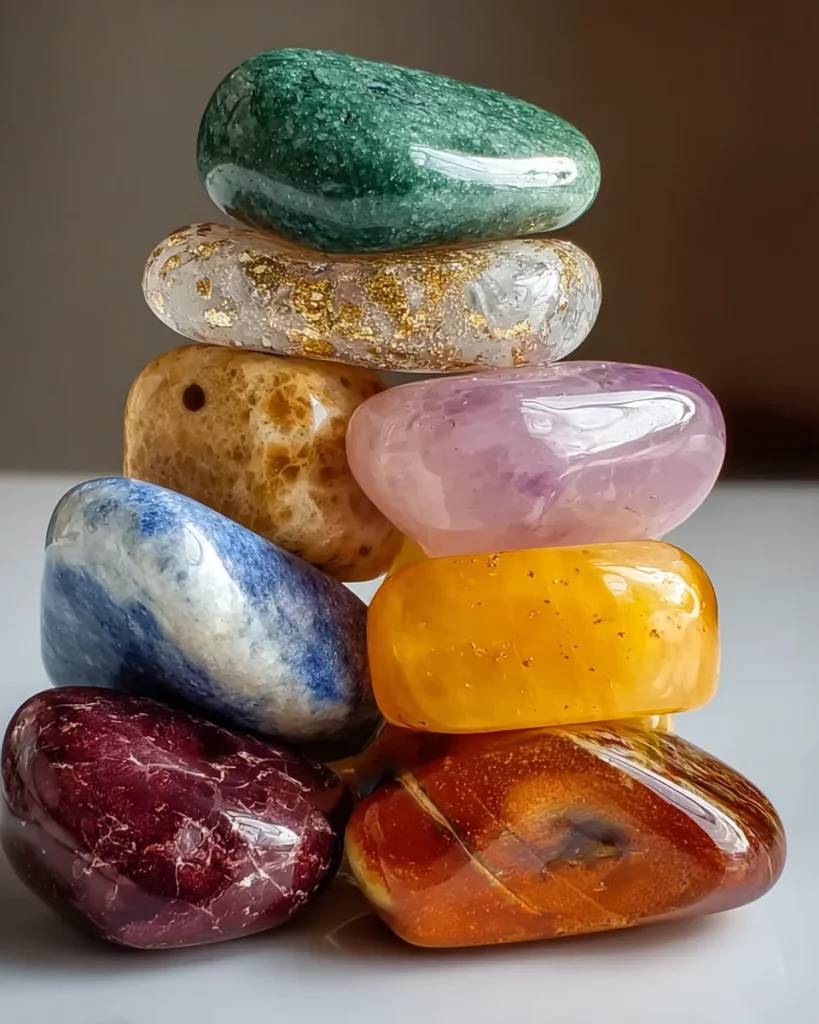
DIY Aroma Stones: Create Scented Decor Effortlessly!

Introduction to DIY Aroma Stones
Welcome, friends! If you’re anything like me, the hustle and bustle of daily life sometimes leaves little room for relaxation. That’s where these DIY aroma stones come in! They’re not only easy to make, but they also bring delightful fragrances into your home without breaking a sweat.
With just a few simple ingredients and minimal effort, you can create these charming scented decorations. Imagine the comforting aroma greeting you after a long day. Plus, it’s a wonderful way to unwind while spending some quality time with your kids or letting your creativity flow! Let’s dive into this aromatic adventure together!
Why You’ll Love This DIY Aroma Stones
These DIY aroma stones are such a breeze to make! With just a small time investment, you can transform your space. Not only do they smell divine, but they also serve as stunning decor pieces. Plus, you can customize scents to match your moods or seasons.
It’s a satisfying project that the whole family can enjoy. Imagine crafting together and filling your home with enchanting aromas. Trust me, you’ll love the results!
Ingredients for DIY Aroma Stones
Creating your own DIY aroma stones is both fun and straightforward. You’ll only need a handful of simple ingredients, which you might already have in your pantry!
- Baking Soda: This acts as the base ingredient, providing structure and helping the stones to harden.
- Cornstarch: Adds to the smoothness of the mixture and ensures a lovely texture for the stones.
- Water: Vital for blending the two dry ingredients into a smooth paste. Take your time pouring it in!
- Essential Oils: Here’s where the magic happens! Choose scents that resonate with you—lavender for calm, lemon for freshness, or eucalyptus for clarity.
- Food Coloring (optional): Add a splash of color to your aroma stones. Personalize them to match your decor or mood!
- Silicone Molds: These come in various shapes. Get creative! Heart, star, or flower molds can make your stones extra special.
- Wax Paper or Parchment Paper: Use it for drying. It creates a clean surface and prevents sticking.
For precise measurements, check the bottom of the article where everything is noted for easy printing.
How to Make DIY Aroma Stones
Now that you have gathered your ingredients, it’s time to roll up your sleeves and embark on this delightful aroma journey! Follow these simple steps to create your enchanting DIY aroma stones.
Combine Dry Ingredients
Start by measuring out the baking soda and cornstarch. Grab a mixing bowl and combine them. It’s like making a magic potion except this one fills your home with lovely scents! Mix them well until they are fully joined, like old friends reuniting. This blend forms the base of your aroma stones, ensuring they have just the right texture.
Add Water
Next, let’s introduce the water. Pour it in slowly while stirring continuously. The mixture should transform into a smooth paste. Don’t rush this part—take your time and enjoy the satisfying sensation of watching it blend! The smoother the mixture, the better your aroma stones will turn out.
Incorporate Oils
Now comes the fun part—adding your essential oils! Choose a fragrance that speaks to you. Want relaxation? Go for lavender. Looking for a fresh vibe? Lemon is your friend. Add 20-30 drops, and stir well to ensure the scent disperses evenly through your mixture. Remember, the strength of the aroma depends on your preferred potency, so adjust as needed!
Choose Colors
If you want to jazz up your aroma stones, consider adding a dash of food coloring. A few drops can turn a simple white stone into a vibrant masterpiece. It’s all about personalizing your decor! Mix until the color is uniform and watch as your creation starts to take on its unique character.
Prep the Molds
Ready for the next step? Grab those silicone molds and set them up on a flat surface. This is where your creativity can really shine! You can use molds in fun shapes—think hearts, stars, or flowers. The possibilities are endless, and you’ll have a charming variety of aromas to enjoy!
Fill Molds
Carefully pour your mixture into the molds. A spatula or spoon can help you smooth out the tops for a polished finish. Take your time here; a gentle hand goes a long way. Imagine each mold is a tiny vessel waiting to hold a piece of calming essence!
Remove Air Bubbles
To ensure your aroma stones are perfect, gently tap the filled molds on the counter. This helps release any stubborn air bubbles trapped inside. Think of it as giving your molds a little shake—it’s a simple tip, but it makes a big difference in the final result.
Cover for Drying
Now that your molds are filled, cover them with a thin towel and place them in a warm, dry area. This helps the stones dry evenly and keeps dust from settling on top. Creating a clean drying environment is key to achieving those beautiful aroma stones we’re aiming for!
Wait for Curing
Patience is a virtue, my friend! Allow your aroma stones to dry completely for about 24 hours. While waiting, imagine how wonderful your home will smell. It’s worth the time, trust me. Soon enough, you’ll be rewarded with your lovely creations!
Unmold
Finally, the moment has arrived! Carefully remove the hardened stones from the molds. Gently flex the silicone and pop them out. Handling them with care is important, as you wouldn’t want to break any of your artistic creations. Stand back and admire your stunning aroma stones—they’re ready to fill your home with fragrance!
Tips for Success
- Always measure your ingredients accurately for the best texture.
- Feel free to experiment with essential oil blends for unique scents!
- Check your molds for any damages before pouring the mixture.
- Make sure your drying area is warm and free of moisture.
- If using food coloring, start with a small amount and adjust to your preference.
Equipment Needed for DIY Aroma Stones
- Mixing Bowl: A large bowl for combining ingredients. A measuring cup can work too.
- Spoon or Spatula: For mixing and pouring the mixture. A regular kitchen spoon does the job!
- Silicone Molds: Various shapes for your stones. Ice cube trays can be a handy substitute.
- Wax Paper or Parchment Paper: To prevent sticking while drying. A clean countertop works in a pinch!
Variations on DIY Aroma Stones
- Herbal Infusions: Mix in dried herbs like lavender or chamomile for extra texture and aroma.
- Citrus Zest: Add a sprinkle of lemon or orange zest for a refreshing twist on fragrance.
- Colorful Layers: Create layered stones by pouring different colored mixtures in stages for a stunning visual effect.
- Moisture-Absorbing Stones: Include a bit of activated charcoal to help absorb odors while adding a unique touch.
- Personalized Shapes: Use molds that reflect seasonal themes, like pumpkins for fall or snowflakes for winter.
Serving Suggestions for DIY Aroma Stones
- Placement: Arrange the aroma stones in a decorative bowl on your coffee table for a warm welcome.
- Gift Idea: Package the stones in pretty boxes as thoughtful gifts for friends or family.
- Bamboo Trays: Use bamboo trays to display your aroma stones, adding a touch of elegance.
- Seasonal Themes: Rotate the stones based on the season to keep your decor fresh and inviting.
FAQs about DIY Aroma Stones
As I craft my DIY aroma stones, I often find myself answering a few common questions. Here are some that I think might help you, too!
Can I use any type of essential oils?
Absolutely! The beauty of DIY aroma stones is that you can customize them. From calming lavender to invigorating eucalyptus, your choices are limitless. Just ensure the oils are appropriate for home use and safe for your family’s environment.
How long do the aromas last?
Typically, your DIY aroma stones will maintain their delightful scent for several weeks. However, the longevity may vary depending on the essential oils used. For the best results, keep them in a cool, dry place to preserve that lovely fragrance!
Can I make aroma stones in different sizes?
Definitely! The size of the molds you choose can change the size of your aroma stones. Just keep in mind that larger stones might take longer to dry. Whatever size you choose, each one will bring a burst of aroma to your space.
How should I store my aroma stones?
Store your finished DIY aroma stones in a cool, dry spot—like a decorative box or a drawer. Avoid direct sunlight, which can fade the colors and aromas over time. Keep them safe until you’re ready to let their delightful scent fill your home!
What can I do if I want a stronger scent?
If you prefer a more potent fragrance, simply increase the number of essential oil drops in your mixture. Start with a few extra to find your perfect balance. Just remember, a little can go a long way, so adjust carefully!
Final Thoughts
Making DIY aroma stones is not just a creative project; it’s a wonderful way to bring warmth and serenity into your home. There’s a unique joy in blending your favorite scents and colors, crafting beautiful pieces that reflect your personality. The process is just as rewarding as the finished product. As the delightful fragrances fill your space, you’ll be reminded of the time spent creating something special. I hope you find as much happiness in making these aroma stones as I do. So roll up those sleeves and let your aromatic adventure begin!
Print
DIY Aroma Stones: Create Scented Decor Effortlessly!
- Total Time: 24 hours and 10 minutes
- Yield: Approximately 10–15 aroma stones depending on mold size 1x
- Diet: Vegan
Description
Learn how to create beautiful scented decor with DIY Aroma Stones using simple ingredients and essential oils.
Ingredients
- 1 cup baking soda
- 1/2 cup cornstarch
- 1/2 cup water
- 20–30 drops of essential oils (your choice)
- Food coloring (optional)
- Silicone molds (various shapes)
- Wax paper or parchment paper for drying
Instructions
- Combine Dry Ingredients: In a mixing bowl, combine the baking soda and cornstarch. Mix well until fully combined.
- Add Water: Slowly pour in the water, stirring continuously until the mixture becomes smooth.
- Incorporate Oils: Add in your selected essential oils. The more drops you use, the stronger the fragrance will be. Stir well to ensure even distribution.
- Choose Colors: If desired, you can add a few drops of food coloring to achieve your preferred color. Mix until the color is uniform.
- Prep the Molds: Lay out silicone molds on a flat surface. You can create different shapes or stick to one type.
- Fill Molds: Carefully pour the mixture into the molds, smoothing the top with a spatula or spoon.
- Remove Air Bubbles: Gently tap the filled molds on the counter to release any air bubbles trapped in the mixture.
- Cover for Drying: Place the molds in a warm, dry area. Cover with a thin towel to prevent dust from settling on top.
- Wait for Curing: Allow your aroma stones to dry for 24 hours. They should harden completely.
- Unmold: Once fully dry, carefully remove the stones from the molds.
Notes
- Ensure the area is warm and dry for best drying results.
- You can experiment with different essential oil combinations for unique scents.
- Store completed aroma stones in a cool, dry place to preserve their fragrance.
- Prep Time: 10 minutes
- Cook Time: 24 hours (drying time)
- Category: Home Decor
- Method: Mixing and Molding
- Cuisine: N/A
Nutrition
- Serving Size: N/A
- Calories: N/A
- Sugar: N/A
- Sodium: N/A
- Fat: N/A
- Saturated Fat: N/A
- Unsaturated Fat: N/A
- Trans Fat: N/A
- Carbohydrates: N/A
- Fiber: N/A
- Protein: N/A
- Cholesterol: N/A

Hello – can you tell me where I can find the mold you used? Thanks,
How did you get them so shiny?