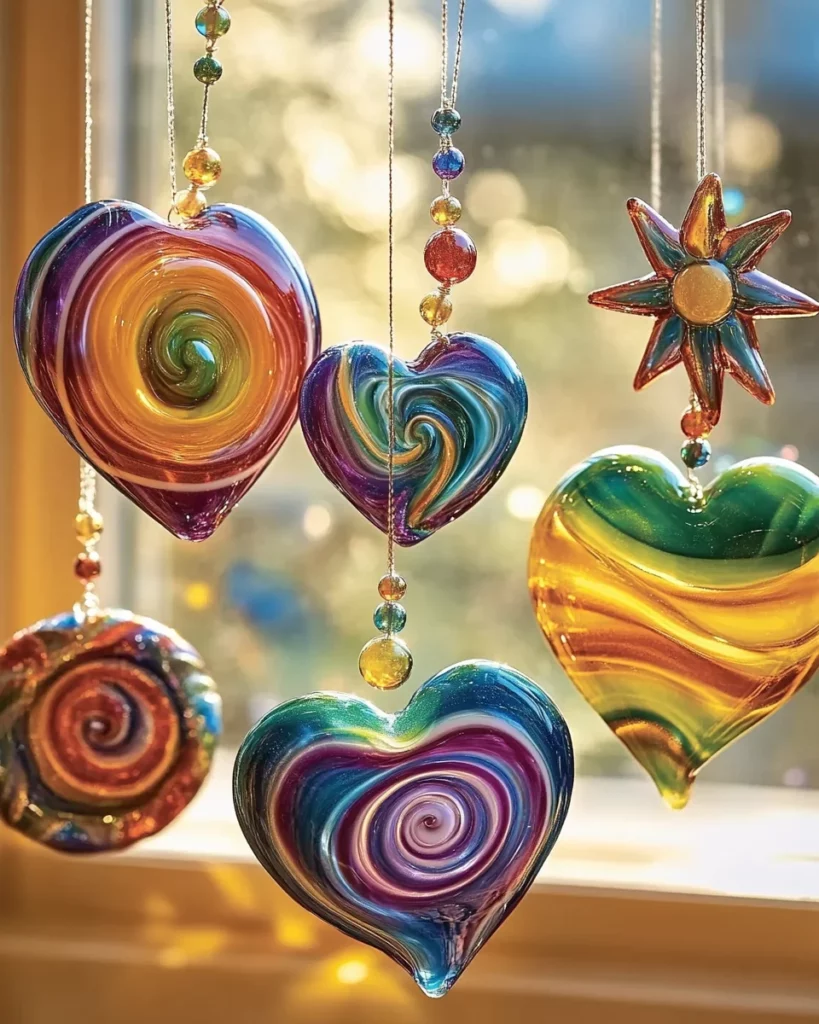
DIY Glue Suncatchers: Craft Colorful Decor Today!

Introduction to DIY Glue Suncatchers
Are you looking for a delightful way to brighten your space? If so, DIY Glue Suncatchers are your answer! This fun and colorful craft is perfect for all ages, making it an excellent activity to share with your kids or even enjoy solo during a quiet afternoon.
Imagine the joy as sunlight streams through your personalized creations, filling your home with cheerful hues. Plus, they’re a quick solution for busy days, providing a simple yet meaningful way to showcase your creativity. Let’s dive into this absorbing craft that’s bound to bring a smile to your face!
Why You’ll Love DIY Glue Suncatchers
One of the best parts about DIY Glue Suncatchers is how easy they are to create. You don’t need to be an expert crafter—just a sprinkle of creativity and a willingness to experiment! Plus, they come together quickly, making them perfect for those hectic afternoons when you need a little craft therapy. And guess what? You’ll end up with vibrant decor that makes your windows pop with color!
Ingredients for DIY Glue Suncatchers
Gathering your ingredients for DIY Glue Suncatchers is part of the fun! Here’s what you’ll need to create these colorful decorations:
- White school glue: This is the star of the show! It’s what will hold your suncatcher together and give it that glossy finish.
- Clear glue (optional): If you’re aiming for a more crystal-like appearance, consider adding clear glue to the mix. It enhances that radiant effect when sunlight shines through!
- Wax paper or plastic sheeting: These surfaces are perfect for your glue application. They ensure your suncatchers peel off easily once dried.
- Food coloring (optional): Want to bring your creations to life? A few drops of food coloring can create dazzling swirls. Mix and match colors—let your imagination run wild!
- Scissors: A tool for shaping your creations into fun designs. You can cut them into hearts, stars, or any shape that tickles your fancy!
- String or ribbon (for hanging): Once your suncatcher is ready, you’ll need something to hang it with. Choose colorful string or ribbon to complement your artwork!
Each of these ingredients plays an important role in creating your bright and cheerful suncatchers. For exact quantities, feel free to check the bottom of the article where they are detailed and available for printing!
How to Make DIY Glue Suncatchers
Creating your own DIY Glue Suncatchers is a joyful experience that unfolds step by step. The beauty lies in the simplicity, and every moment can be filled with creativity. Let’s dive in and explore how to bring your vibrant ideas to life!
Step 1: Spread the Glue
Start with a generous layer of white school glue. Using a popsicle stick or your fingers, spread the glue onto a piece of wax paper or plastic sheeting. You can create any shape you like—circles, hearts, or even abstract designs! Just remember, the thicker the layer, the brighter your suncatcher will be.
Step 2: Add Color
If you want to infuse some personality, this is the perfect time to get colorful! Add a few drops of food coloring to your glue. Swirl it gently with a toothpick or the stick you used for spreading. Feel free to mix different colors for a mesmerizing effect—every swirl tells a story!
Step 3: Let it Dry
Now comes the toughest part—patience! Allow your masterpiece to dry completely. This can take several hours or even overnight. While waiting, imagine where you will hang it. The anticipation makes the reveal even sweeter!
Step 4: Peel Off
Once dried, it’s time for the big reveal! Carefully peel your suncatcher off the wax paper. Start at one corner and gently lift it. If it feels stuck, take your time. You don’t want to rip this beauty!
Step 5: Cut Shapes
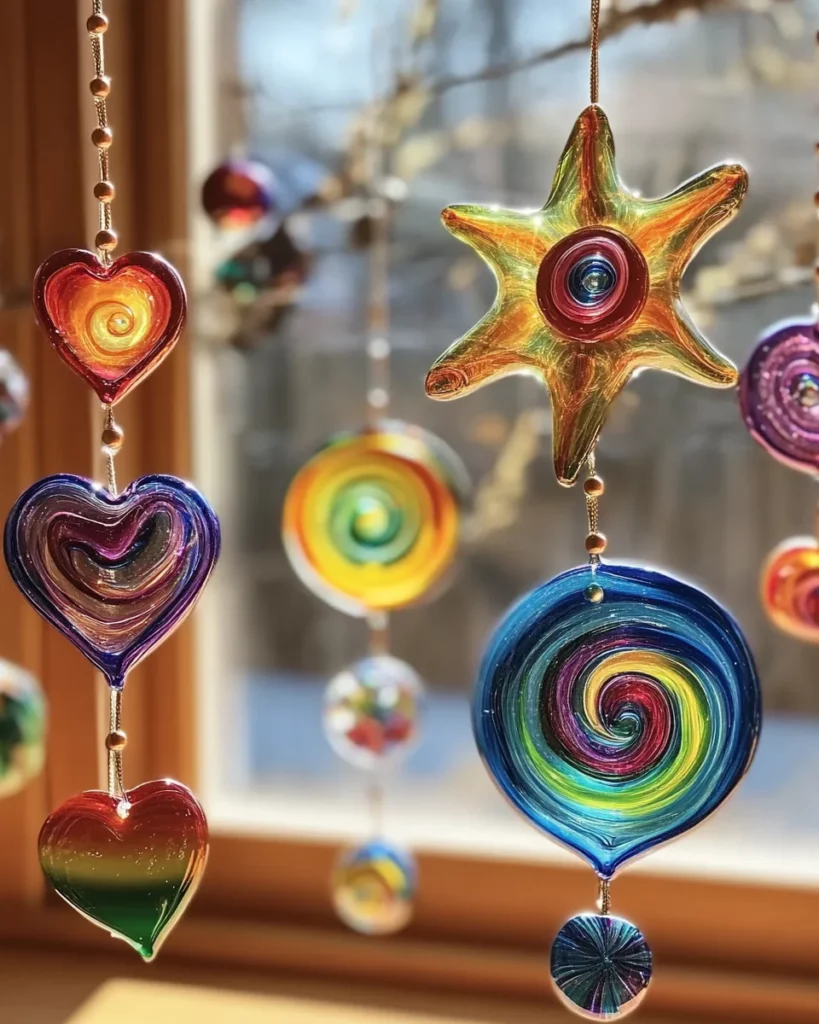
Get creative with your scissors! If you made a larger suncatcher, it’s time to turn it into whimsical shapes. Think about stars, butterflies, or your child’s favorite character. Personalization is key, and each shape can bring a different vibe!
Step 6: Hang Your Suncatchers
Finally, it’s time to showcase your lovely creations! Use string or ribbon to hang the suncatchers in sunny windows. They’ll glitter and sparkle in the light, adding a cheerful touch to your home. You can hang them in the kitchen, living room, or even your child’s bedroom for a splash of joy everywhere!
Tips for Success
- Make sure to apply a thick layer of glue for optimal brightness.
- Use wax paper for easy peeling; avoid regular paper to prevent sticking.
- Let your suncatchers dry in a space free from drafts for an even finish.
- Experiment with shapes and colors for unique designs.
- Consider making themed suncatchers for holidays or special occasions!
Equipment Needed for DIY Glue Suncatchers
- Popsicle sticks: Great for spreading glue; a spoon or paintbrush can work too.
- Plastic sheeting or wax paper: Ideal surfaces; a silicone mat is a good alternative.
- Scissors: Essential for cutting shapes; a craft knife can provide precision.
- Bowls: For mixing colors; any container will do!
Variations of DIY Glue Suncatchers
- Glitter suncatchers: Add some sparkle by mixing glitter into the glue before spreading. It creates a dazzling effect when the sun hits!
- Theme-based designs: For special occasions, try seasonal colors! Use autumnal hues for fall or pastel shades for spring-themed suncatchers.
- Layered suncatchers: Create dimension by drying one layer of color, then adding another on top. This adds depth and complexity to your designs.
- Clear window clings: Omit the food coloring for a transparent look! These can be perfect for a minimalist decor style.
- Use natural dyes: Experiment with natural food colorings from fruits or vegetables to create different shades. Think beet juice for pink or spinach for green!
Serving Suggestions for DIY Glue Suncatchers
- Display Ideas: Hang suncatchers in clusters for a vibrant window display; mix sizes for added interest.
- Gift Presentation: Package them in colorful gift bags for delightful homemade gifts.
- Seasonal Themes: Change them out for different seasons or holidays to refresh your decor.
- Photography: Capture the beautiful light reflections and share on social media for a personal touch!
FAQs about DIY Glue Suncatchers
Can I use any type of glue for my suncatchers?
While white school glue works best for DIY Glue Suncatchers, you can experiment with clear glue for different effects. Just ensure the glue is non-toxic, especially if kids are involved!
How long does it take for the suncatchers to dry?
Generally, allowing several hours or even overnight for drying is best. Patience is key here—rushing this step may result in incomplete drying and sticking!
Can I use colored glue instead of adding food coloring?
Absolutely! Using colored glue can simplify the process. It provides vibrant colors right in the base, resulting in a quick and easy way to create cheerful suncatchers.
Is it safe to hang these suncatchers in a sunny window?
Yes! DIY Glue Suncatchers are safe to hang in sunny spots. The sunlight enhances their beauty, creating lovely reflections throughout your home.
What should I do if my suncatcher won’t peel off the paper?
If your suncatcher feels stuck, don’t force it! Gently wiggle a corner with a fingernail or a small craft knife to release it. Using wax paper typically prevents sticking, making it easier!
Final Thoughts
Creating DIY Glue Suncatchers is more than just a simple craft; it’s a joyous experience that brings families together. As we blend colors and watch them transform into radiant decor, a sense of accomplishment washes over us. These suncatchers become symbols of creativity and love, brightening our homes with each ray of sunlight.
So, whether you’re looking to fill a rainy afternoon or add a personal touch to your space, dive into this colorful adventure. The memories made while crafting together are what truly shine in our hearts, making every day a bit brighter!
Print
DIY Glue Suncatchers
- Total Time: Several hours (or overnight)
- Yield: Depends on the size and shape of the suncatchers
- Diet: N/A
Description
Brighten up your space with these easy DIY Glue Suncatchers, a fun craft for all ages that adds a splash of color to your windows!
Ingredients
- White school glue
- Clear glue (optional for a crystal look)
- Wax paper or plastic sheeting
- Food coloring (optional)
- Scissors
- String or ribbon (for hanging)
Instructions
- Begin by spreading a generous layer of white school glue onto a piece of wax paper or plastic sheeting in any shape you’d like.
- If you’re feeling colorful, add a few drops of food coloring to the glue and swirl it gently for a fun blend.
- Allow your masterpiece to dry completely; this could take several hours or even overnight, so be patient!
- Once fully dried, carefully peel the suncatcher off the wax paper.
- Feel free to cut it into fun shapes to create a unique design.
- Lastly, attach a string or ribbon to hang your suncatchers in a sunny window and watch the magic happen as they catch the light!
Notes
- Ensure there’s enough glue for a thick layer for optimal brightness.
- Experiment with different colors and shapes for variety.
- These suncatchers make great gifts or room decor!
- Prep Time: 10 minutes
- Cook Time: N/A
- Category: Craft
- Method: DIY
- Cuisine: N/A
Nutrition
- Serving Size: N/A
- Calories: N/A
- Sugar: N/A
- Sodium: N/A
- Fat: N/A
- Saturated Fat: N/A
- Unsaturated Fat: N/A
- Trans Fat: N/A
- Carbohydrates: N/A
- Fiber: N/A
- Protein: N/A
- Cholesterol: N/A


What is the best way to attach a hanger? Can you put in the glue while it dries, or poke a hole?