DIY Hanging Paper Cup Ghosts: Spooky Fun for Halloween!

Introduction to DIY Hanging Paper Cup Ghosts
With leaves turning and the air growing crisp, it is that magical time of year again when Halloween has returned. If you are anything like me, you love getting into the spirit of the season but all too often find yourself short on time. Fear not; this is a fun and easy craft to make within the spirit of the season: DIY Hanging Paper Cup Ghosts. They are so adorable and make a great last minute ‘I’ve really gone all out’ decoration…Trust me! Juggling between household chores and deadlines at work to get close to your Halloween this year would be easy with these little ghosts which are made out of just a few materials.
Why You’ll Love This DIY Hanging Paper Cup Ghosts
These DIY Hanging Paper Cup Ghosts are a breeze to whip up in just ten minutes! Perfect for those hectic days, this craft requires minimal materials and offers maximum fun. You don’t need to be a seasoned crafter; just some paper cups and a dash of creativity. Plus, they’re a fantastic way to involve your kids in Halloween festivities, creating lasting memories while adorning your home with smiles and spookiness.
Ingredients for DIY Hanging Paper Cup Ghosts
- White paper cups: The spooky skeleton of your ghost! Choose sturdy ones for better hanging.
- Black marker or paper: This is your ghost’s personality! Use markers for quick faces, or cut out shapes from paper for a crafty vibe.
- White tissue paper or crepe streamers: These create the ghostly wisps. Feel free to get creative—streamers result in a flowing effect.
- String or yarn: This will give your ghosts the ability to float! Pick something strong enough to handle your ghost’s weight.
- Glue: The magic adhesive! Use it to attach the tissue paper and ensure everything sticks according to plan.
All these ingredients can be found at your local craft store, or even in your own home! Don’t forget, you can check the bottom of the article for ingredient quantities available for printing.

How to Make DIY Hanging Paper Cup Ghosts
Step 1: Draw Ghost Faces
First things first, it’s time to unleash your inner artist! Grab your black marker or cut out shapes from black paper to create ghostly faces. You can go spooky with jagged smiles or keep it light and funny. The beauty of this craft is that each ghost can showcase a different character—let your creativity run wild! I like to sit with a cup of tea as I doodle; it makes the whole process more enjoyable.
Step 2: Prepare the Ghostly Body
Now that your ghosts have personalities, it’s time to give them their ethereal bodies. Take your white tissue paper or crepe streamers and cut them into strips. The longer, the better! Next, take one or two strips and glue them inside the bottom rim of each cup. This creates that flowing, ghost-like effect we crave during Halloween. Be generous with the glue—after all, we want our ghosts to look fabulous! Just a little tip: scrunch the tissue paper as you secure it to give a more natural look.
Step 3: Attach the String
With your ghost’s face and body ready, it’s time for the final touches. Poke a small hole at the top of each ghost. Thread a piece of string or yarn through this hole, making sure to leave enough length for hanging. Tie a knot to secure the string in place. This step makes the ghosts ready to soar through the air. And trust me, it’s always fun to imagine them haunting your living room!
Step 4: Hang Your Ghosts
Finally, let’s bring these little friends to life! Choose a spot in your home—whether it’s the entrance, living room, or even a spooky tree outside. Hang your ghosts from ceilings, doorways, or branches, giving them a ghostly sway. I recommend stepping back for a moment to admire your handiwork. That moment is pure magic, and your home will instantly feel festive and fun! Plus, the kids will love it!
Tips for Success
- Use different sizes of cups for variety; mixing sizes can enhance visual interest.
- Have fun with face designs—your kids’ creativity can lead to unique characters!
- For a nighttime glow, place an LED tealight inside each cup before hanging.
- Secure the string tightly to prevent your ghostly creations from falling.
- Get the kids involved! It’s a great way to bond and spark creativity.
Equipment Needed
- Scissors: Any pair will do, even kitchen scissors if that’s what you have!
- Pencil: Use it for marking holes or tracing designs before committing.
- Craft glue: A glue stick works too, but make sure it’s strong enough for tissue paper.
- Hole punch (optional): For a cleaner hole, this can speed up the process.
- Flat surface: A table or countertop works perfectly for crafting!
Variations of DIY Hanging Paper Cup Ghosts
- Consider using colored paper cups for a whimsical twist—glow-in-the-dark cups add extra spookiness!
- Experiment with Halloween-themed stickers for faces instead of drawing. It’s effortless and super fun!
- For a textured look, mix in some shredded tissue paper along with streamers to enhance the ghostly wisps.
- Add ribbons or bows around the neck for a cute yet spooky style. The little details can make a big difference!
- Have a craft day with friends! Invite them over to share ideas and create a ghostly army together.
Serving Suggestions for Halloween Decor
- Pair your hanging ghosts with orange and black balloons for a festive entrance.
- Serve Halloween-themed snacks, like pumpkin-shaped cheese balls or spooky cookies.
- Set the mood with eerie music and flickering candles around the ghost displays.
- Use black tablecloths and scatter faux spider webs for added flair.
- Mix in some fall décor, like mini pumpkins, for a cozy autumn feel.
FAQs about DIY Hanging Paper Cup Ghosts
Can I use different types of cups for the ghosts?
Absolutely! You can use plastic cups or even smaller paper cups for a varied look. Just ensure that whatever you choose can hold up the tissue paper.
How can I make my ghosts glow at night?
For a spine-tingling glow, simply place small LED tealights or glow sticks inside the cups before hanging them. It adds an enchanting touch!
Can this be a fun project for kids?
Yes! This craft is perfect for kids. They’ll enjoy drawing faces and gluing their ghostly bodies together. It’s both creative and a wonderful bonding activity.
What if I don’t have black markers?
No worries! You can cut out shapes from black construction paper or use stickers to create faces. Get creative with what you have on hand!
How long will these ghosts last?
As long as they are kept dry and away from excessive wind, the paper cup ghosts can last for the entire Halloween season! Just be gentle when moving them!
Final Thoughts
Creating these DIY Hanging Paper Cup Ghosts is more than just a craft; it’s an experience! As I gather my materials, I’m reminded of the simple joys of Halloween—laughter, creativity, and family time. The moment those little ghosts sway gently in the breeze, my heart fills with warmth and nostalgia. It’s about more than the end result; it’s the shared smiles and the memories made along the way. So grab your cups, invite your kids to join, and let the magic unfold. This Halloween, let’s not just decorate but celebrate the spirit of togetherness and fun!
Print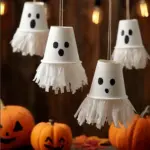
DIY Hanging Paper Cup Ghosts: Spooky Fun for Halloween!
- Total Time: 10 minutes
- Yield: Multiple ghosts depending on cups used
- Diet: Vegetarian
Description
Create adorable and spooky hanging ghosts using paper cups for your Halloween decor.
Ingredients
- White paper cups
- Black marker or paper for faces
- White tissue paper or crepe streamers
- String or yarn for hanging
- Glue
Instructions
- Draw spooky or funny ghost faces on the cups.
- Cut strips of tissue paper and glue them inside the bottom rim of each cup.
- Poke a hole at the top, thread the string through, and tie a knot.
- Hang your ghosts from ceilings, doorways, or tree branches for floating Halloween fun!
Notes
- For a glowing effect, use a small LED tealight or glow stick inside each cup.
- Prep Time: 10 minutes
- Cook Time: 0 minutes
- Category: Crafts
- Method: DIY
- Cuisine: N/A
Nutrition
- Serving Size: 1 ghost
- Calories: 0
- Sugar: 0g
- Sodium: 0mg
- Fat: 0g
- Saturated Fat: 0g
- Unsaturated Fat: 0g
- Trans Fat: 0g
- Carbohydrates: 0g
- Fiber: 0g
- Protein: 0g
- Cholesterol: 0mg