DIY Lightning Storm in a Jar: Unleash a Fun Experiment!

Introduction to DIY Lightning Storm in a Jar
Have you ever wanted to ignite a little magic in your home without a whole lot of hassle? The DIY Lightning Storm in a Jar is the perfect little experiment to spark joy in your day! As a busy mom, I often seek simple yet captivating activities that my kids and I can enjoy together. This science experiment is not only quick, but it also provides endless wonder. Plus, it’s a fantastic way to channel those rainy-day vibes into something truly enchanting!
So gather your family and prepare for some electrifying fun!
Why You’ll Love This DIY Lightning Storm in a Jar
This DIY Lightning Storm in a Jar is the epitome of fun and simplicity! It takes just ten minutes to create, making it a perfect quick project when your schedule is packed. Plus, it’s an engaging way to explore science with your kids, turning a potentially dull afternoon into an interactive adventure. Without requiring fancy tools or difficult steps, you can enjoy a memorable family experience with minimal effort!
Ingredients for DIY Lightning Storm in a Jar
Gather up these simple ingredients to create your very own lightning storm in a jar. Each one plays a key role in making this experiment both educational and visually stunning!
- Clear jar or large plastic cup: A clear container is essential to see your storm action in full glory!
- 1 cup warm water: Warm water helps the colors blend beautifully for a mesmerizing effect.
- ¼ cup vegetable oil or baby oil: This creates the magical layering effect that mimics clouds.
- Several drops of blue food coloring: Blue represents the coolness of the storm, adding depth.
- Several drops of purple food coloring: Purple creates a beautiful contrast and adds a touch of whimsy.
- Several drops of dark gray food coloring: This gives the storm an authentic look, making it feel tempestuous.
- Optional: Yellow and/or white food coloring for lightning: Bring the storm to life with bright flashes representing lightning strikes!
- 1 effervescent tablet (like Alka-Seltzer): This is the magic that makes your storm bubble and surge!
- Optional: Glow-in-the-dark paint: For an enchanting twist, this can enhance the storm’s visual appeal.
- Optional: Flashlight: Use a flashlight to further illuminate your storm and create an electrifying atmosphere!
For precise measurements, check the bottom of the article where you’ll find everything you need to print for easy access!
How to Make DIY Lightning Storm in a Jar
Now that we’ve gathered our ingredients, let’s dive into making this spectacular DIY Lightning Storm in a Jar! Each step adds a little bit of magic, and I promise you won’t be disappointed. Ready? Let’s get started!
Step 1: Prepare Your Jar with Water
Begin by filling your clear jar or plastic cup about three-quarters full with warm water. Make sure the water isn’t boiling—just warm enough to mix colors smoothly. The warmer temperature helps the food coloring disperse more evenly, resulting in a richer storm effect!
Step 2: Add Colors
Next, add several drops of blue, purple, and dark gray food coloring into the water. As you stir gently, watch the colors swirl and dance like clouds in the sky. If you’re feeling extra adventurous, drop in a couple of drops of yellow or white food coloring for lightning flashes! It’s mesmerizing to see how they blend together.
Step 3: Pour the Oil
Carefully pour the vegetable or baby oil into the jar. Aim to fill it nearly to the top, leaving a little space. You’ll notice the oil sits on top of the water, creating a magical separation. This is where the storm really starts to form, mimicking those fluffy clouds rolling in before the rain!
Step 4: Activate with Effervescent Tablet
Now for the exciting part! Take an effervescent tablet and break it in half. Drop it gently into the jar and step back. You’ll see bubbling action as the chemicals react, creating a stormy eruption! It’s like nature’s fireworks right before your eyes!
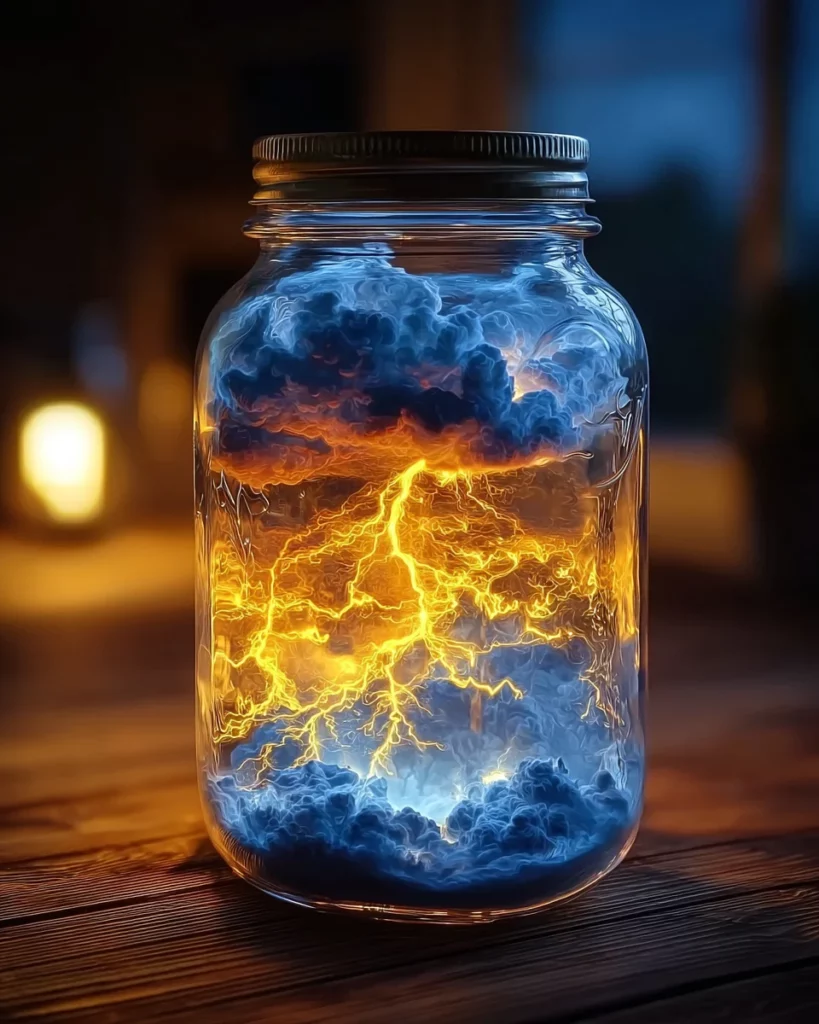
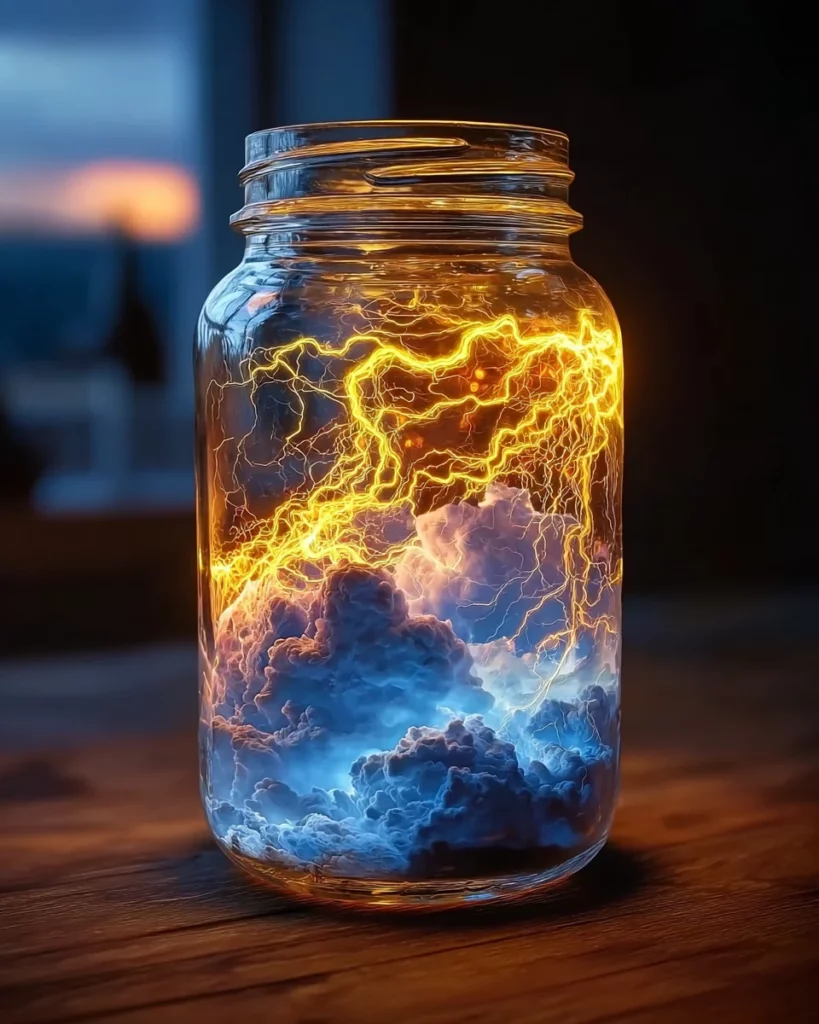
Step 5: Illuminate Your Storm
Finally, turn off the lights and shine a flashlight underneath your jar. This adds a beautiful glow to your storm, enhancing the magical effect. For an extra touch, you can dab a little glow-in-the-dark paint either inside or outside the jar to make it truly enchanting. Your lightning storm is ready to dazzle everyone!
Tips for Success
- Mix the colors gently to avoid bubbles disrupting the effect.
- Keep the jar on a stable surface to prevent spills during the bubbling excitement.
- Make sure your effervescent tablet is fresh for maximum fizz!
- Use a small flashlight for a concentrated lighting effect.
- Encourage kids to personalize their storm with different colors and decorations!
Equipment Needed
- Clear jar or large plastic cup: A glass jar works well, but a sturdy plastic cup is a great alternative!
- Spoon or stir stick: Any kitchen utensil can help you mix those colors.
- Measuring cup: For accuracy, especially if you want perfect proportions.
- Flashlight: Any small flashlight or even your phone’s flashlight will do!
Variations of DIY Lightning Storm in a Jar
- Add Glitter: For a sparkling effect, sprinkle in some crafting glitter. Just be cautious as it might stick to the jar!
- Use Different Colors: Experiment with other colors. Orange and pink can create a sunset storm effect, while green adds a fresh twist!
- Essential Oils: Include a few drops of essential oils like lavender or peppermint for a wonderful scent that enhances the experience.
- Personalize Decorations: Add themed decorations such as cloud stickers or cotton balls to give your jar a more dynamic look!
- Layered Look: Instead of mixing colors, layer each food coloring for a more distinct rainbow storm effect!
Serving Suggestions
- Enjoy with a cozy drink: Pair your lightning storm in a jar with hot chocolate or a refreshing lemonade for a delightful experience.
- Presentation ideas: Set your jar on a colorful tablecloth to enhance the visual appeal during family gatherings.
- Ideal for storytelling: Use the jar as a prop while sharing stormy tales or science stories with your kids!
FAQs about DIY Lightning Storm in a Jar
What age group is this experiment suitable for?
This DIY Lightning Storm in a Jar is perfect for kids aged 5 and up, making it ideal for families and classrooms. Younger children may need some parental supervision to help with pouring and mixing, but the simplicity makes it accessible for everyone!
Can I make the storm in a jar with different colors?
Absolutely! Feel free to experiment with any colors you like. Using shades like orange, green, or even pink can yield some incredible effects. It’s a fun way to personalize each storm and make it unique!
How long will the effect last?
The bubbling and stormy effect lasts for several minutes, depending on how fresh your effervescent tablet is. Once the fizz settles, you can still enjoy the colors and layers in the jar. Just remember to gently stir if you want to recreate the storm!
Are there any safety concerns with this experiment?
This DIY Lightning Storm in a Jar is safe for kids, but avoid ingesting any of the materials. You should also keep glitter and small objects away from young children who might put things in their mouths. Otherwise, it’s a fun, safe way to engage with science!
Can I create an outdoor version of this experiment?
Sure! You can make a larger version in a clear outdoor container. Just remember to work in a shaded area since direct sunlight may affect the colors. Plus, it’s a cool way to enjoy nature while tapping into some scientific wonder!
Final Thoughts
Creating your own DIY Lightning Storm in a Jar is more than just an entertaining science experiment. It’s a delightful way to connect with your kids, spark creativity, and share moments of wonder. Watching those vibrant colors swirl and bubble can leave a lasting impression. Plus, it’s a fantastic conversation starter during family gatherings or playdates. Embrace the joy of discovery and explore new variations together! So, grab your ingredients, ignite your imagination, and let this enchanting project inspire your next family adventure. Remember, a dash of creativity can transform a simple afternoon into something truly magical!
Print
DIY Lightning Storm in a Jar
- Total Time: 10 minutes
- Yield: 1 lightning storm in a jar 1x
- Diet: Vegetarian
Description
Create your own lightning storm inside a jar with this fun and easy DIY experiment!
Ingredients
- Clear jar or large plastic cup
- 1 cup warm water
- ¼ cup vegetable oil or baby oil
- Several drops of blue food coloring
- Several drops of purple food coloring
- Several drops of dark gray food coloring
- Optional: Yellow and/or white food coloring for lightning
- 1 effervescent tablet (like Alka-Seltzer)
- Optional: Glow-in-the-dark paint
- Optional: Flashlight
Instructions
- Fill your jar about ¾ full with warm water.
- Add several drops of blue, purple, and dark gray food coloring. Stir gently to mix. For lightning flashes, add 1–2 drops of yellow or white food coloring.
- Slowly pour vegetable or baby oil into the jar until nearly full.
- Break an effervescent tablet in half and drop it into the jar.
- Turn out the lights and shine a flashlight underneath the jar to enhance the lightning effect. Optionally, add a dab of glow-in-the-dark paint inside or outside the jar.
Notes
- Glow powder or mica shimmer can be added for extra sparkle.
- Be cautious with glitter as it may stick to the jar.
- Essential oils can be included for added scent.
- Themed decorations, like cloud stickers or cotton balls, can enhance the stormy look.
- Prep Time: 10 minutes
- Cook Time: 0 minutes
- Category: Science Experiment
- Method: Mixing and layering
- Cuisine: N/A
Nutrition
- Serving Size: 1 jar
- Calories: 0
- Sugar: 0g
- Sodium: 0mg
- Fat: 0g
- Saturated Fat: 0g
- Unsaturated Fat: 0g
- Trans Fat: 0g
- Carbohydrates: 0g
- Fiber: 0g
- Protein: 0g
- Cholesterol: 0mg