Easter Egg Oreo Balls: Delight Your Taste Buds Today!
Introduction to Easter Egg Oreo Balls
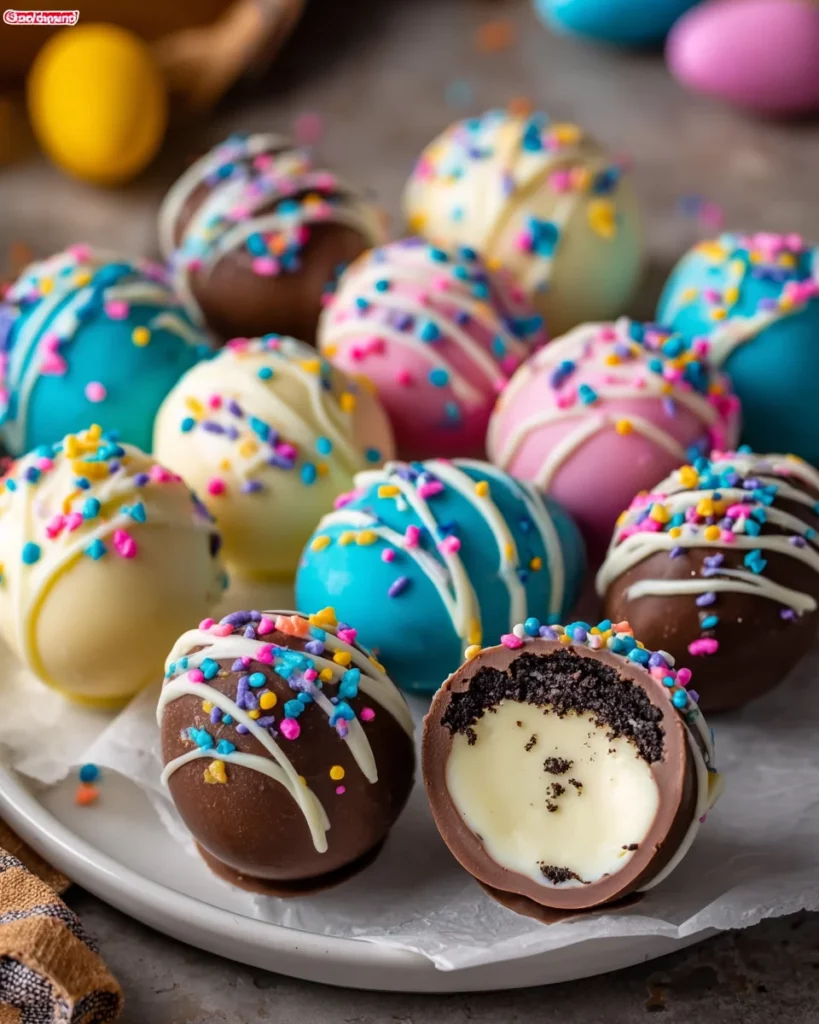
Ah, Easter! A time of renewal, joy, and of course, indulgent treats. I’ve always found myself caught up in the festive spirit, and what better way to celebrate than with these delightful Easter Egg Oreo Balls? They’re a crowd-pleaser, quick to whip up, and gather everyone around the kitchen, ready for some fun multitasking. Trust me, they’re perfect for busy moms and professionals looking for a sweet yet easy dessert. With creamy centers and colorful coatings, these no-bake goodies are bound to brighten your holiday gatherings and tantalize your taste buds!
Why You’ll Love This Easter Egg Oreo Balls
These Easter Egg Oreo Balls are not just simple to make; they are downright delightful! They require minimal effort yet deliver maximum flavor. Plus, they’re no-bake—perfect for those hectic days when time is scarce. Picture the joy on your loved ones’ faces as they bite into these rich, creamy treats. It’s a sweet way to create lasting memories without spending hours in the kitchen!

Ingredients for Easter Egg Oreo Balls
To make these delightful Easter Egg Oreo Balls, you’ll need a few key ingredients that come together to create pure bliss.
- Oreo cookies: The star of the show! These chocolatey cookies provide a rich, sweet base. They’re crushed into fine crumbs, giving your treats that signature cookie crunch.
- Cream cheese: This creates a rich and creamy filling, perfectly binding the Oreo crumbs. Ensure it’s softened for easy mixing—room temperature is key!
- White almond bark: A sweet coating that adds a smooth finish. If you’re looking for vibrant colors, choose colored candy melts instead.
- Colored candy melts: Perfect for adding a pop of color, these melts provide versatility in decorating your egg shapes. Choose festive colors that scream Easter!
- Easter sprinkles: These add the finishing touch, transforming your treats into festive masterpieces. The extra crunch and color bring delight to every bite!
For exact measurements, don’t forget to check the details at the bottom of the article and easily print them out. Happy baking!
How to Make Easter Egg Oreo Balls
Creating these delightful Easter Egg Oreo Balls is not only simple but also a fun activity for the whole family. Follow these clear steps to bring your delicious creations to life!
Step 1: Crush the Oreo Cookies
Start by crushing the Oreo cookies into fine crumbs. Use a food processor for a quick job, ensuring the pieces are finely ground. This texture is crucial; finer crumbs mix better with cream cheese and create a smooth filling.
Step 2: Mix with Cream Cheese
Next, grab your softened cream cheese. It should be at room temperature—this is key for blending. In a large mixing bowl, combine the cream cheese and cookie crumbs with a hand mixer. Mix until everything is fully blended, and the mixture forms a dough-like consistency.
Step 3: Form Egg Shapes
Now comes the fun part: shaping your mixture. Use a 1 ½ tablespoon scoop to help portion your treats. Roll them into egg shapes, which adds that festive flair. Don’t stress—perfection isn’t required! Just ensure they’re similar in size for even coating later on.
Step 4: Freeze for Firmness
Once shaped, place the eggs on a parchment paper-lined sheet pan and pop them in the freezer for about 30 minutes. This step is essential; it helps the ball retain their shape during the final coating process. Trust me, you’ll appreciate this little wait!
Step 5: Melt the Coating
Now, it’s time to melt the almond bark—or, if you prefer, your colorful candy melts. Pour your choice into a microwave-safe bowl and heat in 30-second increments. Stir in between to avoid burning. It should come out smooth and ready for dipping.
Step 6: Dip and Decorate
With the melted coating ready, it’s time to dip! Use two forks to carefully lower each egg into the chocolate. Lift it out, allowing excess coating to drip off. Here’s a pro tip: sprinkle your Easter sprinkles immediately while the chocolate is still wet. This way, they stick beautifully!
Step 7: Storage Options
Finally, once decorated, enjoy your lovely Easter Egg Oreo Balls right away or store them in an airtight container. Place them in the fridge to keep them fresh. If there are leftovers (though I doubt it), they can last about a week—a sweet treat to return to!
Tips for Success
- Ensure your cream cheese is softened for easy mixing and a smooth filling.
- Take your time melting the chocolate to prevent burning—patience is key!
- Use a mini ice cream scoop for uniform egg shapes—your treats will look professional!
- Don’t skip the freezing step; it helps maintain shape during dipping.
- Feel free to mix and match colors of your candy melts for fun designs!
Equipment Needed for Easter Egg Oreo Balls
- Food processor: Use a rolling pin and a zip-top bag if you don’t have one.
- Mixing bowl: Any large bowl will do—just ensure it’s easy to mix.
- Hand mixer: A sturdy spatula works too, though it requires more elbow grease.
- Parchment paper: You can substitute with wax paper if needed.
- Microwave-safe bowl: A regular bowl can work for stovetop melting, too.
Variations of Easter Egg Oreo Balls
- Peanut Butter Oreo Balls: Substitute half the cream cheese with creamy peanut butter for a nutty twist. Unleash a delicious flavor that peanut butter lovers will adore!
- Mint Chocolate Oreo Balls: Add a few drops of peppermint extract to the cream cheese mixture. This will give your treats a refreshing minty flavor—perfect for spring!
- Gluten-Free Option: Use gluten-free Oreo cookies to make these treats suitable for those with gluten sensitivities. Everyone can join the fun!
- Vegan Version: Swap cream cheese with vegan cream cheese and choose dairy-free chocolate for a plant-based delight. Vegan never tasted so good!
- Fruit-Infused Balls: Mix in finely chopped dried fruit such as cranberries or cherries to add a chewy texture and a burst of fruity flavor. Delightfully sweet!
Serving Suggestions for Easter Egg Oreo Balls
- Serve on a decorative platter, arranged in a colorful display to impress guests.
- Pair with a refreshing fruit salad—think strawberries and blueberries for a vibrant contrast.
- For drinks, a sweet iced tea or a light sparkling lemonade complements these treats perfectly.
- Consider a chocolate fondue fountain for a fun dipping option—kids will love it!
FAQs about Easter Egg Oreo Balls
Can I make these Easter Egg Oreo Balls ahead of time?
Absolutely! These delightful treats can be made a day or two in advance. Just store them in an airtight container in the fridge to keep them fresh and ready to impress!
What can I use instead of cream cheese?
If you’re looking for a dairy-free option, vegan cream cheese works wonderfully. You can also experiment with mascarpone for a different flavor, though it tends to be richer.
How do I store leftover Easter Egg Oreo Balls?
Keep any leftovers in an airtight container in the refrigerator. They should stay fresh for about a week, but I doubt they’ll last that long!
Can I customize the colors of the chocolate coating?
Definitely! Feel free to mix and match different colored candy melts for a festive look. You’ll have a rainbow of options to choose from!
Are Easter Egg Oreo Balls gluten-free?
Yes, if you use gluten-free Oreo cookies, these treats can be enjoyed by everyone. It’s a great way to share the sweet joy without worry!
Final Thoughts
Creating these Easter Egg Oreo Balls is more than just whipping up a tasty treat; it’s about sharing joy and laughter with loved ones. Picture your family gathered around the kitchen, smiles on their faces, as they help shape and decorate these delights. The vibrant colors, the sweet aroma, and the delicious flavors bring warmth to any gathering. Plus, they’re effortless, making them the perfect choice for busy moms and professionals. So, this Easter, let these charming little treats add a sprinkle of joy to your celebrations, creating fond memories that will linger long after the last bite!
Print
Easter Egg Oreo Balls
- Total Time: 50 minutes
- Yield: Approximately 24 egg-shaped balls 1x
- Diet: Vegetarian
Description
Delicious Easter-themed treats made with Oreo cookies and cream cheese, shaped like eggs and covered in chocolate.
Ingredients
- 8 ounces cream cheese, softened
- 19.1 ounces Oreo cookies
- White almond bark
- Colored candy melts
- Easter sprinkles
Instructions
- Finely crush the Oreo cookies in a food processor until they form crumbs.
- In a large mixing bowl, combine the cookie crumbs and softened cream cheese using a hand mixer until fully blended.
- Using a 1 ½ tablespoon scoop, form the mixture into balls and carefully shape into egg forms. Place the eggs on a parchment paper-lined sheet pan.
- Place the shaped eggs in the freezer for 30 minutes to set.
- Melt almond bark or colored candy melts in a microwave-safe bowl in 30-second increments until smooth.
- Using 2 forks, dip each egg into the melted chocolate and gently shake off any excess before placing back on parchment paper.
- Sprinkle Easter sprinkles over the eggs immediately while the chocolate is still wet. Repeat for all eggs.
- Serve the eggs immediately or refrigerate leftovers.
Notes
- Ensure the cream cheese is softened for easier mixing.
- For best results, do not rush the melting process of the chocolate.
- Experiment with different colored candy melts for variety.
- Prep Time: 20 minutes
- Cook Time: 0 minutes
- Category: Dessert
- Method: No-Bake
- Cuisine: American
Nutrition
- Serving Size: 1 egg
- Calories: 150
- Sugar: 10g
- Sodium: 60mg
- Fat: 8g
- Saturated Fat: 4g
- Unsaturated Fat: 2g
- Trans Fat: 0g
- Carbohydrates: 18g
- Fiber: 0g
- Protein: 2g
- Cholesterol: 20mg

