Easter Oreo Cookie Casserole

Introduction to Easter Oreo Cookie Casserole
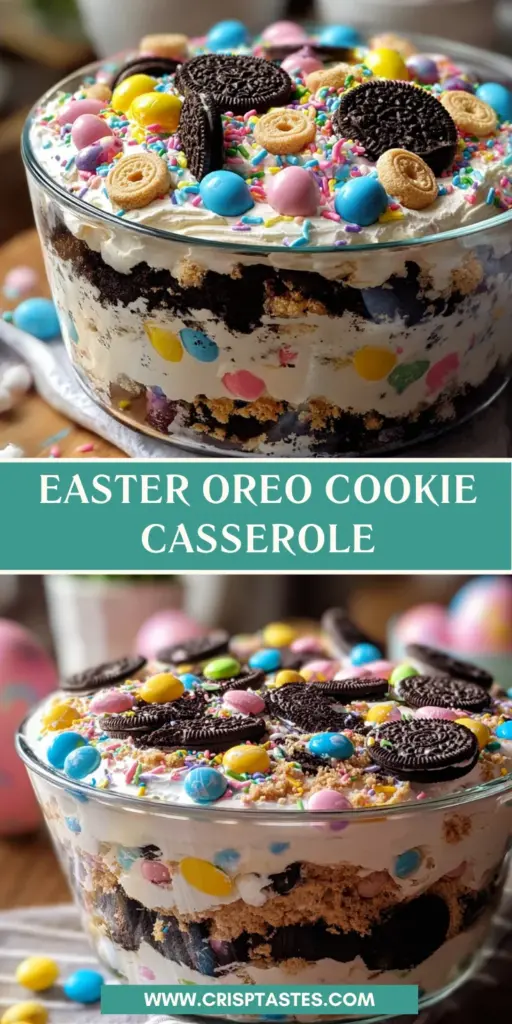
Ah, the joy of spring and the promise of Easter! As the flowers bloom and family gathers around, there’s nothing more delightful than an Easter Oreo Cookie Casserole to sweeten the occasion. This dessert isn’t just eye-catching with its colorful toppings; it’s a quick solution for busy moms like us who want to impress our loved ones without spending hours in the kitchen. The layers of crushed chocolate cookies, cream cheese, and creamy pudding make it a showstopper that everyone will love. Trust me, this is one treat that will bring smiles all around!
Why You’ll Love This Easter Oreo Cookie Casserole
This Easter Oreo Cookie Casserole is a dream come true for busy households.
With its quick prep time, you’ll have it ready to chill in just 20 minutes. Each creamy, dreamy bite hits the perfect balance of flavors, satisfying every sweet tooth at the table. Plus, it’s always a hit with kids and adults alike, making family gatherings a little sweeter and a lot more memorable. Who wouldn’t love that?
Ingredients for Easter Oreo Cookie Casserole
To create this delightful Easter Oreo Cookie Casserole, you’ll need a few simple ingredients that blend together beautifully. Don’t worry; I’ll share the exact measurements at the end for your convenience. Here’s what you’ll need:
- Chocolate sandwich cookies: The star of the show! These offer a rich, chocolatey base. You can use regular Oreos or opt for golden Oreos for a unique twist.
- Cream cheese: This adds a smooth, creamy texture. Make sure it’s softened for easy mixing.
- Unsalted butter: Just a bit of butter brings richness and enhances the cream cheese layer’s texture.
- Powdered sugar: This sweetener adds a lovely sweetness and helps create a fluffy filling.
- Instant vanilla pudding mix: This is the secret to achieving a perfectly creamy layer without cooking. You can swap it for lemon or cheesecake-flavored pudding for a delicious twist!
- Cold milk: Essential for the pudding! Use your favorite type, whether it’s whole, almond, or oat milk.
- Whipped topping: Adds lightness to the filling and a lovely finish on top. Feel free to use a homemade version or store-bought.
- Pastel-colored candy-coated chocolates: These are for decoration, bringing a pop of color and fun. Think M&Ms or seasonal candy eggs!
- Mini chocolate sandwich cookies: Great for garnishing and adding extra crunch on top.
You’ll find the specific measurements below the article for printing, so you won’t have to worry about scribbling everything down while you cook. Happy baking! This delightful treat will not only keep your kitchen vibrant but will also make your Easter table look stunning.
How to Make Easter Oreo Cookie Casserole
Creating your Easter Oreo Cookie Casserole is simpler than you might think! Follow these straightforward steps, and soon you’ll have a delightful dessert ready to impress. Let’s dive right in!
Step 1: Prepare the Crust
Start by crushing those chocolate sandwich cookies. You can use a food processor for a fine crumb, or if you’re like me, grab a zip-top bag and use a rolling pin. It’s oddly satisfying!
Once crushed, set aside about half a cup for garnishing later. Press the remaining crumbs firmly into the bottom of a 9×13-inch dish to create a solid crust. This layer holds everything together and adds a rich flavor.
Step 2: Make the Cream Cheese Layer
In a large mixing bowl, beat together the softened cream cheese, butter, and powdered sugar. You want this mixture to be super smooth and fluffy—think clouds of deliciousness!
Use an electric mixer for the best results. Whip it for about two minutes, scraping the bowl as needed. You’ll know it’s ready when it’s light and airy. This creamy layer is the heart of the casserole.
Step 3: Prepare the Pudding
In a separate bowl, whisk together the instant vanilla pudding mix and cold milk. I find it’s best to use a whisk for a couple of minutes to make sure it thickens properly. Your pudding should be thick but not too stiff, like a lovely mousse.
Step 4: Combine Layers
Now, carefully fold the pudding into your fluffy cream cheese mixture. This is where magic happens! Use a spatula to gently combine them without losing that light texture.
Next, spread this delightful mixture evenly over your crust. Take your time; an even layer makes each square of dessert beautifully tempting!
Step 5: Top and Decorate
Spread the remaining whipped topping over the cream cheese layer. This will give you a lovely creamy exterior that’s both beautiful and delicious!
Now, sprinkle the reserved cookie crumbs, along with the pastel-colored candy-coated chocolates and mini chocolate sandwich cookies on top. The colors will pop, making this casserole perfect for Easter!
Step 6: Chill and Serve
Cover your masterpiece and chill it in the fridge for at least two hours. If you can wait overnight, that’s even better! Chilling allows the flavors to meld and the layers to set perfectly.
When you’re ready to serve, slice into 12 squares. You can plate them with a few extra candies on the side for a fun touch. Enjoy this delightful Easter Oreo Cookie Casserole with your loved ones!
Tips for Success
- Chilling the casserole overnight enhances flavor and texture, so plan ahead!
- For a firmer crust, consider popping the crust into the fridge while you prepare the filling.
- Use a rubber spatula when folding ingredients to maintain airiness.
- Don’t skip the reserved cookie crumbs; they add a lovely crunch!
- Feel free to customize with your favorite seasonal candies for variety!
Equipment Needed
- Mixing Bowls: Use a large bowl for mixing; a medium bowl is handy for pudding.
- Electric Mixer: Ideal for creating a fluffy cream cheese mixture; a whisk works too!
- 9×13-inch Dish: This is perfect for layering your casserole; any comparable dish will do.
- Food Processor or Rolling Pin: For cookie crushing; both get the job done well.
Variations for Easter Oreo Cookie Casserole
- Golden Oreo Option: Swap regular chocolate Oreos for golden Oreos for a lighter flavor.
- Dairy-Free Delight: Use dairy-free cream cheese and coconut whipped topping for a lactose-free version.
- Fruit Options: Add fresh berries like strawberries or raspberries for a burst of freshness and color.
- Nutty Twist: Incorporate chopped nuts, like pecans or walnuts, into the crust for extra crunch.
- Flavor Fusion: Experiment with different pudding flavors—try chocolate or strawberry for a unique spin.
Serving Suggestions for Easter Oreo Cookie Casserole
- Presentation: Serve squares on colorful dessert plates for a festive touch.
- Pair with Fresh Fruit: Fresh strawberries or blueberries complement the sweetness beautifully.
- Accompany with Drinks: Light, fruity beverages like lemonade or sparkling water balance the dessert well.
- Top with Whipped Cream: A dollop of whipped cream adds an extra layer of deliciousness.
- Garnish: Scatter a few extra pastel candies around each plate for a cheerful finish.
FAQs about Easter Oreo Cookie Casserole
Can I make Easter Oreo Cookie Casserole ahead of time?
Absolutely! This casserole is perfect for making a day in advance. Chilling it overnight enhances the flavors and allows the layers to set beautifully.
Can I use different types of cookies for the crust?
Yes! While chocolate sandwich cookies are traditional, feel free to experiment with other cookies like graham crackers or even flavored cookie varieties. The idea is to create a base that complements the creamy layers.
How long can I store leftover casserole?
If you have any leftovers (though I doubt it!), store them in the refrigerator for up to three days. Just be sure to cover it tightly to keep it fresh!
Is this recipe suitable for kids?
Definitely! Kids love the colors and the sweet flavors. Just be mindful of any allergies, and feel free to adjust the candies for a less sugary treat.
What can I substitute for the cream cheese?
If you’re looking for a non-dairy option, use a vegan cream cheese. This will maintain the creamy texture while keeping it suitable for those with dietary restrictions.
Final Thoughts
This Easter Oreo Cookie Casserole isn’t just a dessert; it’s a celebration of flavors, memories, and good times spent with family.
As you gather around the table, this delightful treat will surely ignite joy and laughter among your loved ones.
The vibrant colors and creamy layers make it not only a feast for the taste buds but a visual treat as well.
With its simplicity and deliciousness, you’ll create treasured moments that last far beyond the last crumb.
So roll up your sleeves and dive into this easy recipe; it brings happiness to any Easter gathering!
Print
Easter Oreo Cookie Casserole
- Total Time: 2 hours 20 minutes
- Yield: 12 servings 1x
- Diet: Vegetarian
Description
Easter Oreo Cookie Casserole is a delightful dessert that combines layers of crushed chocolate cookies, cream cheese, and a rich vanilla pudding filling, topped with colorful candies.
Ingredients
- 1 package (14 oz) chocolate sandwich cookies, finely crushed
- 8 oz cream cheese, softened
- ¼ cup unsalted butter, softened
- 1 cup powdered sugar
- 1 package (3.4 oz) instant vanilla pudding mix
- 2 cups cold milk
- 8 oz whipped topping, thawed
- 1 cup pastel-colored candy-coated chocolates (like M&Ms or candy eggs)
- ½ cup mini chocolate sandwich cookies for garnish
Instructions
- Prepare the Crust: Crush the cookies using a food processor or a zip-top bag and rolling pin. Set aside ½ cup for topping. Press the remaining crumbs into the bottom of a 9×13-inch dish to form a crust.
- Make the Cream Cheese Layer: In a large mixing bowl, beat together the cream cheese, butter, and powdered sugar until smooth and fluffy.
- Prepare the Pudding: In a separate bowl, whisk the vanilla pudding mix with cold milk for 2 minutes, or until thickened.
- Combine Layers: Fold the pudding into the cream cheese mixture, then gently fold in half of the whipped topping. Spread the mixture evenly over the crust.
- Top and Decorate: Spread the remaining whipped topping over the cream layer. Sprinkle the reserved cookie crumbs, pastel candies, and mini sandwich cookies on top.
- Chill and Serve: Cover and chill for at least 2 hours, or overnight for best results. Slice into 12 squares and serve chilled.
Notes
- For a firmer crust, chill the base while preparing the filling.
- Substitution Ideas: Use golden Oreos for a vanilla twist or swap vanilla pudding for lemon or cheesecake flavor.
- Prep Time: 20 minutes
- Cook Time: 0 minutes
- Category: Dessert
- Method: Chilled
- Cuisine: American
Nutrition
- Serving Size: 1 square
- Calories: 250
- Sugar: 16g
- Sodium: 150mg
- Fat: 12g
- Saturated Fat: 5g
- Unsaturated Fat: 7g
- Trans Fat: 0g
- Carbohydrates: 32g
- Fiber: 1g
- Protein: 3g
- Cholesterol: 20mg