Easter Rice Krispie Bars: A Fun Treat for the Holiday!

Introduction to Easter Rice Krispie Bars
As Easter approaches, finding a quick and delightful treat can feel like a sprint in a marathon. That’s where these Easter Rice Krispie Bars come in, bringing joy without the fuss!
Picture this: you’re bustling around, preparing for family visits, and need something that’ll grab attention and tastebuds alike. These bars are a perfect answer. They’re a sweet treat that captures the spirit of the holiday—easy to make, festive, and oh-so-delicious! Plus, they’ll make your little ones squeal with joy. Trust me, these bars are bound to impress!
Why You’ll Love This Easter Rice Krispie Bars
These Easter Rice Krispie Bars are a lifesaver for busy moms and professionals alike. They come together in just 20 minutes, making them a perfect last-minute treat! With their crispy texture, gooey marshmallows, and vibrant candies, they hit all the right notes. Plus, they’re a hit with kids and adults, delighting everyone at the table. Trust me, your holiday celebrations will sparkle with this delightful dessert!
Ingredients for Easter Rice Krispie Bars
Gathering your ingredients is part of the fun! Here’s what you’ll need to whip up these fabulous Easter Rice Krispie Bars:
- Rice Krispies cereal: The star of the show! They provide the perfect crunch that complements the gooey marshmallows.
- Mini marshmallows: These little puffs create that ooey-gooey texture we all love. They melt beautifully, coating the cereal perfectly.
- Unsalted butter: A humble but essential ingredient that adds richness. I prefer unsalted; it lets you control the flavor without extra salt.
- Vanilla extract: Just a splash enhances the flavor. It adds warmth and sweetness, making your bars taste homemade and special.
- Pastel-colored candy-coated chocolate eggs: These cheerful candies give a delightful pop of color and sweetness to your bars. Feel free to get creative with other Easter-themed candies if you like!
If you’re feeling adventurous, you can play around with optional ingredients! For instance, almond or coconut extracts can add unique twists to your bars. Need to make a gluten-free version? Swap in some gluten-free crispy rice cereal! Also, check the pantry for other festive treats; it’s a great way to personalize your recipe.
And don’t worry! Exact quantities are listed at the bottom, ready for printing to make your cooking experience as breezy as a spring day.

How to Make Easter Rice Krispie Bars
Now that you have everything ready, let’s dive into making these delightful Easter Rice Krispie Bars! It’s a simple process that I promise will have your kitchen smelling heavenly.
Step 1: Prepare Your Baking Dish
Start by greasing a 9×13-inch baking dish with butter or non-stick spray. This step is essential! It prevents the bars from sticking, ensuring you can easily cut them later. The last thing you want is a tasty treat that won’t release itself from the pan!
Step 2: Melt the Butter
In a large pot, melt the unsalted butter over low heat. This is crucial because high heat can cause butter to brown or scorch. You’ll know it’s melted when it becomes liquid and starts to bubble a bit around the edges. Just keep an eye on it to avoid that sneak attack of burnt flavor!
Step 3: Add Marshmallows
Once the butter is melted, add in the mini marshmallows. Keep stirring continuously! This ensures they melt evenly without any lumps. When they become smooth and creamy, you know you’re ready for the next step. I find this process mesmerizing, like a cooking ballet on the stovetop!
Step 4: Mix in Vanilla
Now, remove the pot from heat and quickly stir in your splash of vanilla extract. This is the magic touch that makes everything taste extra special. It enhances the sweetness and adds depth to the flavor, transforming these bars into a homemade masterpiece!
Step 5: Combine with Rice Krispies
Next, it’s time to introduce the Rice Krispies. Gently fold in the cereal with a spatula, coating each piece with the marshmallow mixture. Use a light hand to ensure you don’t crush the cereal. You want them crispy and airy, not mushy!
Step 6: Add Candy
Now, fold in half of your colorful pastel candy-coated chocolate eggs or other festive candies. This adds that pop of color and sweetness to your bars. Reserve the other half for the top, which brings a joyful, celebratory vibe to your creation!
Step 7: Press into the Dish
Transfer the mixture into your greased baking dish. To make this easier, I like to use a buttered spatula or a piece of wax paper. Press it down evenly, making sure to pack it in nicely. This will help create solid bars that won’t crumble when cut!
Step 8: Add Final Touches
Sprinkle the remaining candies on top and press them in gently. This not only makes the bars visually appealing but also gives each bite extra sweetness. Kids especially love discovering those colorful surprises!
Step 9: Cool and Cut
Allow the bars to cool at room temperature for about 30 minutes. Once they are set and firm to the touch, it’s time to cut them into squares. Use a sharp knife, and for cleaner edges, lightly butter the blade. I get so excited seeing my creations come to life!
Tips for Success
- Use fresh ingredients for the best flavor—especially the marshmallows!
- Mix the cereal gently; you want to keep that delightful crunch intact.
- Experiment with different holiday candies for a unique twist, like jelly beans or chocolate bunnies.
- Keep a pot of hot water nearby to easily clean sticky utensils.
- Store any leftovers in an airtight container for up to a week.
Equipment Needed for Easter Rice Krispie Bars
- Large pot: Any heavy-bottomed pot works, even a classic saucepan.
- Baking dish: A 9×13-inch dish is ideal, or you can use a similar-sized dish.
- Spatula: A rubber spatula is great, but a wooden spoon can also do the trick.
- Wax paper: If you don’t have it, parchment paper is a suitable substitute.
- Sharp knife: Vital for cutting the bars smoothly; a buttered knife helps!
Variations of Easter Rice Krispie Bars
- Chocolate-Dipped Bars: After cutting the bars, dip half of each square in melted chocolate for an indulgent treat!
- Nutty Crunch: Add chopped nuts like almonds or pecans for an extra layer of flavor and crunch.
- Fruit Flavored: Replace a portion of the marshmallows with fruit-flavored ones for a burst of fruity goodness.
- Gluten-Free Option: Swap regular Rice Krispies with gluten-free crispy rice cereal for a gluten-free delight.
- Colorful Swirls: Drizzle melted colored candy melts over the top to create a fun, vibrant design.
Serving Suggestions for Easter Rice Krispie Bars
- Pair these bars with a refreshing glass of lemonade or iced tea for a delightful contrast.
- Serve them on a colorful platter to add a festive touch to your Easter table.
- Consider adding a scoop of vanilla ice cream on the side for an indulgent treat!
- Wrap individual bars in festive cellophane for a fun party favor.
- For a springtime vibe, garnish with fresh fruit or edible flowers.
FAQs about Easter Rice Krispie Bars
Got questions? I’ve got answers! Here are some common queries about these delightful Easter Rice Krispie Bars that can help you whip them up with ease.
Can I make Easter Rice Krispie Bars ahead of time?
Absolutely! These bars stay fresh for about a week when stored in an airtight container. Just let them cool completely before sealing them up. They’re perfect for making in advance to free up time for last-minute holiday preparations!
What can I use instead of butter?
If you’re looking for a dairy-free option, coconut oil works beautifully as a substitute. It adds a subtle flavor too! Just melt it the same way you would butter.
Can I use other candies apart from chocolate eggs?
You certainly can! Feel free to swap in your favorite Easter candies, like jelly beans or chocolate bunnies. The more colorful, the better! Get creative and have fun with it.
How do I store leftover bars?
To keep your bars fresh, store them in an airtight container at room temperature. If they begin to harden, you can pop them in the microwave for a few seconds to soften them up before enjoying!
What if my bars turn out too sticky?
If your Rice Krispie Bars are overly sticky, you may not have added enough Rice Krispies. Ensure they are all coated evenly, and remember, a little stickiness is normal. You can enjoy that gooey goodness!
Final Thoughts on Easter Rice Krispie Bars
There’s truly something magical about the joy these Easter Rice Krispie Bars bring to your table. They are more than just a treat; they become a moment of celebration and togetherness. With their vibrant colors and gooey goodness, they spark smiles and laughter, creating lasting memories with family and friends. I love how they’re not just easy to make but also a fun activity for the kids. So, embrace the spirit of Easter and whip up a batch of these delicious bars. You’ll find that the real treasure is the joy they bring to every bite!
Print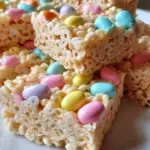
Easter Rice Krispie Bars
- Total Time: 40 minutes
- Yield: 12 servings 1x
- Diet: Vegetarian
Description
A fun and festive treat perfect for Easter celebrations, made with crunchy Rice Krispies, gooey marshmallows, and colorful chocolate candies.
Ingredients
- 6 cups Rice Krispies cereal
- 4 cups mini marshmallows
- 3 tablespoons unsalted butter
- 1 teaspoon vanilla extract
- 1/2 cup pastel-colored candy-coated chocolate eggs or Easter-themed candies
Instructions
- Grease a 9×13-inch baking dish with butter or non-stick spray.
- In a large pot, melt the butter over low heat.
- Add the mini marshmallows and stir continuously until fully melted and smooth.
- Remove the pot from heat and stir in the vanilla extract.
- Immediately add the Rice Krispies cereal and gently fold until the cereal is evenly coated with the marshmallow mixture.
- Quickly fold in half of the pastel-colored candy-coated eggs or Easter candies.
- Transfer the mixture to the prepared baking dish and press it down evenly using a buttered spatula or wax paper.
- Sprinkle the remaining candies on top and gently press them into the bars.
- Allow the bars to cool at room temperature for about 30 minutes before cutting into squares.
Notes
- For a different flavor, experiment with different extracts like almond or coconut.
- Store the bars in an airtight container to keep them fresh.
- These bars can be cut into various shapes using cookie cutters for fun presentations.
- Prep Time: 10 minutes
- Cook Time: 10 minutes
- Category: Dessert
- Method: Stovetop
- Cuisine: American
Nutrition
- Serving Size: 1 bar
- Calories: 150
- Sugar: 10g
- Sodium: 50mg
- Fat: 4g
- Saturated Fat: 2g
- Unsaturated Fat: 1g
- Trans Fat: 0g
- Carbohydrates: 25g
- Fiber: 0g
- Protein: 1g
- Cholesterol: 10mg