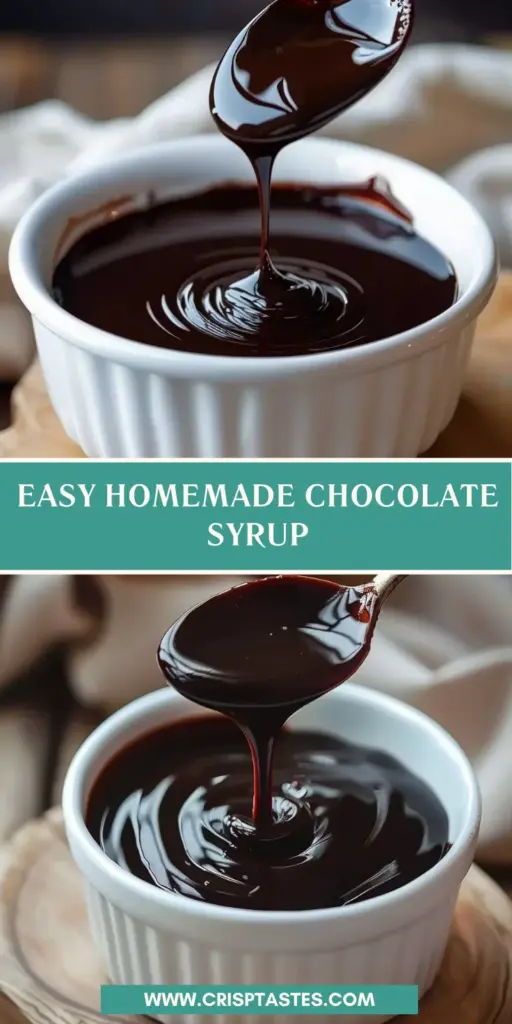
Easy Homemade Chocolate Syrup

Introduction to Easy Homemade Chocolate Syrup
As a busy mom, I understand the struggle of juggling family, work, and a thousand other responsibilities. That’s where this Easy Homemade Chocolate Syrup comes in like a sweet embrace. In just 15 minutes, you can whip up a delicious syrup that transforms ordinary snacks into delightful treats. Imagine drizzling this rich chocolate goodness over ice cream after a long day or stirring it into your morning coffee for a touch of indulgence. It’s a simple solution to elevate any dessert, keeping smiles around your dinner table. Let’s get started!
Why You’ll Love This Easy Homemade Chocolate Syrup
This Easy Homemade Chocolate Syrup is not just a recipe; it’s a lifesaver for those busy evenings. It’s incredibly quick and requires minimal ingredients you likely have on hand. The taste? Absolutely divine! You’ll find it’s richer than store-bought versions. Plus, you can tweak the sweetness to fit your family’s preferences. In just 15 minutes, you bring joy to the table—what’s not to love?
Ingredients for Easy Homemade Chocolate Syrup
Gathering your ingredients is the first step toward creating this luscious Easy Homemade Chocolate Syrup. Here’s what you’ll need:
- Unsweetened cocoa powder: This is where the chocolate flavor comes from. Choose a high-quality brand for the best results.
- Granulated sugar: Essential for sweetness, it balances out the bitterness of the cocoa. You can swap it for brown sugar for a deeper flavor.
- Water: The magic ingredient that binds everything together. Using filtered water can enhance the overall taste.
- Salt: Just a pinch! It helps to deepen the flavors, making the chocolate taste even more intense.
- Vanilla extract: This is the secret weapon that adds warmth and depth to the syrup. Go for pure vanilla for a richer flavor.
If you’re feeling adventurous, you might try adding a splash of espresso powder or a hint of cinnamon for an unexpected twist.
Remember, the exact quantities for these ingredients are provided at the bottom of the article for easy printing!
How to Make Easy Homemade Chocolate Syrup
Making your own Easy Homemade Chocolate Syrup at home is as delightful as it sounds. Follow these simple steps, and soon you’ll have a jar of syrup that brings joy to every dessert. Let’s dive right in!
Step 1: Whisk Cocoa Powder and Sugar
In a medium saucepan, start by whisking together the unsweetened cocoa powder and granulated sugar. Combining these dry ingredients well is crucial for maximum flavor. It prevents clumps and ensures a smooth syrup. Your elbow grease here pays off when you taste that rich chocolatey goodness!
Step 2: Add Water Gradually
Next, slowly pour in the water while continuing to whisk. This step is important because adding water too quickly can create lumps. You want a silky, smooth mixture. Just picture it flowing like a chocolate river, ready to become a delicious topping!
Step 3: Heat and Stir
Now, place the saucepan over medium heat. Bring the mixture to a gentle boil while stirring constantly. This ensures everything merges beautifully without burning. I can’t count how many times I’ve ended up with burnt chocolate because I got distracted. So, keep your eyes on the prize—and the pot!
Step 4: Simmer for Thickness
Once boiling, reduce the heat and let it simmer for 3 to 5 minutes. This is the magical phase where your syrup thickens, transforming into that luscious consistency we all love. Keep stirring to avoid any sticky surprises on the bottom of your saucepan!
Step 5: Stir in Vanilla
Remove the saucepan from heat and stir in the vanilla extract. Ah, the aroma! This simple addition elevates the syrup, adding warmth and complexity to your chocolate creation. It’s like the cherry on top, only better!
Step 6: Cool and Store
Finally, let the syrup cool to room temperature before storing it in an airtight container. You’ll want to keep it in the refrigerator, where it’ll be good for a couple of weeks. And trust me, you’ll be tempted to drizzle it on everything—don’t say I didn’t warn you!
Tips for Success
- Use a whisk instead of a spoon to achieve a better blend of ingredients.
- Keep the heat moderate to prevent burning—your syrup deserves gentle treatment!
- For a thicker syrup, simmer a bit longer; just keep stirring away!
- Taste as you go! Adjust the sweetness to make it perfect for your family.
- Store in a glass jar for easy pouring and a touch of homemade charm.
Equipment Needed
- Medium saucepan: A versatile pan you likely already have; a small pot works too!
- Whisk: Essential for blending ingredients; a fork can be an acceptable substitute.
- Measuring cups: To ensure your ratios are spot-on; a kitchen scale is handy as well.
- Airtight container: For storage; any clean jar will do beautifully.
Variations
- Dark Chocolate Delight: Use dark cocoa powder for a richer, more decadent flavor that chocolate lovers will adore.
- Message of Health: Substitute granulated sugar with agave syrup or honey for a natural sweetener vibe.
- Mocha Magic: Add a teaspoon of espresso powder for that coffee-chocolate kick that makes everything better.
- Spiced Cocoa: Mix in a pinch of cinnamon or cayenne pepper for a warming twist—perfect for chilly nights!
- Vegan Version: Stick to this recipe as it is already vegan-friendly, but ensure your cocoa powder and vanilla are derived from non-animal products.
Serving Suggestions
- Drizzle over vanilla ice cream for an indulgent treat that kids and adults can’t resist.
- Mix into milk or coffee for a deliciously sweet morning pick-me-up.
- Top pancakes or waffles with this syrup for a weekend breakfast that feels special.
- Use as a dip for fresh fruits, turning snack time into a delightful experience.
- Serve in a decorative bottle for a charming gift or party treat!
FAQs about Easy Homemade Chocolate Syrup
Here are some frequently asked questions about this Easy Homemade Chocolate Syrup that can help clarify any doubts. Let’s dive in!
Can I make this syrup sugar-free?
Absolutely! You can substitute granulated sugar with a sugar alternative like stevia or erythritol. Just remember to adjust the quantity according to the brand’s sweetness equivalence.
How long does the homemade chocolate syrup last?
This syrup can be stored in an airtight container in the refrigerator for up to two weeks. Just make sure it cools down completely before you seal it away!
Can I use this syrup in drinks?
Yes, indeed! This homemade chocolate syrup is perfect for flavoring coffees, milk, or even smoothies. It’s a wonderful way to add a touch of decadence to your beverages!
What if my syrup is too thick?
If your syrup turns out too thick, simply stir in a bit of warm water until you reach your desired consistency. Easy peasy!
Can I use flavored extracts instead of vanilla?
Definitely! Feel free to experiment with peppermint or almond extracts for a unique twist. Just remember to use a smaller amount, as flavored extracts tend to be stronger.
Final Thoughts
Creating your own Easy Homemade Chocolate Syrup is more than just whipping up a treat; it’s about crafting joy and memories in your kitchen. Each time you drizzle it over desserts, you’re sharing love with family and friends. The rich aroma, the smooth texture, and the ability to customize it for every taste make it a delightful addition to any pantry. It’s quick, fun, and oh-so-rewarding! So, roll up your sleeves and embrace the sweet adventure. You’ll find that this syrup not only elevates desserts but also sparks joy in everyday moments.
Print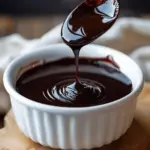
Easy Homemade Chocolate Syrup
- Total Time: 15 minutes
- Yield: 1 1/2 cups 1x
- Diet: Vegetarian
Description
A simple and delicious recipe for homemade chocolate syrup that can be used for desserts, ice cream, and more.
Ingredients
- 1/2 cup unsweetened cocoa powder
- 1 cup granulated sugar
- 1 cup water
- 1/8 teaspoon salt
- 1 teaspoon vanilla extract
Instructions
- In a medium saucepan, whisk together the cocoa powder, sugar, and salt until evenly combined.
- Slowly add the water while continuing to whisk until the mixture is smooth.
- Place the saucepan over medium heat and bring the mixture to a boil, stirring constantly.
- Let it simmer for 3–5 minutes until slightly thickened.
- Remove from heat and stir in the vanilla extract.
- Allow the syrup to cool to room temperature before storing.
Notes
- This chocolate syrup can be stored in an airtight container in the refrigerator for up to 2 weeks.
- Feel free to adjust the sweetness according to your preference.
- Prep Time: 5 minutes
- Cook Time: 10 minutes
- Category: Dessert
- Method: Stovetop
- Cuisine: American
Nutrition
- Serving Size: 2 tablespoons
- Calories: 95
- Sugar: 20g
- Sodium: 30mg
- Fat: 0g
- Saturated Fat: 0g
- Unsaturated Fat: 0g
- Trans Fat: 0g
- Carbohydrates: 23g
- Fiber: 1g
- Protein: 1g
- Cholesterol: 0mg