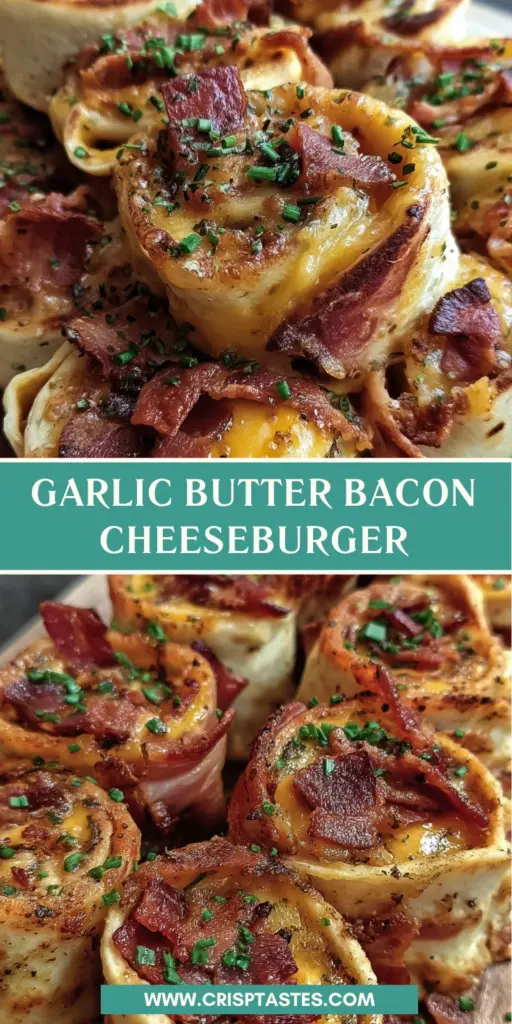
Garlic Butter Bacon Cheeseburger

Introduction to Garlic Butter Bacon Cheeseburger
Hey there, fellow food lovers! If you’re looking for a quick and satisfying meal that will impress your family, let me introduce you to the Garlic Butter Bacon Cheeseburger. This recipe bursts with savory flavors and a perfectly crispy finish, making it a standout dish. As a busy mom myself, I understand how crucial it is to whip up something delicious without spending hours in the kitchen. Whether it’s a weeknight dinner or a snack for game day, these cheeseburger rollups have got you covered. Trust me, your taste buds are in for a treat!
Why You’ll Love This Garlic Butter Bacon Cheeseburger
This Garlic Butter Bacon Cheeseburger recipe is a lifesaver for busy schedules. It combines quick prep with mouthwatering flavors that will keep everyone coming back for more. Just imagine biting into a warm rollup, the gooey cheese mingling with crispy bacon and zesty garlic butter. With only 30 minutes from start to finish, you get a spectacular meal with minimal hassle. It’s truly an effortless way to elevate your family dinners!
Ingredients for Garlic Butter Bacon Cheeseburger
To make these delightful Garlic Butter Bacon Cheeseburger rollups, you’ll need a handful of everyday ingredients that are bursting with flavor!
- Unsalted butter: This adds the rich, creamy base for our garlic butter. Using unsalted allows you to control the seasoning better.
- Garlic: Minced garlic infuses the rollups with zesty flavor. It’s simply magical when combined with butter!
- Dried parsley: This aromatic herb enhances the garlic flavor while adding a pop of color.
- Salt: A dash emphasizes all the other wonderful tastes in this recipe, enhancing the overall experience.
- Black pepper: Just a sprinkle adds a little kick and balances out the richness of the butter and cheese.
- Flour tortillas: The cozy wrap for all of our delicious fillings. Choose large ones for the perfect fit!
- Bacon: Crispy, crumbled bacon brings in the savory, salty goodness. You could substitute with turkey bacon or a vegetarian option for an alternative flavor.
- Cheddar cheese: This melty delight adds sharpness and richness. It’s the ultimate cheeseburger companion!
- mozzarella cheese: Known for its gooey texture, mozzarella ensures that every bite is cheesy and delicious.
- Chopped fresh chives (optional): These bring an oniony punch. If you’re feeling fancy, go for it!
For exact quantities, just scroll down to the end of the article where you can find it all neatly printed for you!
How to Make Garlic Butter Bacon Cheeseburger
Ready to dive into this flavor explosion? Making these Garlic Butter Bacon Cheeseburger rollups is as easy as pie. Follow these simple steps, and you’ll be on your way to a meal that’s downright irresistible!
Step 1: Prepare the Garlic Butter Mixture
First, it’s all about that garlic butter! In a small bowl, combine the melted unsalted butter with minced garlic, dried parsley, salt, and black pepper. Mix well until everything is beautifully blended. The aroma will have your taste buds dancing already!
Step 2: Preheat the Oven
Now, let’s get that oven ready! Preheat it to 375°F (190°C). This temperature is perfect for crisping those tortillas while ensuring the cheese melts into gooey perfection. Trust me, this step is crucial for getting that delightful texture.
Step 3: Assemble the Tortillas
Grab your flour tortillas and lay them out on a flat surface. Next, brush each tortilla generously with your homemade garlic butter mixture. You want a nice, even coating—think of it as a warm hug for the tortilla!
Step 4: Add the Filling
Now for the fun part! Evenly sprinkle the crumbled crispy bacon over each buttered tortilla. Voilà! Next, add the shredded cheddar and mozzarella cheeses, letting those gooey, melty sensations begin. If you’re using chives, don’t forget to sprinkle those on top for that extra zing!
Step 5: Roll and Bake
Time to roll those beautiful creations! Starting from one end, tightly roll each tortilla into a spiral. This will keep all the deliciousness tucked inside. Place the rolled-up tortillas seam-side down on a baking sheet lined with parchment paper. Once they’re all lined up, brush the tops with any remaining garlic butter.
Bake for 12-15 minutes, or until your tortillas turn golden brown and the cheese bubbles with excitement. You’ll be tempted to peek, but I promise, waiting will be worth it!
Step 6: Cool and Slice
After baking, let your rollups cool for a few minutes. This helps everything set beautifully. Now, slice each rollup into bite-sized pieces and arrange them on a platter. They’re gorgeous and ready to be devoured!
Tips for Success
- Make sure to use room temperature butter for easier mixing.
- Don’t overfill the tortillas to prevent spills while rolling.
- Check your cheese for freshness for the best melt.
- For added flavor, consider toasting the tortillas in a pan before assembling.
- If time permits, let the rollups sit for an extra 10 minutes before baking for enhanced flavor.
Equipment Needed
-
- Baking sheet: A standard one works well, but you can use a roasting pan if you have a large batch.
- Parchment paper: Great for easy cleanup; aluminum foil can be a substitute.
- Brush: A kitchen brush helps apply the garlic butter; a spoon can work too!
- Knife: Essential for slicing the rollups before serving.
Variations
- For a spicy kick, add sliced jalapeños or a sprinkle of crushed red pepper flakes inside the tortilla.
- Swap out the meats and go vegetarian by using sautéed mushrooms and bell peppers instead of bacon.
- For a milder flavor, opt for cream cheese instead of cheddar and mozzarella for a rich, creamy filling.
- Make it gluten-free by using gluten-free tortillas and double-checking your bacon and cheese for gluten content.
- Try a barbecue twist by adding barbecue sauce to the garlic butter mix for a smoky flavor.
Serving Suggestions
- Pair these rollups with a fresh garden salad for a light, balanced meal.
- Serve with your favorite dipping sauces, like ranch or spicy ketchup, for an extra layer of flavor.
- Complement the dish with a chilled glass of iced tea or lemonade to quench your thirst.
- Arrange the rollups on a colorful platter, garnished with fresh herbs for an inviting look.
FAQs about Garlic Butter Bacon Cheeseburger
Let’s tackle some common questions about the Garlic Butter Bacon Cheeseburger rollups, shall we?
Can I make these rollups ahead of time?
Absolutely! You can prepare the rollups and store them in the fridge before baking. Just pop them in the oven when you’re ready to enjoy, and you’ll have fresh, warm bites in no time!
What if I don’t have garlic?
No garlic? No problem! You can try substituting with garlic powder or leave it out entirely. The rollups will still taste delicious without it!
Can I freeze the Garlic Butter Bacon Cheeseburger rollups?
Yes, they freeze beautifully! Just wrap them tightly in plastic wrap before placing them in an airtight container. When you’re ready to eat, bake them straight from the freezer, adding a few extra minutes to the cooking time.
Can I use different types of cheese?
Definitely! Experimenting with different cheeses can lead to delightful flavors. Try pepper jack for some heat, or cream cheese for a creamier texture. The sky’s the limit!
How can I make these rollups healthier?
To lighten things up, use whole wheat tortillas, turkey bacon, and reduced-fat cheese. You can also sneak in more veggies, like spinach or bell peppers, for added nutrition!
Final Thoughts
Making Garlic Butter Bacon Cheeseburger rollups is more than just cooking; it’s about creating a delightful experience for your family. The joy of biting into those warm, cheesy treasures is unmatched. I love how these rollups have a way of bringing smiles to everyone’s faces, and they often spark conversations around the dinner table. Whether it’s game day or a cozy weeknight meal, these rollups are a hit every time. Plus, knowing I can whip them up in just 30 minutes makes my heart happy. So, roll up your sleeves, and let’s dig into this delicious adventure together!
Print
Garlic Butter Bacon Cheeseburger
- Total Time: 30 minutes
- Yield: 6 servings 1x
- Diet: Gluten Free
Description
A delicious and savory rollup featuring garlic butter, crispy bacon, and melted cheese, baked to perfection.
Ingredients
- 1/4 cup unsalted butter, melted
- 2 cloves garlic, minced
- 1 teaspoon dried parsley
- 1/2 teaspoon salt
- 1/4 teaspoon black pepper
- 6 large flour tortillas
- 12 slices bacon, cooked and crumbled
- 1 cup shredded cheddar cheese
- 1/2 cup shredded mozzarella cheese
- 2 tablespoons chopped fresh chives (optional)
Instructions
- In a small bowl, combine the melted butter, minced garlic, dried parsley, salt, and black pepper. Mix well and set aside.
- Preheat your oven to 190°C (375°F).
- Lay out the flour tortillas on a flat surface.
- Brush each tortilla generously with the garlic butter mixture.
- Sprinkle the crumbled bacon evenly over each tortilla, followed by the shredded cheddar and mozzarella cheeses. Sprinkle with chopped chives, if using.
- Starting from one end, tightly roll up each tortilla into a spiral.
- Place the rolled-up tortillas seam-side down on a baking sheet lined with parchment paper.
- Brush the tops of the rollups with any remaining garlic butter.
- Bake for 12-15 minutes, or until the tortillas are golden brown and crispy, and the cheese is melted and bubbly.
- Remove the rollups from the oven and let them cool for a few minutes.
- Slice each rollup into bite-sized pieces and arrange them on a serving platter. Serve immediately and enjoy!
Notes
- Can substitute bacon with a vegetarian alternative for a different flavor.
- Experiment with different cheese combinations for varied taste.
- For a spicier version, add sliced jalapeños to the filling.
- Prep Time: 15 minutes
- Cook Time: 15 minutes
- Category: Appetizer
- Method: Baking
- Cuisine: American
Nutrition
- Serving Size: 1 rollup
- Calories: 250
- Sugar: 1g
- Sodium: 600mg
- Fat: 18g
- Saturated Fat: 9g
- Unsaturated Fat: 6g
- Trans Fat: 0g
- Carbohydrates: 20g
- Fiber: 1g
- Protein: 10g
- Cholesterol: 40mg