Ghost Garland: Create a Spooky Decor in 20 Minutes!

Introduction to Ghost Garland
Ah, Halloween–that time of spookiness, fun and, dare I say, creativity. If you are anything like me, trying to juggle family activities with decorating can be a bit overwhelming. That’s why I’m excited to share my quick and easy Ghost Garland with you. Within 20 minutes, you’ll be well on your way to a home that’s transformed into a festive haven, ready to welcome goblins and ghouls. Sweet decoration that is added to your space helps you to share a crafty moment with your kids or friends. So, let’s get started on this delightful DIY project!
Why You’ll Love This Ghost Garland
This isn’t just a quick little project – this is the gateway to creativity! These adorable decorations are joyful to make, with little effort going into them, which will bring a smile to anyone who sets eyes on them. This one’s for all of us busy moms – inject some seasonal flair without the fuss. And, of course, a great bonding craft to do with your kids and really ignite those imaginations! Seriously, what’s not to love?
Ingredients for Ghost Garland
Gather these simple ingredients to create your very own Ghost Garland. Each element plays a role in crafting this festive decoration:
- White fabric: Muslin or cheesecloth works beautifully to give that ethereal ghostly look. You can find these at fabric stores or online.
- Cotton balls: These are crucial for the ghost’s head. They’re lightweight and easy to find at pharmacies or craft stores.
- Black felt stickers, foam cutouts, or marker: This is what brings your ghost faces to life! Use felt for a little texture or a marker for a quick drawing.
- Twine or jute string: This will serve as the base for your garland and adds a rustic vibe. You can grab twine at craft stores or even reuse kitchen string.
- Mini clothespins: These adorable little clips will secure your ghosts in place on the twine. They’re available at craft stores or the dollar store.
- Glue: A little dab will do wonders to keep the cotton balls attached to the fabric. Any craft glue works fine!
- Scissors: You’ll need these to cut your fabric and create those cute ghost shapes. If you have fabric scissors, use them to make your cuts cleaner.
For specific quantities, check the recipe at the bottom of the article, which you can easily print out. Let’s gather our supplies and get crafting!
How to Make Ghost Garland
Make the Ghost
Creating your ghosts is the heart of this project! Start by cutting your white fabric into squares, about 8–10 inches each. This size gives your ghosts a flowing look. The next step is placing a cotton ball in the center of each square. Drape the fabric over the cotton ball, allowing it to flow down like a spooky specter. Remember, it doesn’t have to be perfect; a little imperfection adds character!
Once you have the fabric draped just right, lightly glue the cotton ball to the fabric. This anchor point prevents everything from collapsing. Let it sit for a moment, and voilà—you’ve made your first ghost! Repeat this process for as many ghosts as you want in your garland. Each will bring an adorable charm to your spooky decor.
Create the Face
Now comes the fun part—adding faces to your ghosts! Take your black felt, foam cutouts, or a fine marker. With your scissors or pen, cut or draw small eyes and a mouth on your cotton ball head. Feel free to let your creativity flow! Some ghosts can look spooky, while others can be friendly.
Once your facial features are ready, simply attach them to the cotton ball using glue or by pressing them firmly in place. Now, those ghosts are ready to tell their tale!
Attach the Ghosts
It’s time to bring your floating spirits to life! Take a long piece of twine or jute string and lay it out. Now, grab your mini clothespins. Clip each ghost at the top where the fabric gathers, ensuring it’s secure before you hang it up. As you work, space them out evenly to create a whimsical flow along the string.
Don’t be afraid to adjust the spacing as you go! It’s a great way to experiment with how your garland will look. You’ll find it’s a relaxing process, like hanging up family photos.
Hang and Display
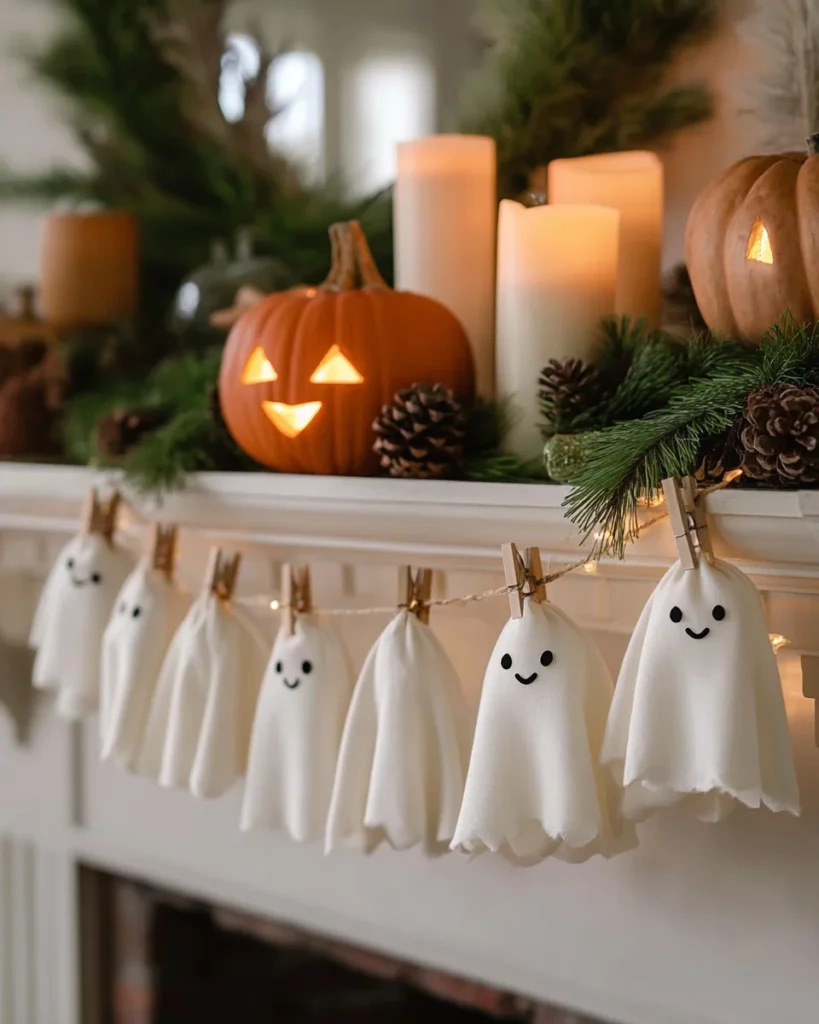
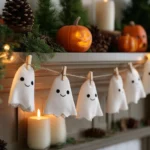
Now that your ghost garland is ready, it’s time to showcase it! Consider draping it across a mantel, hanging it near your front door, or even across a shelf. The ghosts will greet your guests and set a festive tone!
Add in some pumpkins, candles, or fresh greenery nearby for an extra dash of seasonal charm. Let the garland shine in its ghostly glory, creating a perfect Halloween atmosphere. Your home will feel cozy and inviting, just like the spirit of the season!
Tips for Success
- Pre-cut your fabric and faces to save time. This makes assembly a breeze, especially with kids.
- Experiment with different fabrics for unique textures—think lace for a delicate touch!
- Use a hot glue gun for faster adhesion, but be careful of those little fingers!
- Display your garland in well-lit areas to highlight your ghostly creations.
- Don’t stress if your ghosts turn out a bit quirky; charm is in the details!
Equipment Needed
- Scissors: Essential for cutting fabric. If you don’t have fabric scissors, regular ones work well too.
- Glue: Craft glue is great, but a glue stick or a hot glue gun can also speed things up.
- Measuring tape: Optional for precise fabric cutting, but not necessary for this project.
Variations
- For a spooky twist, try using colored fabric for the ghosts—black or purple can add an edgy vibe!
- Create a themed garland by adding mini pumpkins or other Fall elements between the ghosts.
- Make ghostly garland for other holidays, like using white fabric with snowflakes for winter decor!
- Use LED fairy lights woven through the twine for a magical glow at night; it adds an enchanting touch.
- Incorporate nature by using dried leaves or pine cones as accents along the garland for a rustic feel.
Serving Suggestions
- Pair your ghost garland with seasonal treats like pumpkin spice cookies or caramel apples to create a festive mood.
- Serve spooky-themed drinks, such as orange soda or a Halloween punch, for a fun twist.
- Present your garland alongside decorative candles to enhance the eerie atmosphere.
FAQs about Ghost Garland
How long will the Ghost Garland last?
The Ghost Garland can last for many Halloweens if stored properly! Keep it in a dry place, away from direct sunlight, to prevent the fabric from fading.
Can I make the ghosts glow in the dark?
Absolutely! You can paint your cotton balls with glow-in-the-dark paint before assembling them. Just make sure it’s fully dry before you use them in your garland!
What fabric works best for the ghosts?
Muslin or cheesecloth works wonderfully, but you can also experiment with tulle for a more ethereal look. The key is finding something that drapes well.
Is this project safe for kids to do?
Final Thoughts
Creating your own Ghost Garland is not just a crafting project; it’s a delightful experience that brings laughter and joy to your home. As you watch your children’s eyes light up with creativity, you’ll realize it’s these moments that make the season special. With each ghost you hang up, it’s like inviting a little bit of magic into your space. So grab your materials, gather your loved ones, and make memories that will haunt your hearts forever. After all, these simple acts of creativity often lead to the best family traditions!
Ghost Garland: Create a Spooky Decor in 20 Minutes!
- Total Time: 20 minutes
- Yield: 1 garland
- Diet: Vegetarian
Description
DIY ghost garland made with white fabric draped over cotton balls, clipped onto twine with mini clothespins for Halloween decoration.
Ingredients
- White fabric (muslin or cheesecloth)
- Cotton balls (one per ghost for the head)
- Black felt stickers, foam cutouts, or marker (for faces)
- Twine or jute string (for garland)
- Mini clothespins
- Glue
- Scissors
Instructions
- Make the Ghost – Cut your fabric into squares (about 8–10 inches). Place a cotton ball in the center of each square and drape the fabric over it so it flows down like a ghost’s body. Lightly glue the cotton ball in place.
- Create the Face – Cut or draw small eyes and a mouth from black felt, foam, or paper, then attach to the ghost’s head.
- Attach the Ghosts – Clip each ghost at the top with a mini clothespin, fastening them to a long piece of twine.
- Hang and Display – Drape your finished garland across a mantel, shelf, or doorway. Add pumpkins, candles, or greenery nearby for extra seasonal charm.
Notes
- 🎃 Senior-Friendly Tip: Pre-cut fabric squares and felt faces ahead of time to make assembly quick and easy.
- Prep Time: 10 minutes
- Cook Time: 0 minutes
- Category: DIY Decor
- Method: Crafting
- Cuisine: American
Nutrition
- Serving Size: N/A
- Calories: N/A
- Sugar: N/A
- Sodium: N/A
- Fat: N/A
- Saturated Fat: N/A
- Unsaturated Fat: N/A
- Trans Fat: N/A
- Carbohydrates: N/A
- Fiber: N/A
- Protein: N/A
- Cholesterol: N/A