Glow in the Dark Rice Krispies Treats

Introduction to Glow in the Dark Rice Krispies Treats
Do you sometimes wish there was some extra something to jazz up your dessert game with a bit of fun and whimsy? Introducing Glow in the Dark Rice Krispies Treats, a fun, creative spin on a tried and true favorite! Not only do these treats take minimal time to prep, but they also melt hearts – most especially of the little ones in the house. Having three little ones running around, I have become quite a fan of anything that is easy to prepare and truly enchanting. When it only takes a few basic ingredients to make something so spectacular that really lights up whatever occasion it is, I mean, you really have to try it!
Why You’ll Love This Glow in the Dark Rice Krispies Treats
What’s not to love about a dessert that literally shouts fun and nostalgia? Making Rice Krispies Treats take 25 mins or so but most of that is waiting for them to set. A fun twist to the classic treat that will for sure bring smiles and spread happiness. And really, who can resist food that glows? A great way to brighten up what would otherwise be a humdrum day!
Ingredients for Glow in the Dark Rice Krispies Treats
Creating these enchanting Glow in the Dark Rice Krispies Treats requires just a few simple ingredients that you might already have in your pantry. Here’s a quick rundown:
- Rice Krispies cereal: This is the star of the show! The crispy texture adds a delightful crunch to the chewy marshmallow base.
- Mini marshmallows: These tiny sweet puffs melt beautifully and form the gooey foundation of your treats. They create that irresistible chewiness we all love!
- Unsalted butter: Used to melt the marshmallows, it adds richness to the treats. The unsalted kind allows you to control the overall flavor without unnecessary saltiness.
- Tonic water: Here’s where the magic happens! Quinine, found in tonic water, is what makes these goodies glow under blacklight. Make sure it’s cold for the best results!
- Neon food coloring (optional): If you want to take your treats up a notch, a few drops of vibrant food coloring can make them visually pop even more.
Feel free to experiment with different brands or even explore organic versions of these ingredients!
Exact quantities for each ingredient are available at the bottom of the article for your convenience, perfect for printing out or saving for your next kitchen adventure.
How to Make Glow in the Dark Rice Krispies Treats
Making these magical Glow in the Dark Rice Krispies Treats is easier than you think! Follow these simple steps, and you’ll have a tantalizing treat ready for everyone to enjoy. Let’s get going!
Step 1: Grease Your Pan
Start by lightly greasing a 9×13-inch baking pan or some silicone molds. This will help your treats pop out smoothly later on. I prefer using a bit of butter to grease the pan, but cooking spray works just as well. Set the greased pan aside for now.
Step 2: Melt the Butter
In a large saucepan, melt the butter over low heat. Stir it gently, so it doesn’t burn. Once the butter is all melted, toss in the mini marshmallows. Keep stirring until everything transforms into a gooey, melted marshmallow goodness. Oh, the aroma is simply irresistible!
Step 3: Incorporate Tonic Water
Now, here comes the exciting part! Remove your saucepan from the heat and add the chilled tonic water. Stir vigorously until it’s thoroughly combined. You may notice the mixture become frothy. That’s perfectly normal! This is where the glow magic begins to happen, thanks to the quinine in the tonic water.
Step 4: Add Color
If you want your treats to look extra festive, divide your mixture and add drops of neon food coloring to each section. Mix well until you see those vibrant colors spread throughout. It’s like creating your own rainbow of deliciousness!
Step 5: Combine Rice Krispies
Time to bring it all together! Gradually stir in the Rice Krispies cereal until every piece is fully coated in that delightful marshmallow mixture. Make sure to do this gently, so the cereal maintains its crunchy texture. It’s the perfect blend of gooey and crispy!
Step 6: Press into Molds
Spoon the colorful mixture into your prepared pan or molds. Use a spatula or your hands to press down firmly and evenly. I find that a buttered spatula works best for a smooth finish. This step helps ensure that your treats hold together once cooled.
Step 7: Cool and Cut
Allow your treats to cool for about 1–2 hours at room temperature. Once they’re set, cut them into squares or pop them out of the molds. Now comes the best part: turn the lights off and enjoy the magical glow under blacklight! Watch as your treats come alive in the dark, much to everyone’s delight!
Tips for Success
- Always use chilled tonic water for the best glow effect.
- Keep stirring your marshmallow mixture to avoid burning. Patience is key!
- Don’t skip greasing your pan. It makes all the difference when removing your treats.
- Press down the mixture firmly for a compact treat that holds its shape.
- Feel free to mix different neon colors for a vibrant visual experience!
Equipment Needed
- Large saucepan: A sturdy pot works well; avoid non-stick for this step.
- Spatula: Use a buttered spatula for mixing and pressing down; it’s a lifesaver!
- 9×13-inch baking pan or silicone molds: Choose whichever you prefer for shaping.
- Measuring cups: Essential for precise ingredient proportions.
Variations
- Nutty Delight: Add half a cup of your favorite nuts, like almonds or peanuts, for a crunchy texture.
- Fruity Twist: Mix in some dried fruits, such as cranberries or raisins, to add a hint of sweetness and chewiness.
- Healthy Options: Substitute Rice Krispies with brown rice cereal or gluten-free alternatives for a healthier treat.
- Chocolate Lovers: Drizzle melted chocolate or sprinkle mini chocolate chips over the top for a chocolatey twist.
- Vegan Friendly: Use vegan butter and vegan mini marshmallows to make these treats dairy-free.
Serving Suggestions
- Pair these Glow in the Dark Rice Krispies Treats with a fruity punch or lemonade for a refreshing combo.
- For a themed event, serve on black platters to highlight the glow effect further!
- Add glow sticks or glow-in-the-dark decorations for a magical touch during celebrations.
- Consider a scoop of vanilla ice cream as a delightful side for added creaminess.
FAQs about Glow in the Dark Rice Krispies Treats
How do I store Glow in the Dark Rice Krispies Treats?
To keep your treats fresh, store them in an airtight container at room temperature. They’ll stay delicious for up to three days. Just be warned, the glow can fade a bit over time, but they’ll still be tasty!
Can I make these treats ahead of time?
Absolutely! You can prepare these fun desserts a day in advance. Just remember to wait until you’re ready to serve them before turning off the lights and unveiling the glow!
What can I use instead of tonic water?
While tonic water provides that fantastic glow due to quinine, you can experiment! Light soda or lemon-lime beverages can substitute if you’re not keen on the tonic’s flavor, but they won’t glow like the tonic.
Are these Glow in the Dark Rice Krispies Treats safe for kids?
Yes! These treats are entirely safe for kids. Just keep an eye on them while they enjoy their glowing goodies, especially around the blacklight. Fun and safety go hand in hand!
Can I use regular marshmallows instead of mini marshmallows?
You can! Regular marshmallows can be chopped into smaller pieces before melting. They’ll still give you that gooey goodness, making your Glow in the Dark Rice Krispies Treats just as delightful!
Final Thoughts
Creating Glow in the Dark Rice Krispies Treats is more than just preparing a dessert; it’s an experience filled with laughter and joy. There’s something magical about watching the wonder on your family’s faces as these treats light up under blacklight. Whether it’s a birthday party, a Halloween gathering, or just a cozy night at home, these delightful bites are sure to spark happiness. As a busy mom, I find immense joy in recipes like this—where simplicity meets fun, and everyone can join in on the excitement. Give these a try and light up your next gathering!
Print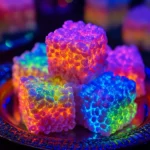
Glow in the Dark Rice Krispies Treats that Dazzle!
- Total Time: 1 hour 25 minutes
- Yield: 12–16 servings 1x
- Diet: Vegetarian
Description
These Glow in the Dark Rice Krispies Treats are a fun and exciting twist on the classic dessert, enhanced with tonic water for a glowing effect under blacklight.
Ingredients
- 6 cups Rice Krispies cereal
- 4 cups mini marshmallows
- 3 tablespoons unsalted butter
- 1/4 cup tonic water (must contain quinine for the glow effect)
- Neon food coloring (optional)
Instructions
- Lightly grease a 9×13-inch baking pan or silicone molds and set aside.
- Melt the butter in a large saucepan over low heat, then add mini marshmallows and stir until melted.
- Remove from heat, add tonic water, and stir vigorously until combined.
- Optionally, divide the mixture and add drops of neon food coloring, mixing well.
- Stir in the Rice Krispies cereal until fully coated.
- Spoon the mixture into the prepared pan or molds and press down firmly.
- Allow to cool for 1–2 hours, then cut or remove from molds. Enjoy the glow under blacklight!
Notes
- For best results, ensure the tonic water is chilled.
- Different colors of food coloring can be mixed for a rainbow effect.
- Use a buttered spatula to press the mixture for a smoother finish.
- Prep Time: 15 minutes
- Cook Time: 10 minutes
- Category: Dessert
- Method: Stovetop
- Cuisine: American
Nutrition
- Serving Size: 1 square
- Calories: 150
- Sugar: 12g
- Sodium: 60mg
- Fat: 5g
- Saturated Fat: 3g
- Unsaturated Fat: 2g
- Trans Fat: 0g
- Carbohydrates: 24g
- Fiber: 0g
- Protein: 1g
- Cholesterol: 10mg