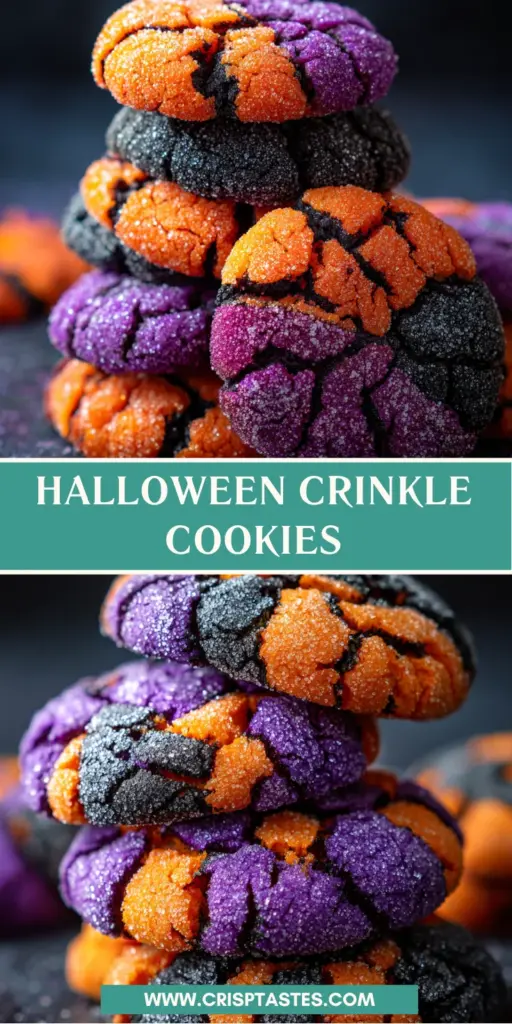
HALLOWEEN CRINKLE COOKIES

Introduction to HALLOWEEN CRINKLE COOKIES
With leaves turning gold, and the air getting crisp, it’s only a sneaky process for Halloween to trickle in, and add joy to our hearts. One of my very favorite methods for celebrating the spooky season is by baking up a batch of Halloween crinkle cookies. These happy little morsels not only sport festive colors but are easy as ever to make on a hectic day. Just picture the smiles on your kiddos’ faces as they bite into these soft, crinkly cookies that just melt in your mouth. Plus, they’re great to bring to any Halloween bash!
Why You’ll Love This HALLOWEEN CRINKLE COOKIES
Halloween crinkle cookies are a party in every bite. Their bright, crinkled exterior will catch attention at any party or gathering, and they’re a quick one to make – even if you’re a mom running around like crazy!
Yummy chocolate taste appeals not only to children but adults also. A soft, chewy interior encased in a sugar coating provides a sweet Christmas treat that is well-matched with hot cider or pumpkin spice lattes. Seriously, how could you resist?
Ingredients for HALLOWEEN CRINKLE COOKIES
To create these festive Halloween crinkle cookies, you’ll need a blend of basic ingredients to achieve that rich, chocolatey flavor. All-purpose flour forms the cookie’s structure, while cocoa powder adds the delightful chocolate essence. Baking powder gives them that perfect rise, helping create those iconic cracks, and a pinch of salt balances the sweetness.
Granulated sugar sweetens the mix, and vegetable oil keeps the cookies moist and tender. Eggs are your binding agent, while vanilla extract infuses warmth and depth. The real fun? Adding gel food coloring! With options like orange, purple, or black, you can customize these cookies to match any Halloween theme. If you’re looking for a gluten-free version, simply swap in a 1:1 gluten-free flour blend. Check out the detailed quantities at the bottom, and let your creativity shine!
- 1 cup all-purpose flour (or 1:1 GF blend)
- ½ cup unsweetened cocoa powder
- 1 tsp baking powder
- ¼ tsp salt
- 1 cup granulated sugar
- ¼ cup vegetable oil (or melted coconut oil)
- 2 large eggs (room temp)
- 1 tsp vanilla extract
- Gel food coloring (orange, purple, or black)
- ½ cup powdered sugar (for rolling)
How to Make HALLOWEEN CRINKLE COOKIES
Making Halloween crinkle cookies is a straightforward and enjoyable process. Follow these clear steps to achieve the best results, and remember—the key to preventing sticky dough and achieving that classic crinkly look lies in chilling the dough. Ready? Let’s get started!
Step 1: Prepare the Dry Ingredients
Begin by whisking together the flour, cocoa powder, baking powder, and salt in a bowl. This step is essential because it evenly distributes the leavening agents and cocoa throughout the flour, ensuring consistent texture and flavor in every cookie. It’s like setting the foundation for a great building—the better your base, the sturdier your cookies!
Step 2: Mix the Wet Ingredients
Next, in a separate bowl, beat together granulated sugar, vegetable oil, eggs, and vanilla extract until smooth. Add your chosen gel food coloring here to elevate the flavor and visual appeal. This not only enhances the festive spirit but also ensures each cookie is bursting with color and taste, making them irresistible!
Step 3: Combine Everything
Now, gently stir the dry ingredients into the wet mixture until they just come together. Be careful not to over-mix, as doing so can lead to denser cookies. You want to see a few streaks of flour remaining for that light and soft texture when baked. Think of it as giving your ingredients a gentle hug!
Step 4: Chill the Dough
Once combined, it’s time for the dough to chill! Cover it with plastic wrap and pop it in the fridge for at least an hour, or for a quicker fix, 30 minutes in the freezer. Chilling is critical as it firms up the dough, leading to perfectly shaped cookies with that signature crinkle—no one likes a flat cookie, right?
Step 5: Shape and Bake
When you’re ready to bake, preheat your oven to 350°F (175°C) and line your baking sheets with parchment paper. Roll the dough into 1 tablespoon-sized balls, then coat each one generously in powdered sugar. Make sure to space them about two inches apart on the baking sheets. Bake for 10 to 12 minutes until they’ve cracked but remain soft in the center—this is what makes them so delightful!
If your cookies don’t crack as expected, don’t fret! Next time, try adjusting the chilling time or ensure you’re using enough baking powder. Each oven behaves differently, so a little experimentation might be needed to find your perfect batch!
Tips for Success
To ensure your Halloween crinkle cookies remain fresh and delightful, store them in an airtight container. This keeps them soft and chewy for days, perfect for those mid-afternoon cravings!
For a twist, try almond extract instead of vanilla for added flavor. Feeling adventurous? Add a sprinkle of cinnamon or a dash of orange zest for an unexpected zing! With these tips, you’re set for success in your cookie-making adventure!
Equipment Needed
Gathering the right tools makes baking Halloween crinkle cookies a breeze! You’ll need a couple of mixing bowls for combining ingredients, a whisk for that smooth mixture, and measuring cups for accuracy. Don’t forget your baking sheets—parchment paper is handy too! If you’re in a pinch, a silicone mat works just as well!
Variations
The fun of making Halloween crinkle cookies lies in the creativity you can express! Why not add a zest of orange for a bright, citrusy kick? You could use different colored gel food dye to create spooky shades like ghostly white or vibrant green for that extra Halloween flair.
If gluten-free is your jam, feel free to swap in that 1:1 gluten-free flour blend. Get inventive with your mix-ins!
Serving Suggestions
These adorable Halloween crinkle cookies shine when served with warm pumpkin spice lattes or hot apple cider. For a fun twist, arrange them on a spooky platter adorned with mini pumpkins and cobwebs. You can elevate the presentation by adding some festive sprinkles on top for a colorful touch!
FAQs about HALLOWEEN CRINKLE COOKIES
Curious about Halloween crinkle cookies? Let’s clear up some common questions! First off, these cookies stay fresh in an airtight container for up to a week—if they last that long!
You can freeze them for up to three months, just wrap each cookie tightly. When it’s time to indulge, simply thaw at room temperature.
If you want to get creative with colors, remember to start with a small amount of gel food coloring—it’s potent! Adjust gradually until you achieve the spooky shades you desire. Happy baking!
Final Thoughts
As we dive into the Halloween season, baking Halloween crinkle cookies not only fills our homes with delightful aromas but also creates cherished memories. There’s something magical about gathering the family in the kitchen, laughing and chatting as flour flies and colorful dough comes to life. These cookies bring a touch of nostalgia, reminding us all of the joy that Halloween brings. Whether decorated for a spooky gathering or enjoyed quietly at home, these festive treats capture the warmth of tradition and the excitement of the season. So let’s bake, create, and celebrate together!
Print
HALLOWEEN CRINKLE COOKIES
- Total Time: 1 hour 30 minutes
- Yield: Approximately 24 cookies 1x
- Diet: Vegetarian
Description
Delicious and festive Halloween-themed cookies that are soft in the center and have a crinkly appearance, perfect for Halloween celebrations.
Ingredients
- 1 cup all-purpose flour (or 1:1 GF blend)
- ½ cup unsweetened cocoa powder
- 1 tsp baking powder
- ¼ tsp salt
- 1 cup granulated sugar
- ¼ cup vegetable oil (or melted coconut oil)
- 2 large eggs (room temp)
- 1 tsp vanilla extract
- Gel food coloring (orange, purple, or black)
- ½ cup powdered sugar (for rolling)
Instructions
- Whisk flour, cocoa, baking powder, and salt together in a bowl.
- Beat sugar, oil, eggs, and vanilla extract until smooth. Add gel food coloring.
- Stir the dry ingredients into the wet ingredients until just combined.
- Cover the dough and refrigerate for at least 1 hour (or 30 minutes in the freezer).
- Preheat oven to 350°F (175°C). Line baking sheets with parchment paper.
- Roll dough into 1 tablespoon balls and coat generously in powdered sugar.
- Place the balls 2 inches apart on the baking sheet and bake for 10–12 minutes until cracked but still soft in the center.
- Let cookies sit on the baking sheet for 5 minutes before transferring to a wire rack to cool.
Notes
- For a gluten-free option, use a 1:1 gluten-free flour blend.
- Adjust the amount of gel food coloring based on desired intensity.
- Store cookies in an airtight container to maintain freshness.
- Prep Time: 20 minutes
- Cook Time: 10-12 minutes
- Category: Dessert
- Method: Baking
- Cuisine: American
Nutrition
- Serving Size: 1 cookie
- Calories: 120
- Sugar: 10g
- Sodium: 80mg
- Fat: 5g
- Saturated Fat: 1g
- Unsaturated Fat: 4g
- Trans Fat: 0g
- Carbohydrates: 15g
- Fiber: 1g
- Protein: 2g
- Cholesterol: 30mg