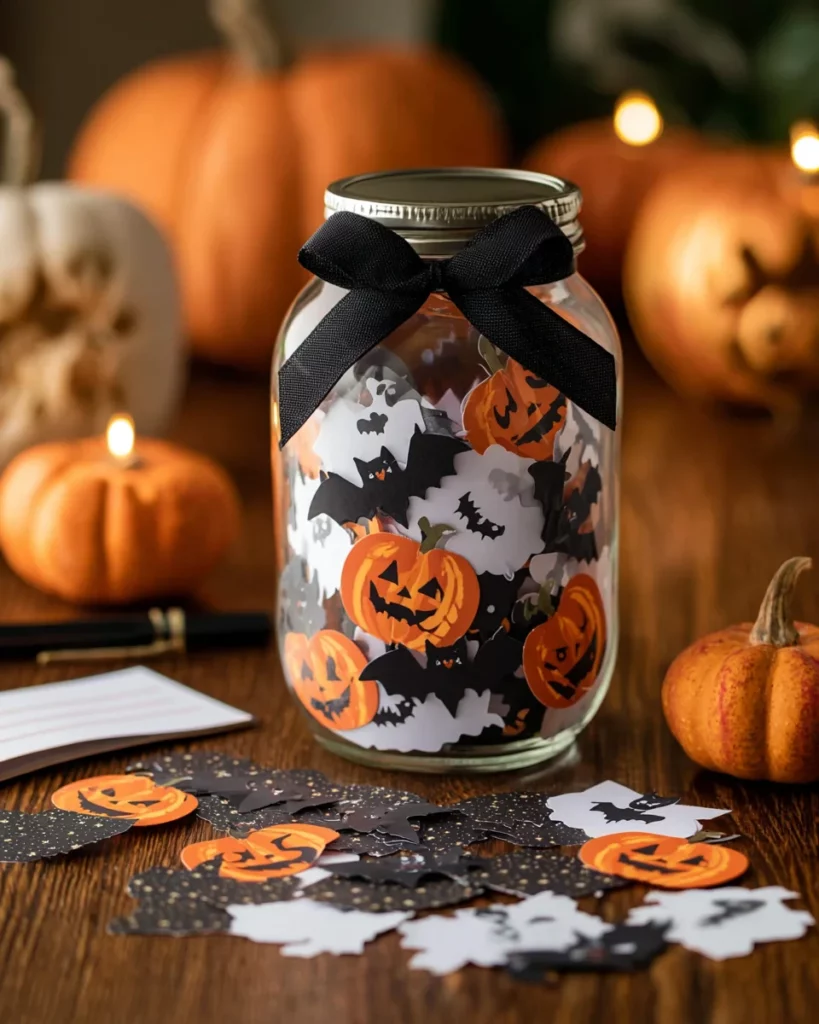
Halloween Memory Jars: Capture Your Spooky Memories!

Introduction to Halloween Memory Jars
‘Tis the season for magic to happen all on its own: the crisp leaves underfoot, the pumpkins spicing up every corner of the landscape. And while it’s the time of year when families come together and lineages of laughter and story build themselves into memories, it’s where our Halloween Memory Jars come in – a seriously cute little craft to help you corral those spooky, er, sort-of loose ends all in one place! So here is something fun to do and price to pay while recording your family’s journey through this ‘most wonderful time of the year: Halloween. Let’s learn how you can make your very own memory jar and keep those Halloween moments alive for years!
Why You’ll Love This Halloween Memory Jars
Memory Jars are not just fun crafts but an open welcoming to creativity around building up a treasure of cherished family traditions; and this one’s so simple to make. Each note in each one records special times to be revisited in the bonding of each and bring forth story upon story. Best yet, this is an awesome way to get your children involved in keeping the magic of Halloween around for you for years.
Ingredients for Halloween Memory Jars
Making your Halloween Memory Jars is as fun as the memories they’ll hold! Here’s what you’ll need:
- Mason jar with lid: A classic choice for storing your notes, it keeps everything safe and sound.
- Black, orange, or Halloween ribbon: Perfect for adding a festive touch, it also allows for creative flair!
- Halloween stickers: Think pumpkins, bats, and ghosts; these playful additions make your jar come alive.
- Small slips of paper or note cards: Use vibrant colors like orange, black, or white to jot down your memories.
- Pens or markers: Grab bold colors to ensure your notes stand out and are easy to read.
You can find these supplies at your local craft stores or online. For detailed measures, check out the bottom of the post for printing!
How to Make Halloween Memory Jars
Creating your Halloween Memory Jars is a delightful journey! Let’s walk through the steps together so you can start capturing those precious memories. It’s easier than you might think, and each step adds a splash of creativity to your festive celebration. Here’s how to make your very own memory jar!
Step 1: Decorate the Jar
The first step is to let your imagination run wild! Grab those stickers, ribbons, and get ready to add some personality to your mason jar. Cover the jar with fun Halloween stickers; think bats, ghosts, and pumpkins. They say the jar is like a canvas—your canvas!
If you’re involving kids, let them pick their favorites. It’s a wonderful way for them to express their Halloween spirit. Once you’re done, tie a ribbon around the lid for a finishing festive touch. Remember, your jar should reflect the fun and excitement of Halloween!
Step 2: Prepare the Notes
The next step is preparing your notes. Start by cutting slips of paper or note cards in colors like vibrant orange, spooktacular black, or ghostly white. These colors not only scream Halloween, but they also make your memories look appealing!
To make the notes visually appealing, consider using decorative scissors to create fun edges. You could even add doodles or small stickers on the slips. This extra effort will make each note a pretty little surprise when you read them later!
Step 3: Record Memories
Now comes the most meaningful part—recording your memories. Think about all those special moments from recent Halloweens; what costumes made you burst out laughing? What treats brought the biggest smiles?
Encourage your family to write down their favorite trick-or-treat stories or memorable gatherings. They can pen down everything from amusing costume mishaps to unexpected spooky encounters. Use different styles of note-taking! Doodle, write a poem, or even have a drawing. Let creativity flow—the more authentic, the better!
Step 4: Fill the Jar
With your memories written down, it’s time to fill the jar! As you place each note inside, consider arranging them with care. Layer the colors or fold them uniquely for a festive look. This makes the jar visually enticing and adds an element of surprise when you reach in to read a memory.
You can also tuck in an extra surprise, like a small Halloween trinket or a charm. Each time you revisit your jar, you’ll find something new hidden amongst the notes—just like the Halloween adventures you share each year!
Step 5: Keep the Tradition
Finally, let’s talk about keeping this tradition alive! Each Halloween, pull out the jar and read through the past memories; it’s such a heartwarming experience!
As you reminisce, encourage everyone to add new notes from the current Halloween festivities. You might even gather family or friends for a memory-reading night. Make it a staple of your Halloween celebration! Capture those evolving stories that will bring laughter and joy for years to come.
Tips for Success
To elevate your Halloween Memory Jar experience, here are some practical tips:
- Involve everyone—have each family member decorate their own jar for a personal touch!
- Use larger note cards and bold markers for easy reading, especially for seniors.
- Set aside time to gather together and read previous memories aloud—it’s a blast!
- Let kids add drawings or photographs to make it more special.
Equipment Needed
Before you dive into creating your Halloween Memory Jars, here’s a quick list of equipment you’ll need:
- Scissors: Essential for cutting your paper and ribbons. If you don’t have regular scissors, try using a craft knife carefully.
- Pencil or Marker: Great for drafting your notes. A pen can also work, but make sure it’s not too fine!
- Ruler: Helpful for measuring slips of paper. If you don’t have one, any straight edge will do!
Variations
To keep the creativity flowing, consider these fun variations for your Halloween Memory Jars:
- Create themed jars for different years—like vintage Halloween or spooky fairytale!
- Host a Halloween party where guests can add their own memories to a communal jar.
- Mix personal stories with collective family memories to build a treasure trove of traditions.
Serving Suggestions
Now that your Halloween Memory Jars are ready, here are some delightful ideas for showcasing them:
- Place your jar on the mantelpiece or dining table as a festive centerpiece.
- Use colorful fabric or spider web decorations around the base for added flair.
- Gift a jar filled with memories to friends or family as a heartfelt surprise!
FAQs about Halloween Memory Jars
As you embark on this exciting journey of creating Halloween Memory Jars, you might have a few questions. Here are some common ones that can help guide you through the process!
How long can I keep the notes in the jar?
You can keep the notes in your memory jar indefinitely! They become timeless treasures, capturing joy and laughter from each Halloween.
How do I add new notes each year?
Simply open the jar, read through the past memories, and then add new notes. It’s a wonderful way to reminisce while keeping your tradition alive!
What are some creative decoration tips?
Get creative by using fabric scraps, glitter, or themed embellishments. Include family photos or drawings to make each jar uniquely special. Use spooky ribbons for that extra flair, too!
Final Thoughts
Creating Halloween Memory Jars is like weaving a tapestry of joyful moments that you can revisit each year. The laughter echoing from past Halloweens, the nostalgia of favorite costumes, and the thrill of trick-or-treating—all captured in one beautiful jar.
By starting this tradition, you’re not just crafting; you’re nurturing family bonds and creating a treasure trove of memories for generations to come. So, gather your loved ones, let your creativity flow, and enjoy the delightful process of capturing the essence of Halloween. Who knows? You might just find that sweet little ghost from last year’s party tucked away in a note!
Print
Halloween Memory Jars: Capture Your Spooky Memories!
- Total Time: 25 minutes
- Yield: 1 memory jar
- Diet: Vegan
Description
Capture your spooky memories with Halloween Memory Jars, a fun and festive way to document your Halloween adventures every year.
Ingredients
- Mason jar with lid
- Black, orange, or Halloween ribbon
- Halloween stickers (pumpkins, bats, ghosts)
- Small slips of paper or note cards (orange, black, or white)
- Pens or markers
Instructions
- Decorate the Jar – Add stickers and tie a festive ribbon around the lid.
- Prepare the Notes – Cut paper slips or note cards in Halloween colors.
- Record Memories – Write down fun stories, favorite costumes, or trick-or-treat highlights.
- Fill the Jar – Place the slips into the jar.
- Keep the Tradition – Each year, add new notes and read through the past ones.
- Variation: Make it a group activity by inviting family or party guests to add their own memories to the jar.
Notes
- Senior-Friendly Tip: Use larger note cards and bold markers to make writing and reading easier.
- Prep Time: 25 minutes
- Category: Craft
- Method: Handmade
- Cuisine: N/A
Nutrition
- Serving Size: N/A
- Calories: N/A
- Sugar: N/A
- Sodium: N/A
- Fat: N/A
- Saturated Fat: N/A
- Unsaturated Fat: N/A
- Trans Fat: N/A
- Carbohydrates: N/A
- Fiber: N/A
- Protein: N/A
- Cholesterol: N/A