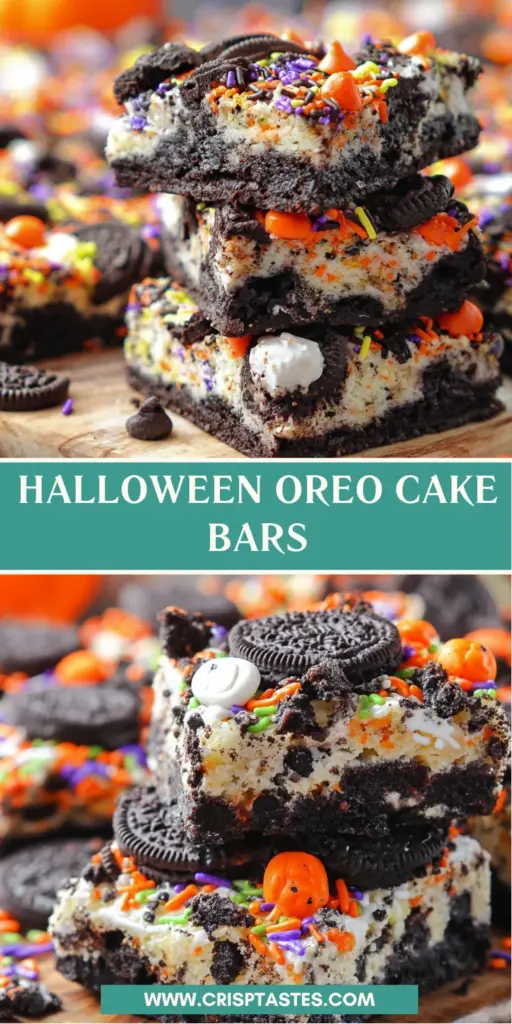
Halloween Oreo Cake Bars: A Spooktacular Treat!

Introduction to Halloween Oreo Cake Bars
Ah, Halloween! A magical time filled with twinkling lights, autumn leaves, and the scent of baked treats wafting through the air. As a busy mom, I know how hectic the season can get, but fear not! These Halloween Oreo Cake Bars are the perfect solution for a quick and festive dessert. They combine the rich flavor of Oreos with a deliciously soft cake, making them a hit for both kids and adults alike. Plus, they come together in no time, letting you spend more moments enjoying the fun instead of slaving away in the kitchen!
Why You’ll Love This Halloween Oreo Cake Bars
These Halloween Oreo Cake Bars are not just easy to make; they’re a delightful treat that will impress everyone. With minimal prep time and simple ingredients, you can whip up a festive dessert in no time. The combination of creamy Oreo chunks and vibrant sprinkles is both delicious and visually appealing. Plus, these bars are perfect for parties or gatherings, allowing you to serve up a slice of joy without any fuss!
Ingredients for Halloween Oreo Cake Bars
To create these yummy Halloween Oreo Cake Bars, you’ll need a handful of key ingredients that pack in flavor and fun. Here’s what’s involved:
- French Vanilla Cake Mix: This gives the bars their light, fluffy texture with a touch of sweetness and vanilla flavor that perfectly complements the Oreos.
- Whole Milk: Adds moisture and creaminess to the batter. You can substitute with almond or oat milk if you prefer a dairy-free option.
- Vegetable Oil: This helps keep the cake bars tender and moist. If you want a healthier alternative, consider using applesauce or melted coconut oil.
- Large Eggs: Essential for binding the ingredients together. They add richness and help with the rise as the bars bake.
- Halloween Sprinkles: These bring a festive vibe! Use any colorful sprinkles you have on hand, or even seasonal chocolates for an extra treat.
- Halloween Oreo Cookies: The star of the show! These cookies add that iconic chocolate taste and a delightful crunch. Feel free to substitute regular Oreos if that’s what you have, but the holiday-themed ones add an extra touch.
For the exact measurements of these ingredients, you can check at the bottom of this article, where you’ll find a handy print option!
How to Make Halloween Oreo Cake Bars
Step 1: Preheat and Prepare
Let’s kick things off by preheating your oven to 350°F. This step is crucial! It ensures even baking and prevents any surprises when your bars go in. Next, grab a 9×13″ baking dish and line it with parchment paper. Trust me, this will make removing the bars a breeze once they’re baked. You’ll appreciate not having to scrape a sticky pan later! With your oven warming up and the baking dish ready, you’re well on your way to a spooktacular treat!
Step 2: Mix Your Ingredients
In a large mixing bowl, combine the French vanilla cake mixes, whole milk, vegetable oil, and large eggs. Using an electric mixer, beat the ingredients together until they’re fully blended. The batter will be thick, almost cloud-like, which is just how we want it! Don’t worry about lumps; they’ll bake out beautifully. Be sure to scrape down the sides of the bowl to incorporate all the ingredients. This thick mixture is the foundation for your delicious Halloween Oreo Cake Bars!
Step 3: Add Festive Fun
Now comes the fun part—it’s time to make your batter festive! Toss in about half a cup of Halloween sprinkles, folding them gently into the mixture. The vibrant colors will not only add a playful touch but also boost the mood of your bars. As you mix, envision the delighted faces of your family when they see these colorful treats! Just a little sprinkle goes a long way in making your cake bars fit for any Halloween celebration!
Step 4: Layer with Oreos
Now, let’s set the stage for those delightful layers. Place half of the chopped Halloween Oreo cookies evenly across the bottom of your prepared baking dish. This will create a deliciously crunchy base for your bars. Then, carefully spoon the thick batter over the Oreos. Don’t worry about being perfect—it’s meant to be rustic! Use an offset spatula that you’ve sprayed with nonstick spray to gently spread the batter into the corners. It’s time to build some Halloween magic!
Step 5: Finish with Sprinkles
It’s almost time to bake! Before we do, sprinkle the remaining Halloween sprinkles over the batter, letting them add that extra festive flair. Next, carefully add the remaining chopped Oreos on top. It’s like dressing your dessert for a Halloween party! Gently press the cookies into the batter using your fingers or a spatula. This helps them bake into the bars, creating that delightful Oreo experience with every bite. Everything is coming together perfectly!
Step 6: Bake to Perfection
With the prep work done, it’s baking time! Slide your dish into the preheated oven and let those bars bake for 20 to 25 minutes. The smell will start wafting through your home, making your mouth water! To check for doneness, insert a toothpick into the center. If it comes out clean, you know they’re ready. If not, give them a few more minutes. You’ll want them perfectly baked for those festive gatherings!
Step 7: Cool and Cut
After that delicious aroma has filled your kitchen, it’s time to let the bars cool. Allow them to cool completely in the baking dish. This is vital for clean, easy cuts. If you try to cut them too early, you might end up with a crumbly disaster, and nobody wants that! Once cooled, lift them out by the parchment paper, slice them into bars, and serve. You’ll create sweet memories as everyone digs into these spooky delights!
Tips for Success
- Always read the instructions fully before starting to avoid surprises.
- Use room temperature ingredients for a smoother batter.
- Don’t overmix the batter. Just blend until combined for the fluffiest texture.
- Let the bars cool completely before cutting for cleaner edges.
- Try adding a drizzle of melted chocolate on top for an extra treat!
Equipment Needed
- 9×13″ baking dish – A glass or metal pan works great.
- Parchment paper – You can use aluminum foil if needed, but parchment makes for easier cleanup.
- Electric mixer – A whisk can work too, though mixing by hand takes more effort.
- Offset spatula – A regular spatula or the back of a spoon will do if you don’t have one.
Variations
- Gluten-Free Option: Use a gluten-free cake mix to make these cake bars suitable for those with gluten sensitivities. The flavor and texture will still be delightful!
- Chocolate Lovers: Swap out the French vanilla cake mix for chocolate cake mix for an extra chocolatey twist. Add chocolate chips for an even richer experience!
- Nutty Addition: Mix in some chopped nuts, like pecans or walnuts, for added crunch and flavor. They pair wonderfully with the chocolatey goodness of Oreos.
- Dairy-Free Version: Replace the whole milk with a dairy-free alternative like almond or coconut milk. Use vegan eggs or flax eggs as a substitute for the large eggs.
- Seasonal Spin: During fall, you can mix in some pumpkin puree or maple syrup for a seasonal flavor change. It pairs nicely with the Oreos and adds a moist texture.
Serving Suggestions for Halloween Oreo Cake Bars
- Pair with a scoop of vanilla ice cream for a delicious contrast to the rich bars.
- Serve with spiced apple cider for a cozy autumn feel.
- Display on a festive platter, garnished with mini pumpkins or spooky decorations.
- Drizzle with chocolate syrup to elevate the dessert experience.
- Add a dollop of whipped cream for an extra touch of sweetness.
FAQs about Halloween Oreo Cake Bars
As you dive into baking your Halloween Oreo Cake Bars, you might have a few questions. Here are some answers to common queries that can help demystify this delightful treat:
Can I use regular Oreos instead of Halloween Oreos?
Absolutely! While Halloween Oreos add a fun festive touch, regular Oreos will work just fine. Feel free to use what you have on hand!
How should I store leftover cake bars?
Store leftovers in an airtight container at room temperature for up to three days. If you want to keep them fresh longer, you can refrigerate them for up to a week.
Can I freeze Halloween Oreo Cake Bars?
Yes! These bars freeze beautifully. Just wrap them tightly in plastic wrap and then in foil. They can last in the freezer for up to three months. Thaw them in the fridge before enjoying!
What can I substitute for eggs in this recipe?
If you’re looking for an egg alternative, try using a flax egg! Simply mix one tablespoon of ground flaxseed with three tablespoons of water, let it sit for about 5 minutes, and use it as a replacement for each egg.
Can I make these cake bars in advance?
Definitely! You can prepare the batter a day ahead and keep it refrigerated. Just bake them the next day for a fresh, warm treat. They’ll be a real crowd-pleaser!
Final Thoughts
Making these Halloween Oreo Cake Bars is more than just a baking project; it’s a chance to create sweet, festive moments with your loved ones. Each bite is a delightful explosion of flavors, combining the beloved crunch of Oreos with the soft, airy texture of vanilla cake. It’s a dessert that brings smiles and warmth, perfect for sharing during this magical season. Whether you’re at a Halloween party or enjoying a cozy evening at home, these bars are sure to light up the room. So, gather your family, get baking, and savor the joy of these spooky treats together!
Print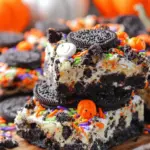
Halloween Oreo Cake Bars: A Spooktacular Treat!
- Total Time: 40 minutes
- Yield: 12–16 servings 1x
- Diet: Vegetarian
Description
Delicious and festive Halloween-themed cake bars made with Oreo cookies and sprinkles.
Ingredients
- 2 boxes French Vanilla Cake Mix
- 1/2 cup Whole Milk
- 1/2 cup Vegetable Oil
- 2 Large Eggs
- 1 cup Halloween Sprinkles, divided
- 1 package (1 lb. 4 oz) Halloween Oreo cookies, coarsely chopped, divided
Instructions
- Preheat oven to 350F. Line a 9×13″ baking dish with parchment paper.
- In a large mixing bowl, combine cake mixes, milk, oil, and eggs. Use an electric mixer to beat until fully incorporated. The batter will be thick.
- Add 1/2 cup of sprinkles to the batter, mixing to combine.
- Sprinkle half of the chopped Oreos into the bottom of the prepared baking dish.
- Carefully spoon the batter over the chopped Oreos. Spray an offset spatula with nonstick spray and gently smooth the batter out until it fills the pan.
- Sprinkle remaining Halloween sprinkles over the batter.
- Add remaining chopped Oreos to the top of the batter, and use your fingers or spatula to press the cookies gently into the batter.
- Bake for 20-25 minutes, or until a toothpick inserted in the center comes out clean.
- Allow bars to cool completely before cutting and serving.
Notes
- Make sure to let the bars cool completely for easier cutting.
- Store leftovers in an airtight container at room temperature for up to 3 days.
- Prep Time: 15 minutes
- Cook Time: 25 minutes
- Category: Dessert
- Method: Baking
- Cuisine: American
Nutrition
- Serving Size: 1 bar
- Calories: 200
- Sugar: 15g
- Sodium: 150mg
- Fat: 8g
- Saturated Fat: 2g
- Unsaturated Fat: 5g
- Trans Fat: 0g
- Carbohydrates: 30g
- Fiber: 1g
- Protein: 2g
- Cholesterol: 30mg