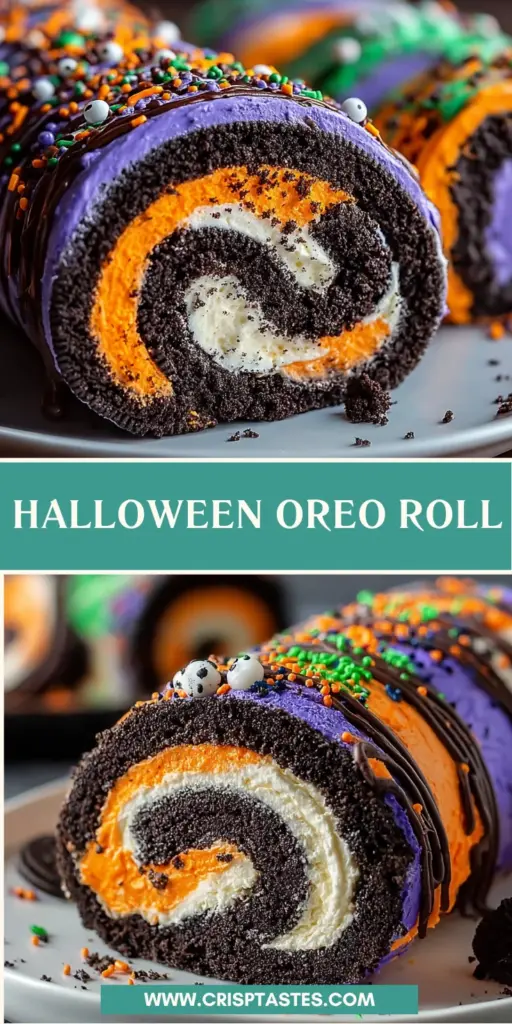
Halloween Oreo Roll: This Easy Recipe Will Delight!

Introduction to Halloween Oreo Roll
Leaves change. The air grows crisp. It’s all Hallows Eve, with charming frights and delightful treats. I get giddy to make something sweet and spooky, which is where my Halloween Oreo Roll steps in. This no-bake dessert is sheer liquid joy—simple enough to pull together on the busiest of days, packed with festive colors for whichever day it might be that you present them to surprise your family or guests. Well, now you believe this is not a recipe only for beginners; it’s an enjoyable recipe to prepare. Let’s have a trip into the Halloween flavors!
Why You’ll Love This Halloween Oreo Roll
Halloween Oreo Roll is embodiment of simplicity and taste. You do not need to bake it; it will take 20 minutes only to prepare it from scratch. Your loved ones would surely be delighted to have such a festive, colorful snack. It is a nice and tasty twist of creamy and chocolaty flavors that every Halloween party host would like to serve, and the kids will gobble up those fun toppings, making it a hit for everyone!
Ingredients for Halloween Oreo Roll
To create this delightful Halloween Oreo Roll, you’ll need just a handful of ingredients that are both easy to find and fun to use. Here’s what you’ll need:
- Halloween Oreos: Grab 24 of these iconic cookies, preferably the orange crème variety. They add a festive flair that’s perfect for Halloween.
- Cream Cheese: Use 8 ounces of full-fat cream cheese. This creamy base makes the roll rich and indulgent.
- Vanilla Extract: Just a teaspoon will enhance the flavor. For a twist, almond extract can be a delightful substitute.
- Halloween-Colored Frosting: You’ll need 1 cup of colorful frosting. Opt for shades like purple, green, or orange to add that Halloween zing.
- Sprinkles: A cup of Halloween-themed sprinkles will add a playful, festive crunch.
- Candy Eyes: For an extra spooky touch, these fun candies make your dessert come alive!
- Chocolate Drizzle: Use about ½ cup for a rich, decadent finish. This drizzle can elevate the whole experience!
Ingredients with exact quantities are listed at the bottom of this article, and you can print them out for your convenience. These ingredients come together to create a fun and delicious Halloween treat that is sure to impress!
How to Make Halloween Oreo Roll
Creating your Halloween Oreo Roll is simpler than carving a pumpkin! Follow these easy steps to whip up a spooky, delicious treat that won’t take much of your precious time. Ready? Let’s get started!
Step 1: Crush the Oreos
First things first, let’s get our hands a little messy! Place your Halloween Oreos in a sealed zip-top bag. Grab a rolling pin or a heavy pan, and crush those cookies until they resemble a fine powder. This might be a fun way to relieve some stress—who knew smashing cookies could be so satisfying?
Step 2: Mix Ingredients Together
In a medium mixing bowl, throw in the crushed Oreos, cream cheese, and vanilla extract. Use a spatula or your hands to mix them until they form a cohesive, thick dough. If you see some stubborn bits of cream cheese, keep mixing until everything is nicely blended. The smell is heavenly, and trust me, your taste buds will thank you!
Step 3: Shape the Mixture
Once your mixture is well combined, it’s time to transform it! Place it on a piece of parchment paper and shape it into a rectangle about 10×14 inches. Make sure it’s roughly even so that each slice will look lovely. Channel your inner pastry chef—this is where the magic starts!
Step 4: Frost the Mixture
Here comes the fun part—decorating! Spread your Halloween-colored frosting evenly over the Oreo mixture. Use an offset spatula or a butter knife for smooth, even coverage. Choose bold purple, orange, or green colors to make it pop, just like a Halloween costume!
Step 5: Roll It Up
With the frosting in place, carefully roll the mixture from one end, using the parchment paper for guidance. Tightly roll, but be gentle to avoid ripping. Once rolled, the paper should wrap around, sealing in the sweetness. It should look like a big, delicious log of joy!
Step 6: Chill the Roll
Now that you have your roll, it’s time to let it chill out! Seal the roll by twisting the parchment at the ends and place it in the fridge for at least an hour, or if you’re in a hurry, pop it in the freezer for 20 minutes. This step is essential for firming up the dessert, making it easier to slice.
Step 7: Slice and Decorate
After chilling, take your roll out of the fridge. Use a warm knife to slice it into 1-inch rounds—this will keep the edges nice and clean. Now’s your chance to go wild with decoration! Sprinkle on some festive sprinkles, add candy eyes, or drizzle with chocolate, transforming your dessert into a Halloween masterpiece!
Tips for Success
- Make sure your cream cheese is at room temperature. This helps it blend smoothly.
- Have fun with frosting colors! Mixing shades can create a vibrant effect.
- For a cleaner cut, use a warm knife when slicing the roll.
- Customize toppings! Let the kids pick their favorite sprinkles and eyes.
- Store leftovers in an airtight container in the fridge to keep it fresh.
Equipment Needed
- Beater or Mixing Bowl: Use a hand mixer for speed, or a sturdy spatula and bowl for a workout!
- Parchment Paper: Essential for shaping the roll; you can use wax paper in a pinch.
- Rolling Pin: Crush those Oreos with a rolling pin or even a heavy pan.
- Sharp Knife: A serrated knife works wonders for clean slices.
- Zip-top Bag: Perfect for smashing up your Oreos with minimal mess!
Variations for Halloween Oreo Roll
- Gluten-Free Option: Use gluten-free Oreos for a delicious, inclusive treat that everyone can enjoy!
- Healthier Cream Cheese: Swap regular cream cheese for light or Neufchâtel cheese to cut down a few calories without sacrificing taste.
- Vegan Version: Replace cream cheese with vegan cream cheese and choose dairy-free frosting to make it plant-based friendly!
- Peanut Butter Twist: Mix in a few tablespoons of creamy peanut butter with your cream cheese for a rich, nutty flavor.
- Flavorful Extracts: Experiment with other extracts like mint or coconut to give your Halloween Oreo Roll a unique flavor spin.
Serving Suggestions
- Pair with Milk: A classic! Serve with a cold glass of milk to complement the rich flavors.
- Spooky Platter: Arrange slices on a festive platter decorated with Halloween decorations for a fun presentation.
- Great with Ice Cream: Serve alongside vanilla or pumpkin ice cream for an incredible dessert duo!
- Party Favors: Wrap slices in plastic wrap tied with Halloween ribbons for cute treat bags!
FAQs about Halloween Oreo Roll
Can I prepare the Halloween Oreo Roll in advance?
Absolutely! In fact, making it the day before is ideal. Just store it in the fridge. This allows the flavors to meld beautifully!
How do I store leftovers?
Keep any leftover slices in an airtight container in the fridge. They’ll stay fresh for up to a few days—if they last that long!
Can I make this recipe without cream cheese?
Certainly! You can use whipped topping or a soft vegan cream cheese alternative for a similar texture and taste without dairy.
What can I use if I can’t find Halloween Oreos?
No worries! Regular Oreos will work perfectly. Just add your own festive touch with colored frosting and sprinkles!
How do I make this Halloween Oreo Roll gluten-free?
Simply swap the regular Oreos for gluten-free versions. It’s an easy way to create a delicious treat that everyone can enjoy!
Final Thoughts
Creating this Halloween Oreo Roll feels like wrapping up a little piece of joy in each slice. The vibrant colors, creamy filling, and playful toppings transform a simple dessert into a festive celebration. It’s a fantastic way to bond with family in the kitchen, even on the busiest of days. Watching the delight on my loved ones’ faces as they savor each bite makes it all worthwhile. This dessert not only satisfies the sweet tooth but also fosters memorable moments. So, roll up your sleeves, and let’s celebrate the Halloween spirit together with this easy, delightful treat!
Print
Halloween Oreo Roll
- Total Time: 1 hour 20 minutes
- Yield: 12 servings 1x
- Diet: Vegetarian
Description
A delightful no-bake dessert featuring Halloween Oreos, cream cheese, and colorful frosting, perfect for Halloween celebrations.
Ingredients
- 24 cookies Halloween Oreos (Opt for the orange crème version)
- 8 ounces Cream Cheese (Full-fat cream cheese is ideal)
- 1 teaspoon Vanilla Extract (Almond extract can be a delightful swap)
- 1 cup Halloween-Colored Frosting (Choose shades like purple, green, or orange)
- 1 cup Sprinkles (Halloween-themed sprinkles)
- 1 cup Candy Eyes (For a playful, spooky effect)
- 1/2 cup Chocolate Drizzle (For a touch of decadence)
Instructions
- Crush the Oreos until they resemble a fine powder.
- Mix the crushed Oreos with cream cheese and vanilla extract until combined.
- Shape the mixture into a rectangle approximately 10×14 inches on parchment paper.
- Spread the Halloween-colored frosting evenly over the Oreo mixture.
- Roll the mixture tightly from one end into a log shape using parchment paper.
- Seal the roll and chill in the refrigerator for at least 1 hour or freeze for 20 minutes.
- Slice the roll into 1-inch rounds using a warm knife.
- Decorate with optional sprinkles, candy eyes, or chocolate drizzle before serving.
Notes
- Ensure the cream cheese is at room temperature for easier mixing.
- Experiment with different frosting colors for a festive look.
- Store any leftovers in the refrigerator for a few days.
- Prep Time: 20 minutes
- Cook Time: 0 minutes
- Category: Dessert
- Method: No-Bake
- Cuisine: American
Nutrition
- Serving Size: 1 slice
- Calories: 180
- Sugar: 16g
- Sodium: 150mg
- Fat: 8g
- Saturated Fat: 4g
- Unsaturated Fat: 3g
- Trans Fat: 0g
- Carbohydrates: 25g
- Fiber: 1g
- Protein: 2g
- Cholesterol: 20mg