Halloween Rice Krispie Treats that Wow Your Guests!

Introduction to Halloween Rice Krispie Treats
Halloween isn’t just all those costumes and spooky decorations. It’s also about the excitement of creating yummy treats for people you love and care for. Every October, the kids and I would converge in the kitchen, sweetness bubbling up through laughter. Halloween Rice Krispie Treats are number one! Quick to make, bursting with fun colors, and imaginative toppings abound. With only a few ingredients whipping up these delightful, colorful treats with such panache won’t fail to wow your guests and get everyone in the mood for the celebration!
Why You’ll Love This Halloween Rice Krispie Treats
Super quick to make treats for Halloween are really handy, just like these Rice Krispie Treats. With a few simple steps, you can have a very festive and sweet treat that will charm anyone. Well, they’re kid-friendly, so that makes them an amazing activity to do together. Apart from that, the bright colors along with the spooky embellishing really endorse them at any assembly or get-together, acting as a sweet refuge from the Halloween rush.
Ingredients for Halloween Rice Krispie Treats
Creating Halloween Rice Krispie Treats is a breeze with just a few vibrant ingredients that capture the essence of the season. Here’s what you’ll need:
- 6 cups Rice Krispies cereal: These light and crunchy morsels provide the perfect base, offering an irresistible texture.
- 4 cups mini marshmallows: The sticky sweetness of marshmallows is what binds everything together, giving each treat that gooey goodness.
- 3 tablespoons butter: A touch of butter adds richness and helps with melting the marshmallows to create a smooth mixture.
- Orange food coloring: This adds a festive, vibrant hue, celebrating the essence of Halloween!
- Black decorating icing: Perfect for creating spooky faces and adding a dash of creativity!
- Candy eyes: These little treats bring your creations to life, adding a fun and quirky factor.
- Halloween-themed sprinkles: Sprinkles add that final touch of festive flair, making your treats pop!
These ingredients come together to make a deliciously fun treat that screams Halloween! For precise measurements, check the printable recipe at the bottom of the article.
How to Make Halloween Rice Krispie Treats
Making Halloween Rice Krispie Treats is not just a task; it’s a delightful culinary adventure! Let’s dive into each step together. I’ll share tips to make the process even smoother. So, grab your apron—it’s time to create some spooky magic!
Step 1: Melting the Butter
Start by placing a large saucepan over low heat. Add the 3 tablespoons of butter. Watch as it melts, swirling gently to ensure even melting. This step sets the foundation for your treats. The butter needs to be fully melted before adding the marshmallows. Make sure to keep an eye on it—burnt butter can ruin the flavor!
Step 2: Adding the Marshmallows
Once the butter is melted, it’s time for the fun part—adding the 4 cups of mini marshmallows! Pour them in and stir continuously. The marshmallows will gradually melt into a smooth, gooey mixture. This part always reminds me of using a wand to conjure up a spell. Keep stirring until it’s completely melted and creamy.
Step 3: Coloring the Mixture
After you achieve that beautiful melted marshmallow state, remove the saucepan from heat. Now, it’s time to bring in the Halloween spirit! Add a few drops of orange food coloring and stir well until the color spreads evenly. This vibrant hue is the heart of your Halloween Rice Krispie Treats. If you want to go for a slightly different shade, feel free to adjust the coloring until you reach your desired tone.
Step 4: Combining with Rice Krispies
Now, grab your 6 cups of Rice Krispies cereal. Gradually add them to your colorful marshmallow mixture. Use a spatula (or your hands with a little greasing) to gently fold the cereal in. You want every crisp to be coated with that sticky sweetness. The sound of the crisp cereal mixing with the marshmallow is music to my ears—it’s as if you’re creating a symphony of flavors!
Step 5: Pressing the Mixture
Next, it’s time to transfer your mixture into a greased 9×13-inch baking pan. Using a buttered spatula or even your hands, press the mixture evenly into the pan. Be careful not to press too hard, or you’ll lose that delightful texture! A little patience here goes a long way in ensuring a perfect set for your treats. This is where I usually find my kids sneaking bites—they just can’t resist!
Step 6: Cooling and Cutting
Once your mixture is evenly pressed, let it cool and set for about 30 minutes. This waiting game might feel hard, but it’s crucial! After they’ve cooled, use a sharp knife to cut them into squares. Each square should be practically begging to be decorated!
Step 7: Decorating the Treats
Now comes the most delightful part: decorating! Gather those candy eyes, black icing, and Halloween-themed sprinkles. Let your creativity soar! Place candy eyes on each square, use the black icing to create spooky faces, and finish with a sprinkle explosion! Watching my kids get creative with the decorations is always a highlight of the day.
And there you have it—your own spooky and delightful Halloween Rice Krispie Treats! It’s a simple process that brings loads of joy, and you’ll be the star of the Halloween party. Enjoy every gooey bite!
Tips for Success
- Use wax paper on your hands when shaping the treats to avoid sticky fingers.
- Add a teaspoon of vanilla extract to the melted marshmallow mixture for an extra layer of flavor.
- Clean up easily by wiping down surfaces with a damp cloth while residual marshmallow is still warm.
- Consider lining your baking pan with parchment paper for effortless removal.
- To ensure crispness, store any leftovers loosely covered, not sealed!
Equipment Needed
- Large saucepan: Essential for melting butter and marshmallows. A medium pot works in a pinch!
- Spatula: Perfect for mixing and pressing your mixture. A wooden spoon can also do the job.
- 9×13-inch baking pan: This will hold your treats. If it’s not available, any similar-sized dish will work!
Variations
- Different Colors: Swap out the orange food coloring for shades of purple or green for a spookier look!
- Seasonal Sprinkles: Use festive sprinkles for other holidays like Christmas or Valentine’s Day for versatile treats.
- Alternative Cereals: Try adding Cheerios or Cornflakes for a different texture and flavor!
- Dairy-Free Option: Use vegan butter and ensure your marshmallows are dairy-free for a safe treat.
- Gluten-Free: Most Rice Krispies are gluten-free, but double-check labels for peace of mind.
Serving Suggestions
- Arrange your Halloween Rice Krispie Treats on a festive platter for a stunning centerpiece.
- Pair with spooky drinks like orange soda or “witches’ brew” punch for an extra festive touch!
- Include complementary snacks like caramel popcorn or candy corn for a well-rounded treat table.
- Wrap individual squares in colorful cellophane for a fun party favor!
FAQs about Halloween Rice Krispie Treats
As I’ve dabbled in various Halloween Rice Krispie Treats over the years, some questions pop up frequently. Here are a few to brighten your culinary adventure:
Can I make variations of flavors? Absolutely! You can mix in flavored extracts like almond or peppermint to switch things up.
How should I store my treats? Keep them in an airtight container at room temperature for up to a week. Just avoid refrigerating them, as it can make them tough!
Are these treats kid-friendly? Definitely! Their fun colors and creative decorations make them a hit with kids. Let them unleash their creativity while decorating!
Can I use different cereals? Yes! Feel free to experiment with cereals like Fruit Loops for vibrant colors. It’ll give your treats a unique twist!
Now that your curiosities are satisfied, let’s move on to enjoying these delightful Halloween treats!
Final Thoughts
Creating these Halloween Rice Krispie Treats is not just about the end result but the joy you share with your loved ones while making them. Each square is a piece of happiness waiting to be enjoyed! I love how they can be the centerpiece of your Halloween gatherings, sparking laughter and connection. Whether you’re sharing them at a party or giving them as sweet gifts, these treats are sure to leave a lasting impression. So gather your ingredients, unleash your creativity, and dive into this delightful recipe! You’ll find that the fun is just as sweet as the treats themselves!
Print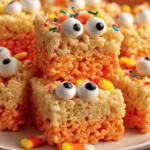
Halloween Rice Krispie Treats
- Total Time: 20 minutes
- Yield: 12 servings 1x
- Diet: Vegetarian
Description
A fun and festive treat perfect for Halloween that will wow your guests with its vibrant color and spooky decorations.
Ingredients
- 6 cups Rice Krispies cereal
- 4 cups mini marshmallows
- 3 tablespoons butter
- Orange food coloring
- Black decorating icing
- Candy eyes
- Halloween-themed sprinkles
Instructions
- In a large saucepan, melt the butter over low heat.
- Add the mini marshmallows and stir continuously until completely melted and smooth.
- Remove from heat and add a few drops of orange food coloring to achieve a bright orange color. Stir well.
- Gradually add the Rice Krispies cereal, stirring until well coated with the marshmallow mixture.
- Using a buttered spatula or hands, press the mixture evenly into a greased 9×13-inch baking pan.
- Allow the treats to cool and set for about 30 minutes.
- Once set, cut into squares. Decorate each square with candy eyes, black icing to create spooky faces, and sprinkle with Halloween-themed sprinkles.
Notes
- Use wax paper on your hands to prevent sticking while shaping the treats.
- For extra flavor, add a teaspoon of vanilla extract to the melted marshmallow mixture before combining with cereal.
- Prep Time: 10 minutes
- Cook Time: 10 minutes
- Category: Dessert
- Method: Stovetop
- Cuisine: American
Nutrition
- Serving Size: 1 square
- Calories: 150