Healthy No-Bake Protein Balls
Introduction to Healthy No-Bake Protein Balls
Hey there, fellow busy bees! If you’re like me, juggled between work, family, and a thousand little tasks, you know how challenging it can be to whip up nutritious snacks. That’s where these Healthy No-Bake Protein Balls swoop in to save the day! They’re quick to make, absolutely delicious, and packed with protein to keep your energy up. Whether you need a pick-me-up during the 3 PM slump or a tasty treat for your kids’ after-school snack, these little gems are here to make your life a bit easier and tastier!
Why You’ll Love This Healthy No-Bake Protein Balls
Let’s talk about why these Healthy No-Bake Protein Balls are going to be your new best friend in the kitchen! First off, they’re incredibly easy to whip up—just mix, roll, and you’re done! These tasty treats can be customized for every family member, making them perfect for picky eaters. Plus, they taste amazing, leaving you and your loved ones satisfied without the guilt. Who doesn’t love that?
Ingredients for Healthy No-Bake Protein Balls
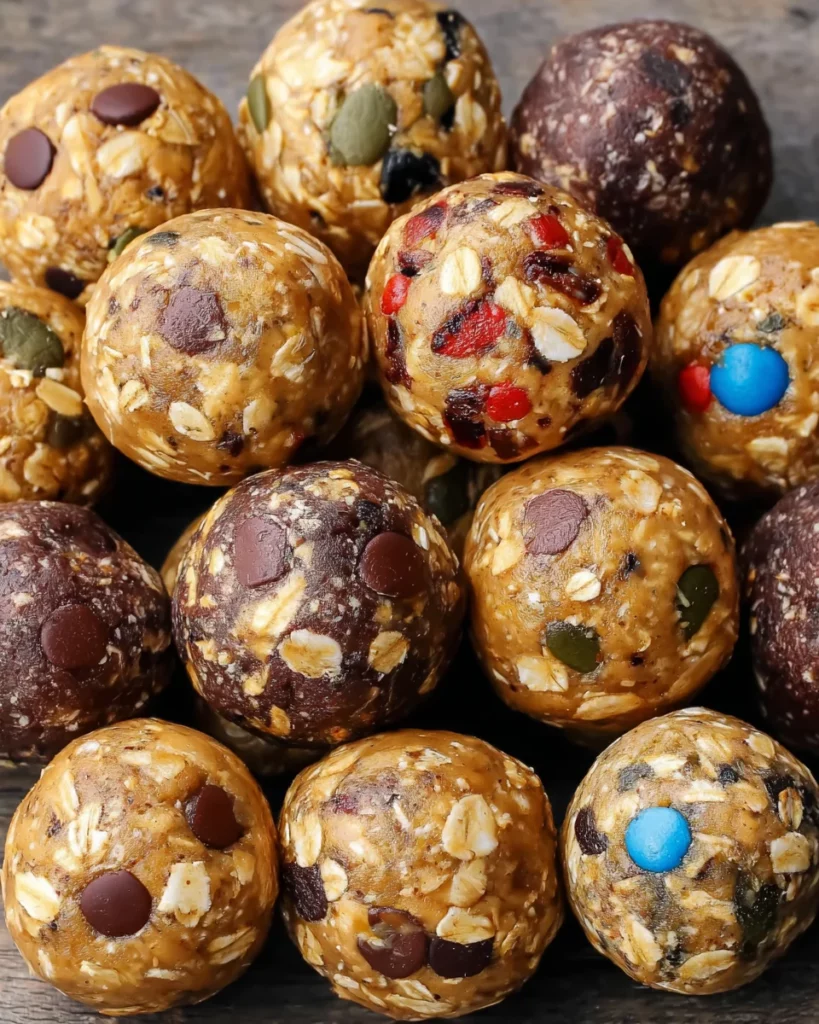
Making these Healthy No-Bake Protein Balls is as simple as gathering a few wholesome ingredients. Here’s what you’ll need:
- Rolled oats: The hearty base, providing fiber and giving the protein balls their chewy texture.
- Peanut butter: Creamy and full of healthy fats, it acts as the glue that holds everything together while adding that delicious nutty flavor.
- Honey or maple syrup: A natural sweetener to balance the flavors. You can switch between them based on what you have on hand.
- Vanilla protein powder: For a boost of protein and a hint of vanilla goodness. You can use any flavor you love.
- Chocolate protein powder: Adds richness and an extra protein punch, perfect for chocolate lovers!
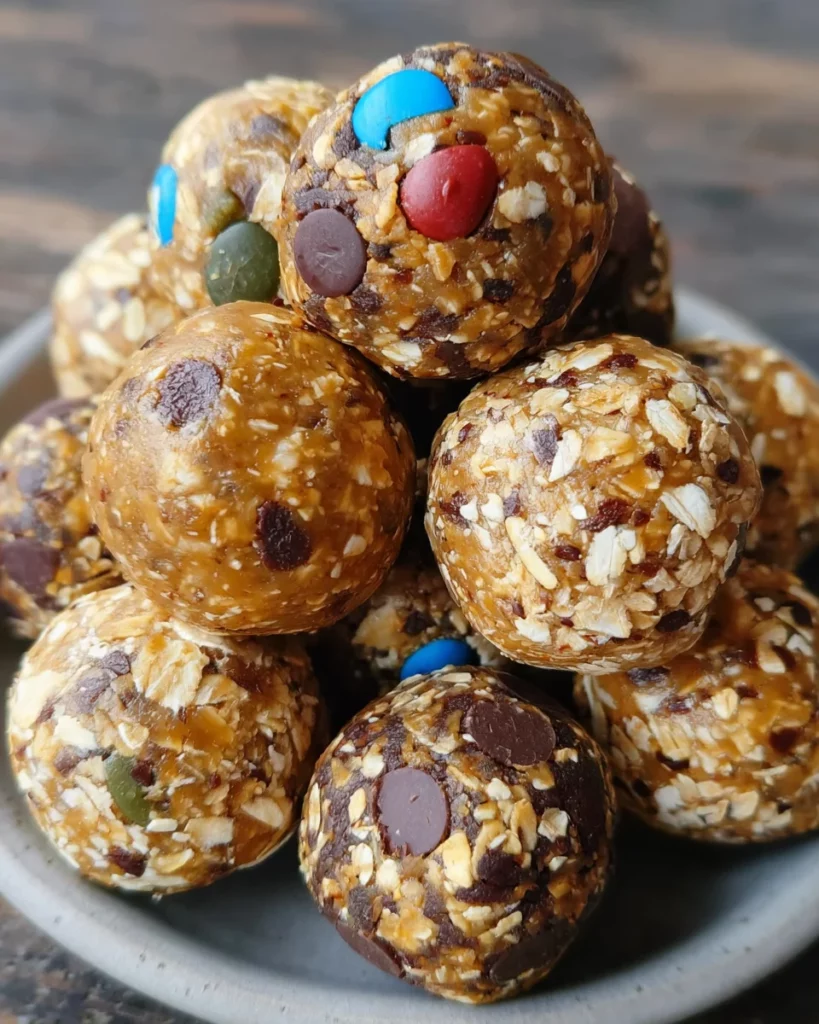
- Chocolate chips: A decadent treat for those chocolate chip balls, giving them a melty sweetness.
- Raisins: Sweet and chewy morsels for the oatmeal raisin variation, adding a burst of natural sweetness.
- Cinnamon: A sprinkle for warmth and flavor, transforming ordinary oats into a cozy delight.
- M&M’s: Perfect for the fun “Monster Cookie Balls” variation, these candy-coated treats will be a hit with the kids!
Feel free to explore the world of add-ins! Nuts, seeds, or even shredded coconut can elevate these energy snacks to the next level. If you need exact measurements, don’t worry—they’re at the bottom of the article and ready for printing!
How to Make Healthy No-Bake Protein Balls
Making Healthy No-Bake Protein Balls is an absolute breeze! Follow these simple steps, and you’ll have a batch ready in no time. Let’s get rolling!
Step 1: Combine Base Ingredients
Start by grabbing a large mixing bowl.
In it, combine the rolled oats, peanut butter, and honey or maple syrup.
Mix everything together until it forms a nice, compact mixture. This step helps establish a solid base for the protein balls.
Step 2: Segregate the Mixture
Once everything is well incorporated, divide the mixture into two equal parts.
This will let you create different flavor profiles that will delight everyone in your family!
Step 3: Flavor the Vanilla Base
Take one half of the mixture and mix in the vanilla protein powder.
Stir until fully combined, making sure there are no lumps.
Now fold in the chocolate chips to add a sweet touch for your vanilla-flavored balls.
Step 4: Prepare Oatmeal Raisin Flavor
Now, take the vanilla protein base and sprinkle in some cinnamon.
Next, fold in the raisins, mixing well to combine.
This tasty twist creates a delightful oatmeal raisin flavor that’s a classic favorite!
Step 5: Flavor the Chocolate Base
For the second half, mix in the chocolate protein powder.
Ensure it’s well blended and then stir in more chocolate chips.
This will make the chocolate balls rich and extra satisfying!
Step 6: Create the Monster Cookie Balls
Now for the fun part! In the chocolate mixture, fold in the M&M’s.
This adds color and a playful crunch, making the “Monster Cookie Balls” a hit with the kids.
Step 7: Form the Protein Balls
Grab a spoon and scoop out portions of the mixtures.
Roll them into bite-sized balls with your hands. If it gets sticky, moisten your hands with a little water or oil.
Keep rolling until you’ve formed about 24–25 protein balls!
Step 8: Storage Tips
Store your protein balls in an airtight container.
They’ll stay fresh in the fridge for up to a week, or freeze them for a month for longer storage.
Get ready to enjoy these fun and nutritious snacks whenever you need a boost of energy!
Tips for Success
- Moisten your hands with water or a bit of oil to roll the balls effortlessly.
- Chill the mixture for 10 minutes in the fridge before rolling for easier handling.
- Customize with your favorite seeds or nuts for added texture and flavor.
- Keep a variety of mix-ins on hand to switch things up for family members.
- Label your containers to quickly track flavors and stay organized!
Equipment Needed
- Large mixing bowl: A classic choice, but any bowl will do!
- Spoon: Use a sturdy spoon or spatula for mixing.
- Measuring cups: Essential for accurate ingredient ratios.
- Cookie sheet or plate: Handy for placing rolled protein balls.
- Optional: Food processor for quick mixing if you prefer!
Variations
- Nut Butter Swaps: Try almond butter or cashew butter for a different nutty flavor.
- Vegan Option: Use maple syrup and your favorite plant-based protein powder to keep it vegan-friendly.
- Superfood Add-ins: Mix in chia seeds, flaxseeds, or hemp hearts for an extra nutritional boost.
- Fruit Flavors: Add dried cranberries, chopped dates, or even coconut flakes for a fruity twist.
- Spiced Up: Experiment with vanilla extract, nutmeg, or pumpkin spice for seasonal flavors!
Serving Suggestions
- Pair these protein balls with a refreshing smoothie for a nutritious breakfast on-the-go.
- Serve them alongside fresh fruit slices for a delightful afternoon snack.
- Pack them in lunchboxes to brighten up your kids’ school day.
- Present them in a fun jar for a colorful kitchen display.
- Enjoy with a cup of herbal tea for a cozy evening treat!
FAQs about Healthy No-Bake Protein Balls
Can I use different protein powders for these protein balls?
Absolutely! You can experiment with any flavor of protein powder you like. Whether it’s whey, plant-based, or even flavored options, it will work well in these Healthy No-Bake Protein Balls.
How long do Healthy No-Bake Protein Balls last?
These protein balls can be stored in the refrigerator for up to a week. If you need them to last longer, freeze them for up to a month. Just make sure they’re in an airtight container!
Are these protein balls suitable for kids?
Yes! These Healthy No-Bake Protein Balls are perfect for kids. They provide energy and nutrition without added sugars, and with the fun mix-ins like chocolate chips or M&M’s, they’ll be a hit!
What if I have nut allergies?
No worries! You can easily swap peanut butter with sunflower seed butter or any allergy-friendly spread that gives a similar texture. Your protein balls will still be delicious!
Can I make them gluten-free?
Yes! Just ensure you use certified gluten-free oats in your recipe. That way, you can enjoy these Healthy No-Bake Protein Balls without any worries!
Final Thoughts
Creating these Healthy No-Bake Protein Balls is more than just making snacks; it’s about embracing the joy of quick, wholesome treats that energize our busy lives. The satisfaction of rolling balls filled with nutritious ingredients warms my heart, knowing I’m fueling my family with good food. Every bite brings smiles, whether it’s among kids or friends. Plus, the endless flavor combinations keep it exciting! Trust me, once these beauties find a spot in your kitchen, they’ll become a go-to recipe, making snack time not just healthy, but also a delightful bonding experience. Happy snacking!
Print
Healthy No-Bake Protein Balls
- Total Time: 15 minutes
- Yield: 24–25 protein balls 1x
- Diet: Vegan
Description
Healthy No-Bake Protein Balls are delicious energy snacks that provide a great source of protein and can be made in various flavors.
Ingredients
- 3 cups rolled oats
- 1/2 cup honey or maple syrup
- 1 cup peanut butter
- 1/4 cup vanilla protein powder
- 1/4 cup chocolate protein powder
- 1/4 cup chocolate chips (for Chocolate Chip Balls)
- 1/4 cup raisins (for Oatmeal Raisin Balls)
- 1/2 teaspoon cinnamon (for Oatmeal Raisin Balls)
- 1/4 cup chocolate chips (for Chocolate Peanut Butter Balls)
- 1/4 cup M&M’s (for Monster Cookie Balls)
Instructions
- In a large mixing bowl, combine rolled oats, peanut butter, and honey or maple syrup. Stir until the mixture is compact.
- Divide into two equal parts. Mix vanilla protein powder into one part and chocolate protein powder into the other part until fully combined.
- Mix chocolate chips into the vanilla protein base until evenly combined.
- Combine the vanilla protein base with cinnamon and raisins until well mixed.
- Mix chocolate chips into the chocolate protein base until evenly incorporated.
- Combine M&M’s with the chocolate protein base until thoroughly mixed.
- Using a spoon, scoop the mixture, roll it into balls with your hands, and make about 24–25 portions. Moisten your hands if needed to help shape the balls.
- Store in an airtight container in the refrigerator for up to 7 days or in the freezer for up to a month.
Notes
- Moisten hands with water or a bit of oil for easier rolling.
- Experiment with different mix-ins like nuts or seeds for variation.
- Prep Time: 15 minutes
- Cook Time: 0 minutes
- Category: Snacks
- Method: No-Bake
- Cuisine: American
Nutrition
- Serving Size: 1 protein ball
- Calories: 120
- Sugar: 5g
- Sodium: 50mg
- Fat: 5g
- Saturated Fat: 1g
- Unsaturated Fat: 3g
- Trans Fat: 0g
- Carbohydrates: 15g
- Fiber: 2g
- Protein: 4g
- Cholesterol: 0mg

