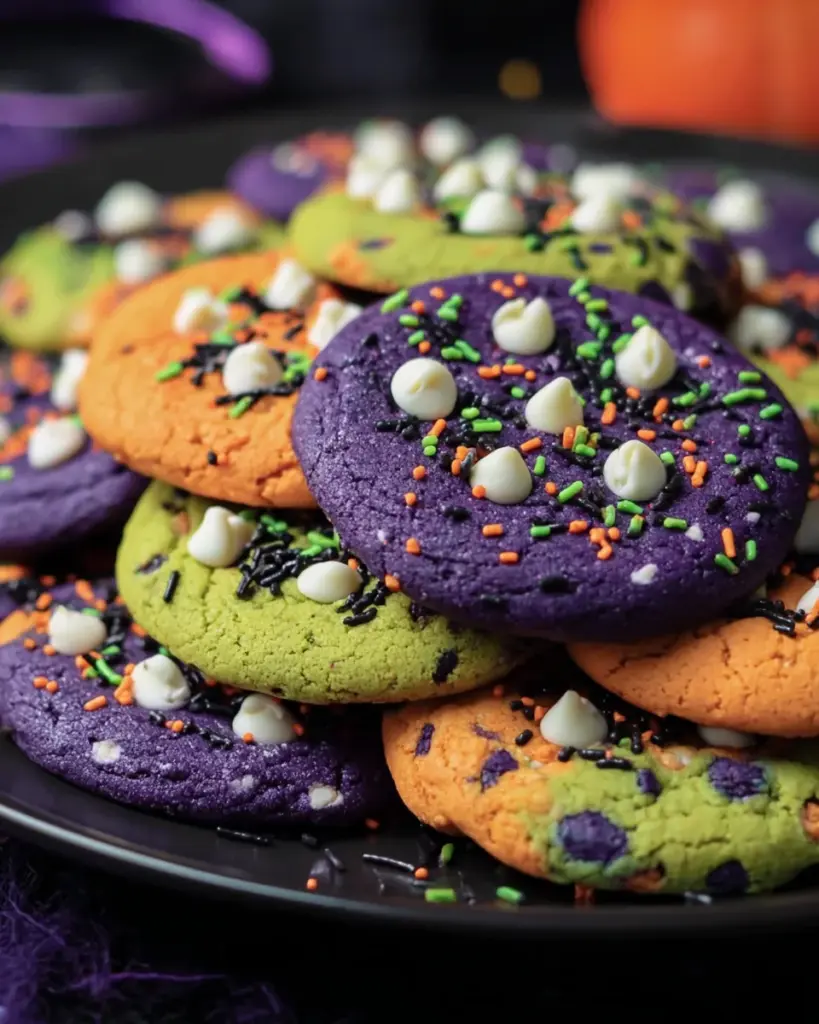
Hocus Pocus Cookies: Create Magical Treats Easily!
Introduction to Hocus Pocus Cookies
As fall rolls in and the leaves start to dance, I can’t help but get a little bit excited about Halloween. One treat that always gets my family in the mood is Hocus Pocus Cookies. These colorful delights not only bring a burst of festive cheer to our kitchen but are also super easy to whip up! Imagine a soft, chewy cookie enriched with sweet vanilla flavor, ready in just about half an hour! Whether you’re a busy mom gearing up for a fun-filled season, or someone looking to impress friends at a gathering, this quick recipe is your ticket to delight!
Why You’ll Love This Hocus Pocus Cookies
These Hocus Pocus Cookies are a perfect treat for anyone short on time but big on flavor! They’re incredibly easy to make, ensuring even the busiest schedules can squeeze in some baking fun. The striking colors will captivate kids and adults alike, making them ideal for Halloween gatherings. Plus, the sweet vanilla flavor paired with a soft, chewy texture will leave everyone asking for seconds—seriously, who can resist such magical goodies?
Ingredients for Hocus Pocus Cookies
Gathering the right ingredients for my Hocus Pocus Cookies is like assembling a magical potion. Each element plays a significant role in creating these delightful treats. Here’s what you’ll need:
- White cake mix: This is the base of our cookies, providing a quick and easy foundation with just the right amount of sweetness.
- Baking powder: A crucial element that helps the cookies rise, giving them that fluffy, chewy texture.
- Eggs: They bind the ingredients together and add richness, ensuring your cookies are soft and tender.
- Vegetable oil: This adds moisture to the dough, making the cookies irresistibly chewy.
- Vanilla extract: A splash of flavor that enhances the sweet notes of the cookies, making them taste like a warm hug.
- Gel food coloring: Here’s where the magic truly happens! Orange, purple, and lime green will create a festive, colorful spread that’s perfect for Halloween.
- White chocolate chips: For that creamy, sweet addition, these chips melt beautifully and provide a delightful surprise in every bite.
- Colored sugar or sprinkles (optional): Use these to add an extra touch of festivity and fun! They’re completely optional but are perfect for that eye-catching finish.
You’ll find the exact quantities of all these ingredients listed at the end of the article, available for easy printing. So, let’s gather our supplies and get ready to bake up some magic!
How to Make Hocus Pocus Cookies
Step 1: Preheat and Prepare
First things first, let’s get that oven fired up! Preheat it to 350°F (175°C) to ensure the cookies bake evenly. While that’s heating up, line a baking sheet with parchment paper. This prevents sticking and makes cleanup a breeze—a tiny step that brings big results! Trust me, your future self will thank you when baking time rolls around!
Step 2: Mix the Dry Ingredients
In a large mixing bowl, combine the white cake mix and baking powder. Stir them together until well combined. This dry mixture sets the stage for your Hocus Pocus Cookies. Don’t skip this step; it’s crucial for achieving the right texture! A good blend creates a smooth foundation that will turn into cookie magic in no time.
Step 3: Blend in Wet Ingredients
Now it’s time to bring in the fun! Add the eggs, vegetable oil, and vanilla extract to your dry mixture. Mix everything gently until it forms a sticky dough. This part is where the magic begins! The aroma of vanilla wafting through your kitchen is truly irresistible. Just picture it—such a warm, inviting scent!
Step 4: Divide and Color the Dough
Next, let’s get creative! Divide your dough into three equal portions and place each into separate bowls. This is where the real fun starts—add gel food coloring to each bowl. Knead the dough until the colors blend beautifully. You’ll have vibrant orange, purple, and lime green dough that’s Halloween ready! It’s like transforming your kitchen into a whimsical, colorful wonderland!
Step 5: Form the Cookies
Using a tablespoon, scoop up portions of each colored dough. Roll them into balls and place them on the prepared baking sheet. Make sure to leave some space between them—this gives them room to spread while they bake. Watching the vibrant colors come together on the baking sheet is such a joy! Just wait till they bake; they’ll be absolutely enchanting.
Step 6: Add Toppings
Now for the finishing touches! Press three white chocolate chips into each cookie dough ball. If you’re feeling festive, sprinkle some colored sugar or sprinkles on top too! These little extras make each cookie pop with color and sweetness. It’s the perfect way to bring a bit of whimsy to your Halloween treats!
Step 7: Baking Time
Pop your baking sheet in the oven and set the timer for 10 to 12 minutes. Keep an eye on them; you’ll know they’re done when the edges are set and the tops start to crack. Your kitchen will soon smell like a cozy bakery! Don’t worry if they look a little soft; they will firm up as they cool!
Step 8: Cooling and Decorating
Once baked, let the cookies cool on the sheet for a few minutes before transferring them to a wire rack. This allows them to set properly. After they’re cool, the real fun begins—decorate! Add frosting, extra sprinkles, or even drizzle some melted chocolate on top. It’s all about making them uniquely yours. Get creative!
Tips for Success
- Measure your ingredients accurately for the best results—baking is a science!
- Don’t rush the cooling process; letting the cookies cool completely enhances their texture.
- Feel free to mix and match food coloring for a unique look—get creative!
- Try different toppings such as candy eyes for an extra spooky touch!
- Always keep an eye on the cookies while baking; oven times can vary.
Equipment Needed
- Baking sheet: A standard one works well, but a silicone mat is a great non-stick alternative.
- Parchment paper: If you don’t have this, simply grease your baking sheet.
- Mixing bowls: Any size will do; just make sure they’re sturdy.
- Spoon or cookie scoop: A tablespoon works fine, but a scoop gives uniformity.
- Wire rack: Essential for cooling; if you don’t have one, any flat surface will suffice.
Variations of Hocus Pocus Cookies
- Gluten-free option: Swap the white cake mix with a gluten-free cake mix for a magical treat that everyone can enjoy!
- Nutty twist: Add chopped nuts like pecans or walnuts for a delightful crunch and rich flavor in every bite.
- Chocolatey goodness: Incorporate cocoa powder into the dough for a chocolate version of these festive cookies. Who can resist chocolate on Halloween?
- Vegan variation: Replace eggs with flaxseed meal mixed with water, and use a plant-based oil to cater to vegan friends.
- Dairy-free delight: Choose dairy-free chocolate chips and ensure your cake mix is free from dairy for a delicious dairy-free option.
Serving Suggestions for Hocus Pocus Cookies
- Pair these cookies with warm apple cider for a cozy fall treat.
- Serve alongside a spooky Halloween punch or themed milk for a fun twist!
- Arrange on a decorative platter, garnished with colorful candies for an eye-catching display.
- Wrap in festive cellophane bags as delightful party favors!
FAQs about Hocus Pocus Cookies
Can I use a different cake mix for Hocus Pocus Cookies?
Absolutely! While the white cake mix creates a sweet base, feel free to experiment with other flavors like chocolate or lemon. Just remember, the color might change a bit with different mixes!
How can I store the cookies after baking?
To keep your Hocus Pocus Cookies fresh, store them in an airtight container at room temperature. They should stay nice and chewy for up to a week. If they last that long, that is!
Can I freeze these cookies for later?
You bet! Once baked, let the cookies cool completely, then place them in a freezer-safe bag. They can be frozen for up to three months. Just thaw them at room temperature when you’re ready to enjoy!
What can I use instead of gel food coloring?
If you don’t have gel food coloring, liquid food coloring works too, but the colors may not be as vibrant. You can also use natural colorants like beet juice for red or turmeric for yellow, but keep in mind the flavors might change slightly.
Are Hocus Pocus Cookies suitable for kids?
Definitely! These cookies are fun and colorful, making them a hit with kids. Just keep an eye on the sprinkles for any allergies, and they’ll surely enjoy helping out with the decorating!
Final Thoughts
As I wrap up my journey into the world of Hocus Pocus Cookies, I can’t help but feel a rush of joy. These delightful treats bring not only vibrant colors but also a sprinkle of nostalgia and family togetherness. Whether you’re baking them for a Halloween party, a cozy evening at home, or just because, each bite becomes a small celebration of fun and creativity. Remember, in the kitchen, it’s the little moments that create lasting memories. So roll up your sleeves, dive in, and let your inner witch or wizard shine through with these magical cookies!
Print
Hocus Pocus Cookies
- Total Time: 27 minutes
- Yield: 24 cookies 1x
- Diet: Vegetarian
Description
Delicious and colorful cookies perfect for Halloween, featuring a soft and chewy texture with a sweet vanilla flavor.
Ingredients
- 1 box of white cake mix
- 1 teaspoon baking powder
- 2 eggs
- 1/2 cup vegetable oil
- 1 teaspoon vanilla extract
- Orange Gel Food Coloring
- Purple Gel Food Coloring
- Lime Green Gel Food Coloring
- White chocolate chips (3 per cookie)
- Colored sugar or sprinkles (optional)
Instructions
- Preheat your oven to 350°F (175°C) and line a baking sheet with parchment paper.
- In a large mixing bowl, combine the white cake mix and baking powder.
- Add the eggs, vegetable oil, and vanilla extract to the dry ingredients and blend until it forms a sticky dough.
- Divide the dough into three bowls and add food coloring to each, kneading until fully colored.
- Scoop tablespoon-sized portions of dough onto the prepared baking sheet, leaving space between them.
- Add 3 white chocolate chips and sprinkles to each cookie before baking.
- Bake for 10-12 minutes until edges are set and tops are cracking, then allow to cool slightly before transferring to a wire rack.
- Decorate cooled cookies with frosting, sprinkles, candy eyes, or drizzle with chocolate if desired.
- Enjoy your magical Hocus Pocus cookies!
Notes
- For a Halloween-themed look, use orange, purple, and green sugar.
- Cookies will firm up as they cool.
- Consider sandwiching two cookies with a filling for added flavor.
- Prep Time: 15 minutes
- Cook Time: 12 minutes
- Category: Dessert
- Method: Baking
- Cuisine: American
Nutrition
- Serving Size: 1 cookie
- Calories: 150
- Sugar: 10g
- Sodium: 100mg
- Fat: 7g
- Saturated Fat: 1g
- Unsaturated Fat: 6g
- Trans Fat: 0g
- Carbohydrates: 20g
- Fiber: 0g
- Protein: 2g
- Cholesterol: 20mg

