How to Make Spooky Tissue Paper Jars for Halloween Fun

Introduction to How to Make Spooky Tissue Paper Jars
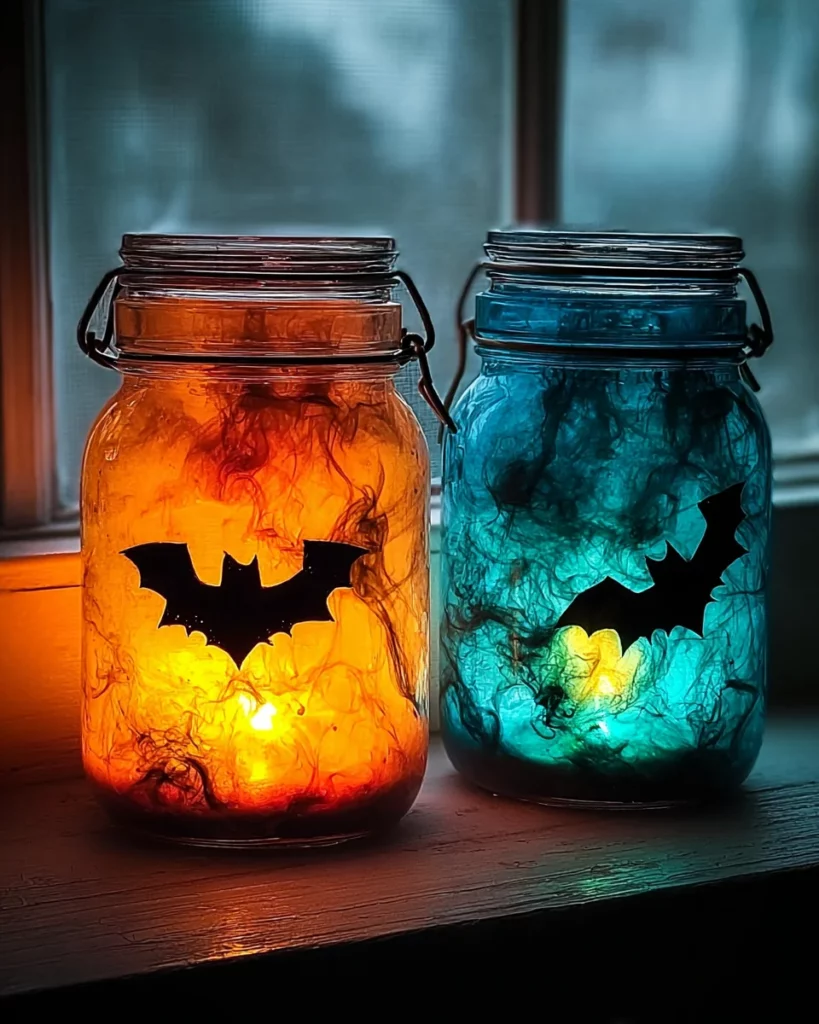
As the leaves turn vibrant shades of orange and the air gets a little crisp, I can feel the excitement of Halloween creeping in. It’s the perfect time to add some festive flair to our homes, and that’s where learning how to make spooky tissue paper jars comes into play! This fun DIY craft is a great solution for busy moms like us who want to bring a bit of Halloween spirit without spending hours on complicated projects. Trust me, these jars will not only brighten your space but also create delightful memories in the process!
Why You’ll Love This How to Make Spooky Tissue Paper Jars
This craft is all about simplicity and fun! With just a few materials, you can whip up spooky tissue paper jars in no time. It’s a project that brings the kids together, allowing them to flex their creativity while you sip on your favorite hot drink. Plus, decorating your home for Halloween has never been easier, making these jars a fantastic way to celebrate the season with little effort!
Ingredients for How to Make Spooky Tissue Paper Jars
Before we dive into this creative adventure, let’s gather our ingredients! You’ll be pleased to know that they are all simple and easy to find, making this project a breeze. Here’s what you’ll need:
- Clean Glass Jars: Use mason jars or other wide-mouth jars. They’re perfect for showcasing your designs.
- Tissue Paper: Choose classic Halloween colors like orange and black, but feel free to use your favorite shades to add a personal touch.
- Mod Podge or White School Glue: This acts as your adhesive. Mod Podge gives a nice finish, while school glue is budget-friendly.
- Water: You’ll need this for diluting your glue to help apply the tissue paper smoothly.
- Brushes: A flat brush works wonders for applying glue evenly onto the jars.
- LED Tea Lights: These are essential for illuminating your jars. They’re safe and create a warm glow without any fire hazards.
- Scissors: For cutting your tissue paper into manageable pieces. Scissors are a must-have!
- Black Marker or Paint: Use this to draw spooky faces or designs. It’s your chance to get imaginative!
- Optional Decorations: Ribbons, washi tape, and other embellishments can make your jars even more magical.
For precise measurements, don’t forget to check the bottom of the article for easy printing. Let your creativity flow, and let’s get started on making those spooky tissue paper jars!
How to Make Spooky Tissue Paper Jars
Now that we have everything ready, let’s dive into the fun part: crafting our spooky tissue paper jars! Follow these straightforward steps to bring your Halloween vision to life. I promise, this will be as enjoyable as a crisp autumn day.
Prepare Your Jars
Start by giving your glass jars a good wash. Make sure they are squeaky clean and completely dry. Any leftover moisture could mess with our project. I usually let mine air dry while I gather my other materials. It’s as easy as pie!
Cut Tissue Paper
Next, grab your scissors and tissue paper. Cut them into little squares, about 2×2 inches. Keep it simple; they don’t have to be perfect! I often let my kids help with this part. It’s a fun way to bond and get their creativity flowing.
Mix the Glue
Now it’s time to mix things up! Combine an equal part of school glue and water in a bowl. This 1:1 ratio helps the glue go on smoothly. I always encourage my kids to test the consistency first—squeezing in a little glue can turn into a science experiment!
Adhere the Tissue Paper
Using a flat brush, apply a thin layer of the glue mixture to the jar. Place a piece of tissue paper on top, gently pressing it down. Coat it again with another layer of glue. This creates a nice bond and gives it that spooky vibe! Don’t rush. Take your time and admire your work.
Create Your Design
Let’s unleash our inner artists! Layer different pieces of tissue paper on the jar, allowing some glass to peek through for depth and character. This layering adds dimension, making your jars look extra spooky. It’s like dressing them up for a Halloween party!
Let it Dry
Patience is key here. Once you’ve finished decorating, allow your jars to dry completely, for about 1-2 hours. The anticipation is part of the fun! I usually wrap up my craft time with a cup of apple cider while I wait.
Add Faces or Art
Now, the final touch! Grab your black marker or paint and let your creativity flow. Draw spooky faces or eerie designs that reflect your style. It’s the cherry on top of an already delightful treat! Your jars are now ready to shine brightly.
Tips for Success
- Have all your materials ready before starting to keep things organized.
- Use a thick layer of glue to ensure the tissue paper sticks well.
- For easier application, tear the tissue paper instead of cutting—this creates a more organic look!
- Try different colors and textures of tissue paper for unique designs.
- Get creative! Don’t hesitate to personalize your jars with additional decorations.
Equipment Needed
- Flat Brush: Essential for applying the glue. A foam brush works well too!
- Bowl: For mixing glue and water. Any small container will do.
- Scissors: Handy for cutting tissue paper. Let the kids use safety scissors.
- Paper Towels: Useful for cleaning up after your crafting fun!
Variations
- Use different colors of tissue paper based on your favorite themes, like winter white or spring pastels.
- Try layering patterned tissue paper for added texture and design, like stripes or polka dots.
- Incorporate metallic or glitter tissue paper for a festive touch, especially for celebration jars!
- Create seasonal variations with holiday-specific colors, such as red and green for Christmas or pink for Valentine’s Day.
- Experiment with stencils to create intricate designs instead of freehand drawing.
Serving Suggestions
- Place your spooky tissue paper jars on the dining table as a festive centerpiece for Halloween gatherings.
- Pair the jars with warm apple cider or pumpkin spice lattes for a cozy autumn feel.
- Consider adding a sprinkle of fake spider webs around the jars for extra Halloween flair!
- Use these jars as trick-or-treat holders, lighting up the path for little ghosts and goblins.
FAQs about How to Make Spooky Tissue Paper Jars
Can I use regular glue instead of Mod Podge?
Absolutely! White school glue works just as well. Just remember to mix it with water for better application. It’s a great budget-friendly choice for this Halloween craft!
How long do the spooky tissue paper jars last?
These jars can last a long time if you take care of them! Keep them in a dry area away from moisture. If you’ve used LED lights, they’re safe for display during Halloween and beyond.
Can kids help with this project?
Yes, definitely! This craft is a fantastic way for kids to express their creativity. Just be ready to assist with the glue and cutting, especially for younger children. It’s a fun bonding activity!
What if I want to make these jars for other holidays?
That’s the beauty of this project! Simply switch up the color scheme and designs depending on the holiday. Use reds and greens for Christmas or pastels for Easter. Your imagination is the limit!
Do I need to seal the jars after decorating?
It’s not necessary to seal them, but if you’d like added durability, a clear acrylic sealer spray can give them a protective finish. Just ensure they are completely dry before applying!
Final Thoughts
Crafting spooky tissue paper jars is more than just a Halloween project; it’s a delightful experience that creates memories to treasure. As you gather with loved ones, laughter fills the air, and creativity blossoms. Watching the jars illuminate your home adds a touch of warmth and whimsy. Each jar tells a story of shared moments and fun, bringing your family’s Halloween spirit to life. So, roll up your sleeves, let your imagination run wild, and enjoy the magic of transformation. These jars aren’t just decorations; they’re heartwarming reminders of the joy of creating together during this special season.
Print
How to Make Spooky Tissue Paper Jars for Halloween Fun
- Total Time: 2 hours 30 minutes
- Yield: Varies based on number of jars used
- Diet: N/A
Description
Learn how to create spooky tissue paper jars for Halloween, perfect for adding a fun and festive touch to your decorations.
Ingredients
- Clean Glass Jars: Mason jars or other wide mouth jars
- Tissue Paper: Orange and black or your preferred colors
- Mod Podge or White School Glue
- Water: For diluting glue
- Brushes: Flat brush for application
- LED Tea Lights: For illumination
- Scissors: For cutting tissue paper
- Black Marker or Paint: For designs
- Optional Decorations: Ribbons, washi tape, etc.
Instructions
- Prepare Your Jars: Clean glass jars thoroughly and make sure they are dry.
- Cut Tissue Paper: Cut into manageable pieces, about 2×2 inches.
- Mix the Glue: Dilute school glue with water in a 1:1 ratio.
- Adhere the Tissue Paper: Apply a layer of glue, place tissue paper, and coat with another layer of glue.
- Create Your Design: Layer tissue paper and allow some glass to show for depth.
- Let it Dry: Allow jars to dry completely, about 1-2 hours.
- Add Faces or Art: Use a black marker or paint to draw spooky faces.
Notes
- Use LED tea lights for safety if desired.
- Be gentle while applying tissue paper to avoid tearing.
- Experiment with different designs and colors as desired.
- Prep Time: 30 minutes
- Cook Time: 2 hours
- Category: Crafts
- Method: Handmade
- Cuisine: N/A
Nutrition
- Serving Size: N/A
- Calories: N/A
- Sugar: N/A
- Sodium: N/A
- Fat: N/A
- Saturated Fat: N/A
- Unsaturated Fat: N/A
- Trans Fat: N/A
- Carbohydrates: N/A
- Fiber: N/A
- Protein: N/A
- Cholesterol: N/A