Little Debbie Christmas Tree Cake Balls: Holiday Bliss!

Introduction to Little Debbie Christmas Tree Cake Balls
Who doesn’t love a little holiday magic? These Little Debbie Christmas Tree Cake Balls are like a sweet hug on a busy day. They’re quick to whip up, perfect for surprising your loved ones, or even for bringing to festive gatherings. Imagine sinking your teeth into a creamy, chocolate-coated delight that tastes just like those iconic Christmas tree cakes. With just a few simple ingredients, you can create a charming treat that spreads joy around your table. Trust me; everyone will rave about them!
Why You’ll Love This Little Debbie Christmas Tree Cake Balls
These Little Debbie Christmas Tree Cake Balls are a breeze to make, saving you time in the kitchen. You’ll adore how effortlessly they come together, needing no baking at all. Plus, the blend of creamy cream cheese and sweet chocolate brings happiness in every bite. They look festive, making them a hit at any holiday party. Trust me, your busy schedule will thank you for this quick and delightful treat!
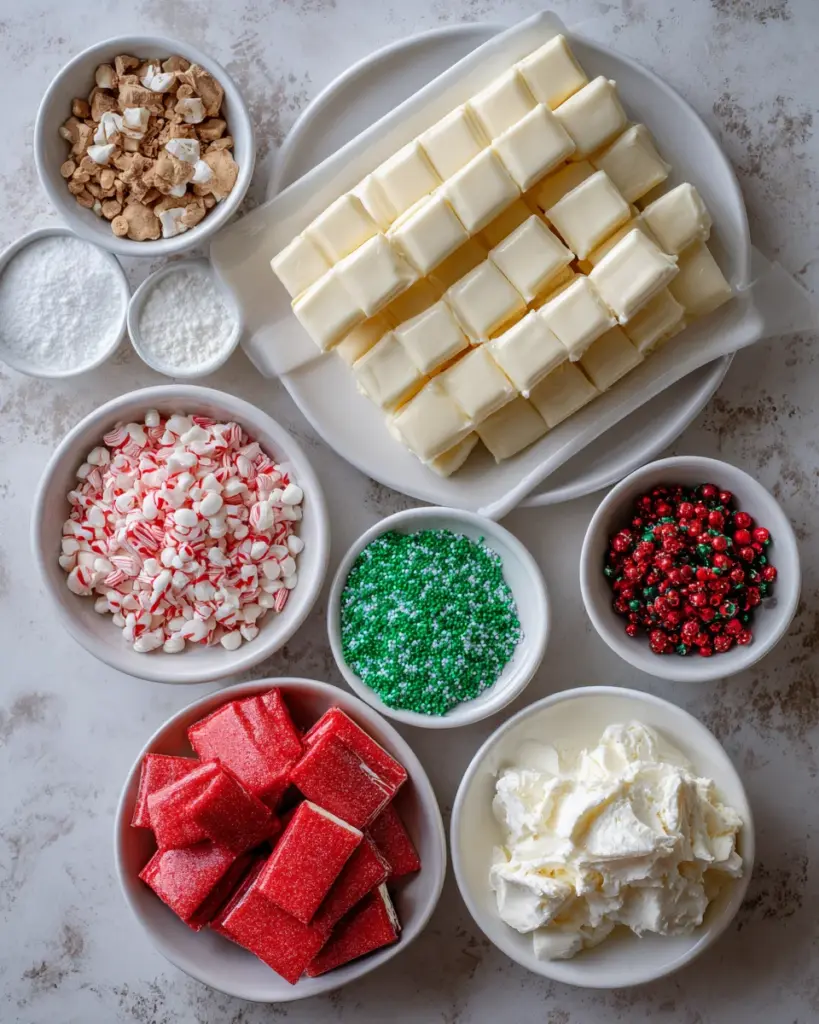
Ingredients for Little Debbie Christmas Tree Cake Balls
Gathering your ingredients is part of the fun! For these Little Debbie Christmas Tree Cake Balls, you’ll need:
- Little Debbie vanilla Christmas tree snack cakes: These provide the delightful cake base. Their sweet, vanilla flavor is simply Christmas in every bite.
- Cream cheese: A must-have for that creamy and rich texture. Ensure it’s softened to blend smoothly and effortlessly with the cakes.
- White chocolate melting wafers: For the ultimate chocolatey coating, white chocolate makes these cake balls extra luscious. I love using Ghirardelli brand for its smooth melt.
- Red vanilla flavored melting candy wafers: These add a pop of color and flavor, making your cake balls even more festive. Wilton is my go-to for vibrancy.
- Green sanding sugar sprinkles: A final touch for visual flair, these sprinkles mimic the classic Christmas tree decoration, and who doesn’t love a bit of sparkle?
All the exact quantities for these delightful ingredients can be found at the bottom of the article, ready for easy printing. Feel free to mix and match, or even bring in alternatives if you have dietary needs or pantry items to use up. Let your culinary creativity shine!
How to Make Little Debbie Christmas Tree Cake Balls
Preparing Your Baking Sheets
Start by lining two large baking sheets with parchment paper or a silicone mat. This helps avoid sticky situations later on. If you don’t have those, greasing the sheets lightly with cooking spray works too. Just make sure whatever you use allows the cake balls to lift off easily.
Making the Cream Cheese Mixture
Next, grab that softened cream cheese and beat it in a large mixing bowl until it’s fluffy, about 1-2 minutes. This step is key! Now, gently break the Little Debbie Christmas tree cakes into smaller pieces. Add them to the fluffy cream cheese and mix on low speed. You want to combine them well while keeping some chunkiness. That texture makes every bite a delight!
Forming the Cake Balls
Now it’s time to form those gorgeous cake balls! Using a small cookie scoop, take out about a tablespoon of the mixture. Roll it between your palms until it’s nice and smooth. Keep the size consistent so they all look lovely together on the platter. If the mixture gets too soft, just pop it back in the fridge for a few minutes to firm up.
Freezing the Cake Balls
Once rolled, place the cake balls onto one of your lined baking sheets. They need to freeze for about 30-45 minutes. This step is crucial! Freezing helps the cake balls hold their shape when you coat them in chocolate. Don’t skimp on the time here; firm is best for dipping!
Coating with White Chocolate
While the cake balls are freezing, melt about 20 ounces of your white chocolate melting wafers according to the package instructions. Stir until it’s completely smooth. Then, remove the cake balls from the freezer. Dip each ball into the warm white chocolate, allowing excess to drip off. Just a gentle tap will do. Nobody likes a soggy surprise!
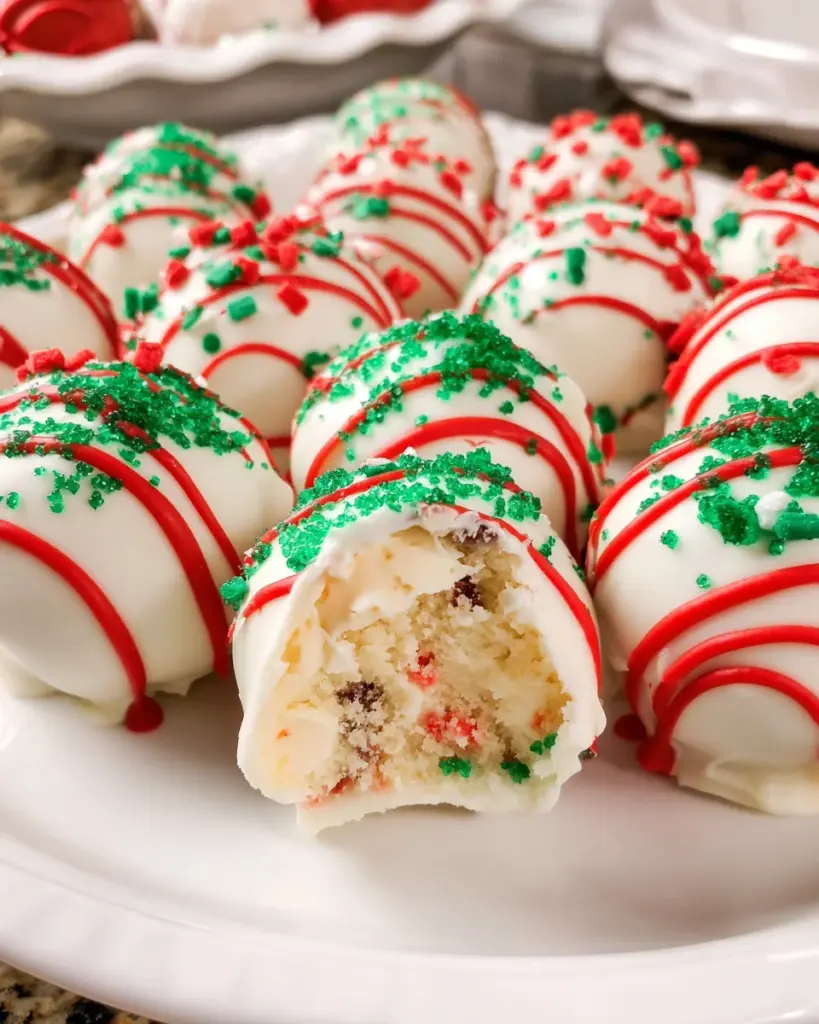
Decorating the Cake Balls
After coating, transfer your cake balls back onto the second baking sheet. Melt the red vanilla flavored melting candy wafers in a small bowl. Wait until it’s smooth, then fill a piping bag or a small zip-top bag with a corner snipped off. Create a fun zig-zag design on each cake ball. Finally, sprinkle on that vibrant green sanding sugar for a festive finishing touch!
Setting the Coating
Let your decorated cake balls set for about 15-20 minutes. They’ll be ready when the white chocolate covering is firm to the touch. If you’re feeling impatient, a quick trip to the fridge can speed things along. Once set, they’re ready to dazzle at your holiday gatherings!
Tips for Success
- Ensure your cream cheese is at room temperature; it mixes better when soft.
- Work quickly when coating the cake balls to avoid them softening too much.
- If chocolate thickens while coating, gently reheat it to smooth it out.
- Keep a small bowl of warm water nearby to dip your hands; it helps with rolling.
- Store leftover cake balls in the fridge for freshness!
Equipment Needed
- Mixing bowls: A medium bowl works great, but a large one is helpful for mixing.
- Handheld mixer: Perfect for fluffing the cream cheese. A whisk can work too, just requires more elbow grease!
- Cookie scoop: Ideal for portioning, but a tablespoon works just fine.
- Parchment paper or silicone mat: Essential for easy cleanup; cooking spray is a suitable alternative.
- Piping bag or zip-top bag: For decorating; a simple spoon can do the trick in a pinch.
Variations of Little Debbie Christmas Tree Cake Balls
- Chocolate Christmas Tree Cake Balls: Replace the white chocolate coating with milk or dark chocolate for a richer flavor.
- Gluten-free Version: Use gluten-free snack cakes or even homemade vanilla cake crumbled for the base.
- Nutty Delight: Add crushed nuts, like almonds or pecans, into the cream cheese mixture for a delightful crunch.
- Minty Twist: Incorporate a drop of peppermint extract into the cream cheese for a refreshing minty flavor.
- Colorful Candy Coating: Use colored candy melts instead of white chocolate for a festive rainbow of options.
- Vegan Option: Substitute cream cheese with a dairy-free alternative and use vegan chocolate for coating.
Serving Suggestions
- Festive Platters: Arrange the cake balls on a decorative platter for an eye-catching display.
- Hot Cocoa: Pair with warm hot cocoa or spiced apple cider for a cozy treat.
- Giftable Treats: Package them in festive boxes as delightful gifts for friends and family.
- Colorful Napkins: Use bright, Christmas-themed napkins to complete the cheerful presentation.
FAQs about Little Debbie Christmas Tree Cake Balls
Can I use other Little Debbie cakes for this recipe?
Absolutely! While Little Debbie Christmas Tree Cake Balls are delightful, you can substitute other flavors like the Swiss Cake Rolls or Zebra Cakes. Just remember, the flavor may change slightly, but that’s half the fun of experimenting!
How should I store the cake balls?
To keep your Little Debbie Christmas Tree Cake Balls fresh, store them in an airtight container in the refrigerator. They can last up to a week, but let’s be honest; they probably won’t last that long!
Can I freeze these cake balls?
Yes! If you’re making them ahead of time, feel free to freeze the cake balls before coating them. Just layer them in an airtight container with parchment paper in between, and they’ll keep well for a month. When you’re ready to enjoy, simply coat them in chocolate when you pull them out.
What can I use if I don’t have melting wafers?
If melting wafers aren’t available, you can easily use chocolate chips. Just keep in mind that they may not melt as smoothly, so add a tiny bit of vegetable oil to help achieve that right silky consistency.
Why is my cream cheese mixture too soft?
This can happen if the cream cheese isn’t cold enough. Make sure to bring it to room temperature, but not too soft. If the mixture feels too loose, chilling it in the fridge for about 15 minutes can help restore firmness before you roll them into balls.
Final Thoughts
Creating these Little Debbie Christmas Tree Cake Balls brings a sprinkle of joy to the holiday season. Each creamy, chocolatey bite is not just a treat; it’s a reason to come together with loved ones and revel in the festivities. The laughter shared while rolling the cake balls or decorating them becomes cherished memories. Plus, they’re simple enough to whip up on a busy afternoon yet impressive enough to dazzle your guests. Trust me, these delightful little gems will quickly become a holiday favorite, filling your home with sweet nostalgia and comfort. It’s holiday bliss on a plate!
Print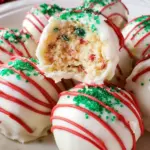
Little Debbie Christmas Tree Cake Balls
- Total Time: 1 hour 5 minutes
- Yield: 20–25 cake balls 1x
- Diet: Vegetarian
Description
Delicious holiday-inspired cake balls made with Little Debbie Christmas Tree cakes and coated in white chocolate.
Ingredients
- 10 Little Debbie vanilla Christmas tree snack cakes, unwrapped (from 2 – 8.62 oz. boxes)
- 8 ounces cream cheese, softened to room temperature
- 20 ounces white chocolate melting wafers, Ghirardelli brand used
- 6 ounces red vanilla flavored melting candy wafers, Wilton brand used
- 1 tablespoon green sanding sugar sprinkles
Instructions
- Line two large baking sheets with parchment paper or a silicone mat and set aside.
- In a large mixing bowl, add the softened cream cheese and beat on medium speed with a handheld mixer for 1-2 minutes or until fluffy and smooth.
- Break the Little Debbie vanilla Christmas tree Snack Cakes into smaller pieces and add to the bowl of beaten cream cheese. Mix on low speed until fully combined while still having some small pieces remaining.
- Using a small cookie scoop, scoop out 1 tablespoon-sized portions of the mixture and roll into smooth balls.
- Place the cake balls onto one of the prepared baking sheets and repeat until all are formed.
- Freeze the cake balls for 30-45 minutes until completely solid.
- Melt the white chocolate wafers according to package directions and stir until smooth.
- In a separate bowl, melt the red vanilla flavored candy wafers, transfer to a small piping bag with the tip cut off.
- Coat each cake ball in the melted white chocolate, gently tapping off excess before placing them on the second baking sheet.
- Pipe a decorative zig-zag pattern on top of each coated cake ball and sprinkle with green sanding sugar.
- Allow the cake balls to set for 15-20 minutes until the coating is firm before serving.
Notes
- For best results, ensure the cream cheese is at room temperature for easier mixing.
- Work quickly when coating the cake balls to prevent them from softening.
- Store leftovers in the refrigerator to keep them fresh.
- Prep Time: 20 minutes
- Cook Time: 45 minutes
- Category: Dessert
- Method: No-bake
- Cuisine: American
Nutrition
- Serving Size: 1 cake ball
- Calories: 160
- Sugar: 12g
- Sodium: 50mg
- Fat: 9g
- Saturated Fat: 5g
- Unsaturated Fat: 2g
- Trans Fat: 0g
- Carbohydrates: 18g
- Fiber: 0g
- Protein: 2g
- Cholesterol: 15mg