Loaded Taco Creamy Cheese Sauce
Introduction to Loaded Taco Creamy Cheese Sauce
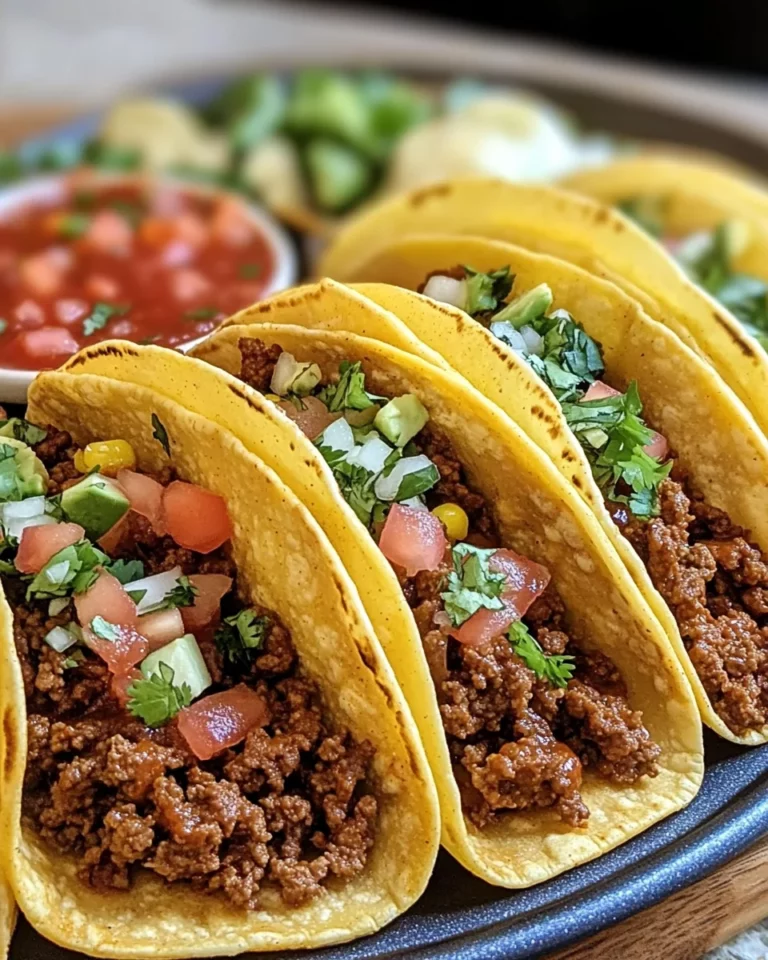
Let’s be honest, as a busy mom, I know how hectic life can get! Sometimes, you just need a delicious meal that comes together quickly, and that’s where Loaded Taco Creamy Cheese Sauce shines. This dish is like a warm hug after a long day, perfect for taco lovers craving comfort food. Imagine seasoned beef enveloped in a creamy cheese sauce, resting in a crunchy taco shell. Trust me, it’s a showstopper for dinner parties or just a cozy night in with the family. In just 40 minutes, you’ll create a meal everyone will adore!
Why You’ll Love This Loaded Taco Creamy Cheese Sauce
This Loaded Taco Creamy Cheese Sauce is the perfect blend of simplicity and flavor. It comes together in just 40 minutes, making it a lifesaver for those busy weeknights. The rich, cheesy goodness satisfies every taste bud. Plus, it’s versatile, allowing everyone to customize their tacos. Your family will be raving about this dish long after the last bite, and you’ll love how easy it is to whip up on a moment’s notice!

Ingredients for Loaded Taco Creamy Cheese Sauce
Gathering the right ingredients is half the fun! Here’s what you’ll need to bring this Loaded Taco Creamy Cheese Sauce to life:
- Ground Beef: I prefer an 80/20 blend for the perfect balance of flavor and juiciness.
- Onion: Diced onions add a savory depth to your dish. Go for a small size to keep it subtle.
- Garlic: Fresh minced garlic brings a punch of flavor. You can never go wrong with garlic!
- Taco Seasoning: A pre-packaged blend works wonders, but homemade gives you better control over the spices.
- Water: Just a splash helps bring everything together in the beef mixture.
- Butter: This is crucial for creating a rich base for your cheese sauce. Trust me, it makes all the difference!
- All-Purpose Flour: To thicken the creamy cheese sauce, flour is essential for that silky texture.
- Whole Milk: It adds creaminess to your sauce. You might substitute with half-and-half if you wish!
- Cream Cheese: Softened cream cheese gives our sauce that luxurious richness we all crave.
- Cheddar and Monterey Jack Cheese: These are my go-to cheeses! They melt beautifully and pack flavors everyone loves.
- Bell Pepper: Diced bell pepper adds a pop of color and freshness. Feel free to choose red or green!
- Diced Tomatoes: They bring a hint of sweetness and a splash of juiciness to the mix.
- Cilantro: Freshly chopped cilantro brightens up the flavors and adds a nice herbaceous note.
- Garlic and Onion Powder: These add a little extra oomph to the flavor profile of your cheese sauce.
- Red Pepper Flakes: Optional, but a pinch gives a lovely kick if you like a little heat!
- Taco Shells: Hard taco shells are perfect for that satisfying crunch. You could also use soft tortillas if you prefer.
- Extra Cheese: Who doesn’t love more cheese? Sprinkle some on top before you pop it back in the oven!
- Sour Cream & Hot Sauce: These are optional but provide excellent finishing touches to your loaded tacos.
For exact measurements, check at the bottom of the article for printing convenience! Happy cooking!
How to Make Loaded Taco Creamy Cheese Sauce
Now that we have our ingredients lined up, it’s time to dive into the cooking! Follow these simple steps to create a meal that’ll have your loved ones begging for seconds. Believe me, the aroma alone will have everyone at the dinner table in no time!
Step 1: Cook the Ground Beef
Start by heating a large skillet over medium-high heat. Toss in the ground beef and use a wooden spoon to break it apart. Cook it until it turns a lovely brown, about 6-8 minutes. Then, stir in the diced onion, letting it soften for around 3-4 minutes. The sweetness of the onions melds beautifully with the beef!
Next, add the minced garlic, cooking for another minute. It’s amazing how garlic can uplift a dish! Then, sprinkle in the taco seasoning, followed by a splash of water to help combine those bold flavors. Let everything simmer for 5 minutes. This allows the mixture to thicken and become oh-so-flavorful. Don’t forget to season with salt and pepper! Once done, set this mixture aside.
Step 2: Prepare the Creamy Cheese Sauce
In a medium saucepan, melt the butter over medium heat. Create a roux by whisking in the flour for about a minute. This is your thickening agent, so take your time to make it smooth!
Slowly whisk in the whole milk, stirring constantly to avoid lumps. Keep stirring until it reaches a gentle simmer. It should start thickening beautifully. Now, reduce the heat to low and stir in the softened cream cheese. When it melts, mix in the cheddar and Monterey Jack cheeses, adding them gradually. This ensures you achieve that dreamy, creamy consistency we all crave!
Finally, throw in the diced bell pepper, tomatoes, and the spices you set aside. Stir in the garlic and onion powder, along with fresh cilantro. Taste and adjust the seasoning as needed. Keep your sauce warm on low heat as you prepare the shells.
Step 3: Warm the Taco Shells
Preheat your oven to 375°F (190°C). Place your hard taco shells on a baking sheet and warm them for about 3-5 minutes. This helps ensure they’re nice and crispy, creating a perfect vessel for all the tasty fillings!
Step 4: Assemble the Tacos
Now comes the fun part! Take each taco shell and fill it with 2-3 tablespoons of that flavorful ground beef mixture you set aside earlier. Don’t be shy—load them up!
Next, generously spoon the creamy cheese sauce over the beef, letting it overflow just a bit. You want every bite to be a delicious delight! Sprinkle extra shredded cheese on top, then pop them back in the oven for about 2-3 minutes. This melts the cheese topping just right, giving it that gooey finish. Garnish with fresh cilantro before serving!
Enjoy these Loaded Taco Creamy Cheese Sauce creations hot, with sour cream and hot sauce on the side for a little extra kick!
Tips for Success
- Prep all ingredients before you start cooking. It saves time and makes the process smoother!
- Experiment with spices in the beef mixture. A dash of cumin or paprika can add depth!
- Don’t rush the cheese sauce. Stir continuously to achieve that perfect creamy texture.
- For added crunch, bake taco shells a bit longer for extra crispiness!
- Top with your favorite veggies for a fresh twist, or personalize with toppings your family loves!
Equipment Needed
- Large Skillet: A non-stick pan works well, but any heavy skillet will do.
- Medium Saucepan: Essential for making the cheese sauce; you can use a small pot if needed.
- Wooden Spoon: Great for stirring the beef; a spatula can be a handy alternative.
- Whisk: Important for mixing the cheese sauce; a fork can also work in a pinch!
- Baking Sheet: Needed for warming taco shells; a pizza stone makes a fun alternative!
Variations
- Vegetarian Option: Replace ground beef with lentils, black beans, or crumbled tempeh for a hearty, meatless meal.
- Cheesy Spinach: Add fresh spinach to the creamy cheese sauce for a nutritious twist and a pop of color!
- Spicy Chicken: Swap out beef for shredded rotisserie chicken and add jalapeños to the mixture for a spicy kick.
- Gluten-Free: Ensure to use gluten-free taco seasoning and corn-based taco shells to cater to gluten sensitivities.
- Paleo-Friendly: Use ground turkey or chicken, coconut milk, and avocado in place of cheese for a deliciously light option.
Serving Suggestions
- Sides: Pair with a fresh garden salad or crispy tortilla chips for delightful crunch.
- Drinks: Enjoy with iced tea or a refreshing margarita for a fiesta vibe!
- Presentation: Serve the tacos on a colorful platter, garnished with extra cilantro for a pop of freshness.
FAQs about Loaded Taco Creamy Cheese Sauce
Can I use ground turkey or chicken instead of beef?
Absolutely! Ground turkey or chicken works wonderfully as a substitute in this Loaded Taco Creamy Cheese Sauce. Just be sure to adjust the spices slightly, as they may need a little extra flavor!
How can I make this recipe dairy-free?
If you’re looking for a dairy-free version, you can use plant-based cream cheese and dairy-free cheese options. Coconut milk can replace the whole milk for a creamy texture!
What toppings can I add to my tacos?
The sky’s the limit! Try adding sliced jalapeños for heat, diced avocado for creaminess, or a sprinkle of corn for sweetness. Customize them to suit your family’s taste!
How long can I store the leftovers?
Your Loaded Taco Creamy Cheese Sauce can be stored in an airtight container in the fridge for about 3-4 days. Just reheat gently for a quick meal!
Can I freeze the cheese sauce?
Yes, you can freeze the cheese sauce! Store it in portioned containers, and it should stay good for up to three months. Just make sure to thaw it overnight in the fridge before reheating!
Final Thoughts
Cooking should be a joy, not a chore. This Loaded Taco Creamy Cheese Sauce is all about bringing smiles and satisfaction to the dinner table. I’ve witnessed first-hand how a simple meal can transform an ordinary evening into a cherished family moment. Plus, the delightful blend of flavors and textures makes it hard not to fall in love with every bite. So the next time you’re in need of a quick yet impressive dish, remember this recipe. It’s a guaranteed hit that will leave your loved ones asking for more—definitely a culinary adventure worth diving into!
Print
Loaded Taco Creamy Cheese Sauce
- Total Time: 40 minutes
- Yield: 4–6 servings 1x
- Diet: Gluten Free
Description
Loaded Taco Creamy Cheese Sauce is a decadent and flavorful dish featuring seasoned ground beef topped with a creamy cheese sauce, perfect for taco lovers.
Ingredients
- 1 lb ground beef (80/20 blend)
- 1 small onion, diced
- 2 cloves garlic, minced
- 1 packet taco seasoning or homemade blend
- 1/4 cup water
- Salt and pepper to taste
- 3 tablespoons butter
- 3 tablespoons all-purpose flour
- 1 1/2 cups whole milk
- 8 oz cream cheese, softened
- 1 1/2 cups shredded cheddar cheese
- 1/2 cup shredded Monterey Jack cheese
- 1 small bell pepper (red or green), diced
- 1/4 cup diced tomatoes
- 2 tablespoons fresh cilantro, chopped
- 1/2 teaspoon garlic powder
- 1/2 teaspoon onion powder
- Red pepper flakes (optional)
- 8–10 hard taco shells
- Extra shredded cheese for topping
- Fresh cilantro for garnish
- Sour cream (optional)
- Hot sauce (optional)
Instructions
- In a large skillet over medium-high heat, cook the ground beef, breaking it up with a spoon until browned, about 6-8 minutes. Add the diced onion and cook for 3-4 minutes until softened. Add minced garlic and cook for another minute. Stir in the taco seasoning and water. Simmer for 5 minutes until the liquid reduces and the mixture thickens. Season with salt and pepper. Remove from heat and set aside.
- In a medium saucepan, melt the butter over medium heat. Whisk in the flour and cook for 1 minute to create a roux. Gradually whisk in the milk, making sure to prevent lumps. Bring to a gentle simmer, stirring constantly. Reduce heat to low and add the softened cream cheese, whisking until smooth and melted. Add the cheddar and Monterey Jack cheeses gradually, stirring until completely melted and smooth. Stir in the diced bell pepper, tomatoes, garlic powder, onion powder, and cilantro. Season with salt, pepper, and red pepper flakes if using. Keep the sauce warm over low heat, stirring occasionally.
- Preheat oven to 375°F (190°C). Place taco shells on a baking sheet and warm for 3-5 minutes until crispy.
- Fill each taco shell with 2-3 tablespoons of the seasoned ground beef mixture. Generously spoon the creamy cheese sauce over each filled taco shell, allowing it to overflow slightly. Sprinkle with extra shredded cheese and return to the oven for 2-3 minutes to melt the cheese topping. Garnish with fresh cilantro and serve immediately with sour cream and hot sauce on the side.
Notes
- For a spicier sauce, add more red pepper flakes.
- Feel free to customize the toppings based on your preference.
- This dish is great for parties or family gatherings.
- Prep Time: 20 minutes
- Cook Time: 20 minutes
- Category: Main Dish
- Method: Baking and Stovetop
- Cuisine: Mexican
Nutrition
- Serving Size: 1 taco
- Calories: 320
- Sugar: 3g
- Sodium: 650mg
- Fat: 22g
- Saturated Fat: 10g
- Unsaturated Fat: 10g
- Trans Fat: 0g
- Carbohydrates: 18g
- Fiber: 2g
- Protein: 18g
- Cholesterol: 60mg

