Mason Jar Lanterns: Create Spooky Glow in 30 Minutes!

Introduction to Mason Jar Lanterns
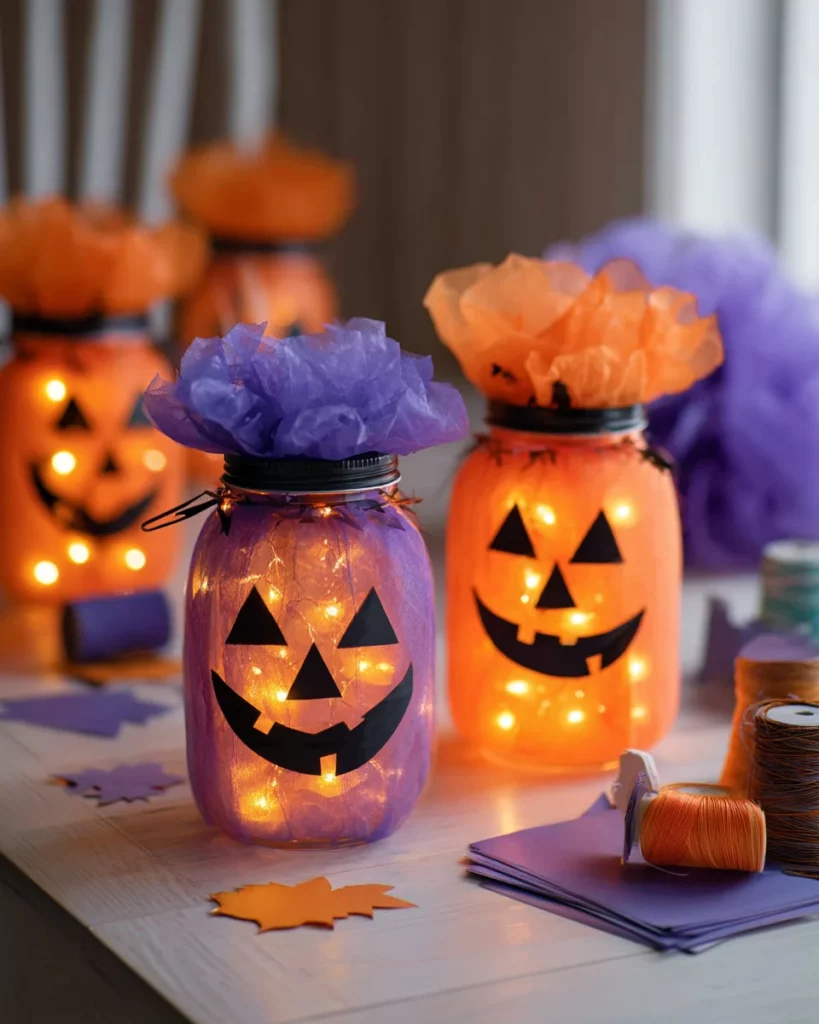
There is magic in thinking of making glowing Mason Jar Lanterns once the leaves turn and the evenings grow cooler. This quick and adorable project is perfect for busy moms or professionals like myself who desire to be creative but are always short on time. Thirty minutes and you have charming lanterns to add a warm, spooky glow to your Halloween decor. Just motherhood thrifting the kids or being able to have moments of creativity all to oneself. Grab those jars. Let’s light up the season!
Why You’ll Love This Mason Jar Lanterns
You’re going to love making these Mason Jar Lanterns for a few very good reasons. For one, it’s incredibly easy – even if you’re not much of a crafter. For another, it takes only half an hour, and who has more time than that to dedicate to one thing right now? It’s a great excuse to be super crafty while adding a bit of that holiday feel to your house. Trust me, these lanterns will bring smiles and warmth and that delightful sense of accomplishment.
Ingredients for Mason Jar Lanterns
Creating your Mason Jar Lanterns is a breeze with these simple ingredients. Here’s what you’ll need:
- Mason jars: Any clear glass jars with lids will work. They’re the canvas for your creativity!
- Orange and purple tissue paper: These vibrant colors set the Halloween mood perfectly. Feel free to mix it up!
- Black construction paper or adhesive vinyl: Use this for crafting spooky faces. The sturdiness helps them stand out beautifully.
- Scissors: A trusty pair for cutting tissue paper and features. Safety first, so be careful!
- Glue stick or Mod Podge: This is your secret weapon for sticking the tissue paper onto the jars. Mod Podge gives a glossy finish, while a glue stick is mess-free.
- Ribbon (optional): Consider adding a dash of charm around the lids. A festive touch that ties it all together!
- LED string lights or battery-operated tea lights: These are essential for illuminating your lanterns safely. Avoid real candles for family-friendly fun!
Remember, if you’re looking for specific measurements, you can find them at the bottom of the article for easy printing!
How to Make Mason Jar Lanterns
Creating your Mason Jar Lanterns is a delightful process! Follow these simple steps, and soon your home will be aglow with festive cheer!
Prepare the Jar
First things first, let’s clean those jars! Rinse them out with warm soapy water. Dry them thoroughly. A clean jar lets the tissue paper stick properly. Trust me, this preparation sets you up for success. You want those lanterns to shine bright, and it all starts here!
Wrap the Jar
Now, grab your colorful tissue paper and cut it into squares—around three inches works well. Take your glue stick or Mod Podge and brush a layer onto the jar. Then, press the tissue paper squares onto the jar like little colorful patches. Be careful to smooth out any pesky wrinkles gently; your goal is a beautifully even look!
If the newspaper tears, don’t fret! Just keep your scissors handy and cut a fresh piece. It happens to the best of us. Just breathe and keep going!
Add a Face
Time for the fun part! Cut different jack-o’-lantern features from the black construction paper or vinyl. Think silly eyes, goofy grins, or even spooky expressions. You can go all out with a vampire mouth or a ghostly pattern! Use your glue to attach them right onto the jar. The possibilities are as endless as your creativity!
Light It Up
Now for the magic moment: it’s time to light up your creations! Carefully place LED string lights or a battery-operated tea light inside each jar. This step is super important—please avoid using real candles. We want these lanterns to be a family-friendly activity! Safety first!
Finish the Lid
Let’s give those lids some flair! Cover them with matching tissue paper or dress them up with a cheerful ribbon. This little touch elevates your lanterns, making them stand out beautifully. It’s like putting a cherry on top of your craft sundae!
Display
Now that your lanterns are complete, it’s time to show them off! Arrange them on a mantelpiece, dining table, or even a windowsill. Mix and match with small pumpkins or autumn leaves for a festive display. Trust me, these glowing beauties will add a cozy charm to any spot!
Tips for Success
- Use a thin coat of glue for sticking tissue paper to avoid wrinkles.
- Choose contrasting colors for faces to make them pop against the jars.
- Position your LED lights to maximize the glow—experiment with placement!
- Involve kids in the decorating for extra fun and creativity.
- Make a few extra jars to gift to family or friends!
Equipment Needed
- Scissors: Essential for cutting paper. Safety scissors work for little hands.
- Glue stick or Mod Podge: Use a glue stick for easy application, or Mod Podge for a glossy finish.
- Paintbrush: For applying Mod Podge evenly, a foam brush is great!
Variations for Mason Jar Lanterns
- Try swapping the pumpkin faces with playful bat cutouts for an eerie twist!
- Create ghostly lanterns by using white tissue paper and drawing spooky faces with a black marker.
- Use different shapes like cats or owls to give your lanterns a unique personality.
- Experiment with metallic paints for the lids to add a touch of glam to your lanterns.
- For a whimsical touch, decorate jars in a rainbow of Halloween colors instead of traditional hues!
Serving Suggestions for Mason Jar Lanterns
- Pair your lanterns with a cozy pumpkin spice latte for a delightful seasonal treat!
- Set them amidst a spread of Halloween-themed snacks like ghost-shaped cookies or candy corn.
- Use your lanterns as table centerpieces to spark conversations at fall gatherings!
FAQs about Mason Jar Lanterns
Got questions about these charming Mason Jar Lanterns? I’ve got you covered! Here are some common queries and answers to guide you through your crafting adventure.
Can I use regular candles inside the jars?
It’s best to stick with LED lights or battery-operated tea lights for safety. Real candles can pose a fire hazard, especially with tissue paper surrounding them.
What if my tissue paper tears while sticking it on the jar?
No worries! Just grab some scissors and cut a new square. Crafting is all about having fun, so don’t stress about a little tear!
Can I make these lanterns for other holidays?
Absolutely! Switch out the themes and use different colors and shapes. Think hearts for Valentine’s Day or snowflakes for winter—your creativity is the limit!
How long will these lanterns last?
As long as you handle them gently and store them properly, these lanterns can be reused for many seasons. They’re a wonderful addition to your holiday decor!
Can kids help with this project?
Definitely! This project is perfect for involving kids. Just supervise them with scissors, and let their creativity shine as they decorate their lanterns!
Final Thoughts on Mason Jar Lanterns
Creating Mason Jar Lanterns is more than just a craft; it’s an opportunity to connect with family and embrace the spirit of the season. Each flicker of the LED light inside your delightful creations reflects the joy of creativity and the warmth of togetherness. As you gather around your glowing masterpieces, don’t be surprised if laughter and stories flow freely. These charming lanterns not only enhance your Halloween decor but also spark cherished memories that will last a lifetime. So grab your materials, channel your inner artist, and light up your home with love and happiness!
Print
Mason Jar Lanterns: Create Spooky Glow in 30 Minutes!
- Total Time: 30 minutes
- Yield: Varies based on the number of jars used
- Diet: Low Calorie
Description
Create spooky mason jar lanterns for Halloween using simple materials and LED lights.
Ingredients
- Mason jars (or any clear glass jars with lids)
- Orange and purple tissue paper
- Black construction paper or adhesive vinyl (for faces)
- Scissors
- Glue stick or Mod Podge
- Ribbon (optional, for trimming lids)
- LED string lights or battery-operated tea lights
Instructions
- Prepare the Jar – Clean and dry your jars to ensure the tissue paper adheres well.
- Wrap the Jar – Cut tissue paper into squares. Brush glue or Mod Podge onto the jar and press on the paper until fully covered. Smooth out wrinkles gently.
- Add a Face – Cut jack-o’-lantern features (eyes, nose, mouth) from black paper or vinyl and glue them on.
- Light It Up – Place LED lights or a battery-operated tea light inside. Avoid real candles for safety.
- Finish the Lid – Cover the lid with tissue paper or add a ribbon for a polished touch.
- Display – Arrange your glowing lanterns on a mantel, table, or windowsill for instant festive charm.
Notes
- Variation: Swap pumpkin faces for bat cutouts, ghosts, or cats for different spooky effects.
- Senior-Friendly Tip: Pre-cut tissue paper squares and vinyl faces make this project easier and less tiring.
- Prep Time: 10 minutes
- Cook Time: 20 minutes
- Category: Crafts
- Method: DIY
- Cuisine: N/A
Nutrition
- Serving Size: N/A
- Calories: N/A
- Sugar: N/A
- Sodium: N/A
- Fat: N/A
- Saturated Fat: N/A
- Unsaturated Fat: N/A
- Trans Fat: N/A
- Carbohydrates: N/A
- Fiber: N/A
- Protein: N/A
- Cholesterol: N/A