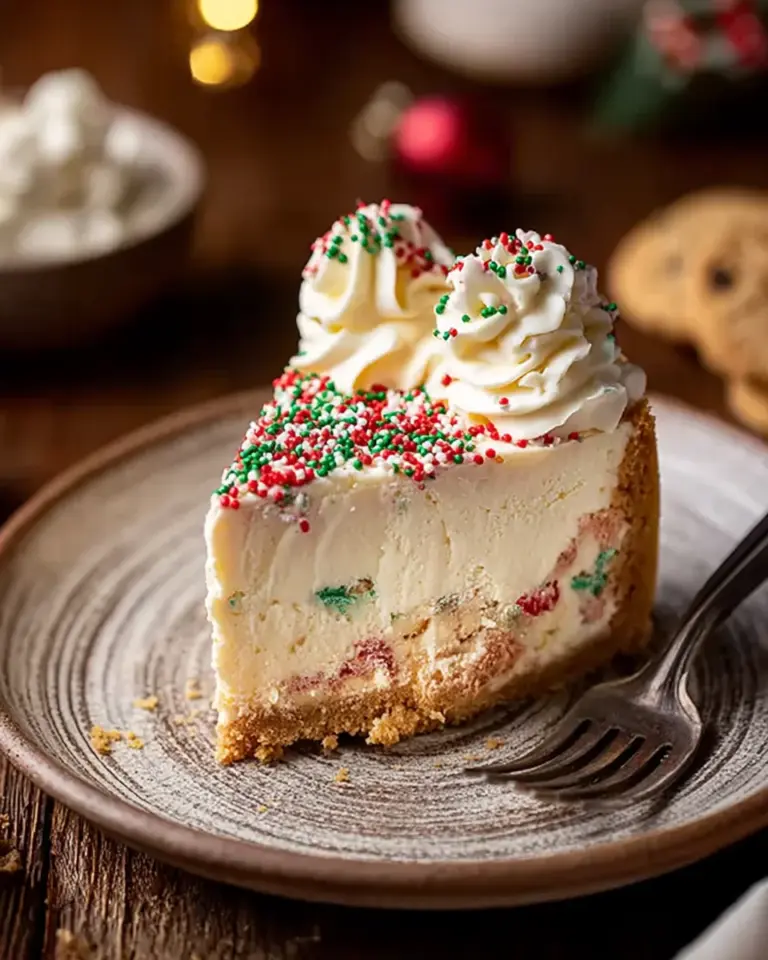
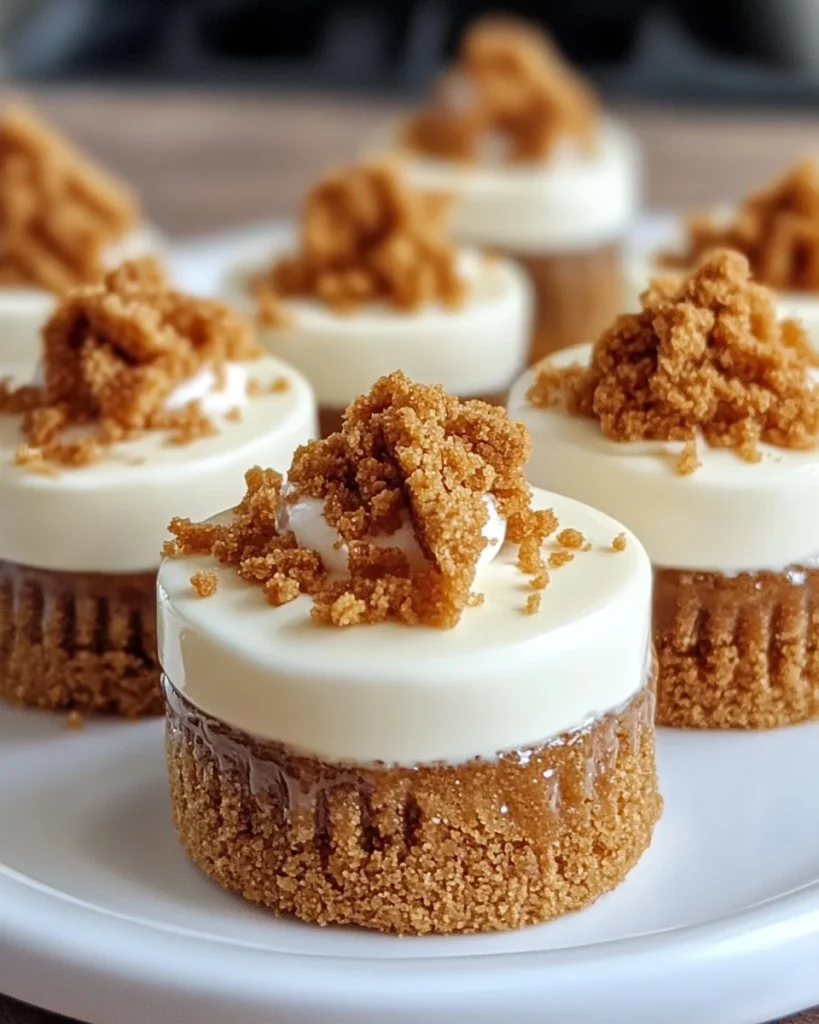
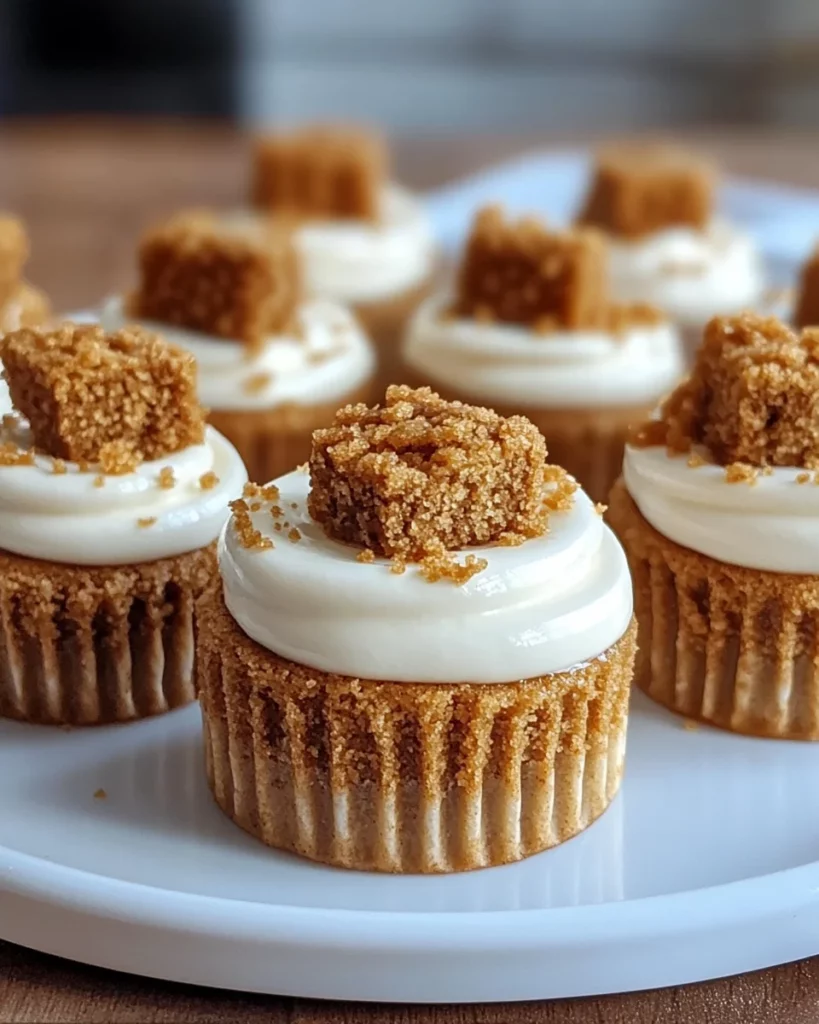
Mini Biscoff Cheesecakes: Discover Irresistible Delight!

Introduction to Mini Biscoff Cheesecakes
As a passionate home cook, I know how hectic life can get, especially for busy moms and professionals. That’s why I’m excited to share my delightful Mini Biscoff Cheesecakes with you! These little bites of heaven are not only an effortless treat to whip up but also a crowd-pleaser that will impress your loved ones. Whether you’re hosting a get-together, celebrating a special occasion, or simply need a sweet escape, these cheesecakes provide a quick solution for any day. Trust me, once you take a bite, you’ll be in a state of bliss!
Why You’ll Love This Mini Biscoff Cheesecakes
One bite of these Mini Biscoff Cheesecakes, and you’ll be hooked! They’re incredibly easy to make, requiring just 20 minutes of prep time. Plus, the creamy filling paired with that crunchy Biscoff cookie crust creates a sweet symphony in every mouthful. Not to mention, they’re the perfect size for a little indulgence without the guilt. It’s a win-win for your taste buds and your busy schedule!
Ingredients for Mini Biscoff Cheesecakes
To create these divine Mini Biscoff Cheesecakes, you’ll need a few simple ingredients that pack a punch of flavor. Here’s what you’ll gather:
- Biscoff cookie crumbs: The base of our crust. You can buy them pre-made or crush your own Biscoff cookies for freshness.
- Melted butter: This brings everything together in the crust, adding richness and helping it hold its shape.
- Cream cheese: The star of our filling! Softened cream cheese ensures a smooth and creamy texture.
- Heavy cream: This adds a luscious, airy quality to the cheesecake, making it delectable and indulgent.
- Powdered sugar: Just a touch for sweetness. You can adjust this based on your desired sweetness level.
- Vanilla extract: A splash of vanilla elevates the flavor and adds an aromatic quality.
- Biscoff spread: This is the secret weapon! It infuses our filling with that unmistakable Biscoff flavor.
- Crumpled Biscoff cookies: For topping, they add a lovely crunch and a visually appealing finish.
If you’re looking for a richer flavor, feel free to add an extra tablespoon of Biscoff spread to the filling! And if you’re in a pinch and don’t have a muffin tin, a mini cheesecake pan or standard cupcake tin works just as well.
For exact measurements of each ingredient, head to the bottom of the article where they’re listed and easily printable for your convenience!
How to Make Mini Biscoff Cheesecakes
Now that we’ve gathered our ingredients, let’s dive into making these Mini Biscoff Cheesecakes! The process is simple, yet every step is crucial to ensure scrumptious results. Just follow this guide, and you’ll end up with mini cheesecakes that will make hearts (and stomachs) happy.
Step 1: Preheat the Oven and Prepare Muffin Tin
Start by preheating your oven to 350°F (175°C). Preheating ensures that your crust cooks evenly and properly. While the oven warms up, grab a 12-cup muffin tin and line each cup with paper liners. This little step keeps your cheesecakes from sticking, making them easy to remove later!
Step 2: Create the Cookie Crust
In a medium bowl, mix your Biscoff cookie crumbs with melted butter. You want to stir until the crumbs are completely coated. The mixture should feel like wet sand—this is the perfect consistency! It holds together but isn’t overly sticky. Once mixed, it’s ready for the next step.
Step 3: Bake the Crust
Now, spoon about a tablespoon of your crust mixture into each muffin cup. Use the back of a spoon to press it down firmly. This helps create a solid crust. Pop the muffin tin in the preheated oven and bake for just 5 minutes. This quick bake reinforces the crust. Let the crusts cool completely after they come out—this is important for a stable cheesecake base.
Step 4: Make the Cheesecake Filling
While the crust cools, it’s filling time! In a large mixing bowl, beat the softened cream cheese using an electric mixer. You’ll want it to be smooth and creamy—no lumps allowed! Next, add heavy cream, powdered sugar, and vanilla extract, and continue mixing until everything is thick and smooth. Finish by incorporating the Biscoff spread until fully blended. This will create a luscious, creamy filling that will make your taste buds dance!
Step 5: Assemble the Cheesecakes
Take your cheesecake filling and either spoon or pipe it onto each cooled cookie crust. Aim to fill each cup almost to the top. For a clean look, use a spatula to smooth the tops until they’re even. They should look cute and inviting, ready for chilling!
Step 6: Chill for Perfect Texture
It’s time to chill! Place the muffin tin in the fridge for at least 3 hours—or longer if you can wait. Chilling allows these Mini Biscoff Cheesecakes to set properly. When they’re ready, the filling should be firm yet creamy. You can check by gently touching the surface; it should feel firm to the touch.
Step 7: Finish with Toppings
Ready to add the final touches? After the cheesecakes have set, remove them from the fridge. Sprinkle the tops with crumbled Biscoff cookies for that delightful crunch. Get crafty with your toppings if you like—whipped cream or a drizzle of caramel sauce adds an extra indulgent touch!
Tips for Success
- Ensure your ingredients, especially cream cheese, are at room temperature for a smoother filling.
- Press the cookie crust firmly to avoid a crumbly base; it should feel solid when you touch it.
- Chilling is non-negotiable; this really helps the texture and flavor meld together beautifully.
- Experiment with toppings for a fun twist—try chocolate shavings or a berry compote!
Equipment Needed for Mini Biscoff Cheesecakes
- Muffin tin: Essential for shaping your mini cheesecakes, but a mini cheesecake pan or standard cupcake tin can work too.
- Mixing bowls: A medium bowl for the crust and a large one for the filling.
- Electric mixer: While a whisk will do, a mixer makes achieving creamy perfection so much easier!
- Spatula: Perfect for smoothing out your cheesecake tops.
- Measuring cups: Essential for accuracy in baking delicious cheesecakes.
Variations of Mini Biscoff Cheesecakes
- Chocolate Lovers: Swirl in some melted chocolate to the cheesecake filling for a luscious chocolate twist.
- Peanut Butter Delight: Mix in a few spoonfuls of peanut butter to the filling for a nutty profile that pairs beautifully with Biscoff.
- Gluten-Free Option: Use gluten-free Biscoff cookies to make this dessert suitable for those with dietary restrictions.
- Fruit Fusion: Top your cheesecakes with fresh berries or a berry compote to add a refreshing burst of flavor.
- Dairy-Free Version: Substitute cream cheese and heavy cream with dairy-free alternatives like cashew cream or coconut cream to enjoy a vegan variation.
Serving Suggestions for Mini Biscoff Cheesecakes
- Pair your cheesecakes with a warm cup of coffee or a creamy latte for a delightful afternoon treat.
- Add a scoop of vanilla ice cream on the side for extra indulgence—yum!
- Present them on a beautiful platter, garnished with fresh mint leaves for a vibrant touch.
- For a festive flair, drizzle some melted chocolate or caramel sauce over the top before serving.
FAQs about Mini Biscoff Cheesecakes
As we dive into the world of Mini Biscoff Cheesecakes, I’ve gathered some common questions that often pop up. Here’s everything you need to know to navigate this delightful recipe with ease!
Can I make Mini Biscoff Cheesecakes ahead of time?
Absolutely! These mini cheesecakes store beautifully in the refrigerator for up to 5 days. Just make sure to keep them in an airtight container. They’re perfect for prepping ahead of a gathering!
How do I know when the cheesecakes are set?
When your cheesecakes are ready, the filling will feel firm to the touch but still slightly springy. It’s best to chill for the full 3 hours, or even a little longer for optimal texture.
Can I use other cookies for the crust?
Definitely! While Biscoff cookies shine here, feel free to experiment with graham crackers, Oreos, or even gluten-free cookies if needed. Each will bring its own delicious twist!
What’s the best way to store leftovers?
Store any leftovers in an airtight container in the fridge. They’re delicious cold, and the flavors often deepen after a day in the fridge!
Can I freeze Mini Biscoff Cheesecakes?
Yes, you can! Just make sure to wrap them tightly in plastic wrap and place them in a freezer-safe container. They’ll last up to 2 months. Thaw them in the fridge before serving!
Final Thoughts
These Mini Biscoff Cheesecakes are more than just a dessert; they’re a little piece of happiness on a plate. The creamy filling, combined with that beloved Biscoff cookie crust, can brighten up even the busiest of days.
Whether you’re sharing them with family, hosting friends, or enjoying a quiet moment to yourself, each bite is a moment of pure bliss. I hope this recipe becomes a cherished addition to your kitchen. So gather your ingredients and start baking—your taste buds will thank you, and I promise you’ll create delicious memories along the way!
Print
Mini Biscoff Cheesecakes
- Total Time: 3 hours 25 minutes
- Yield: 12 mini cheesecakes 1x
- Diet: Vegetarian
Description
Delightfully creamy mini cheesecakes with a Biscoff cookie crust, topped with crumbled Biscoff cookies.
Ingredients
- 1 1/2 cups Biscoff cookie crumbs
- 1/4 cup melted butter
- 2 cups cream cheese
- 1 cup heavy cream
- 1/2 cup powdered sugar
- 1 teaspoon vanilla extract
- 1/2 cup Biscoff spread
- 1/4 cup Biscoff cookies, crumbled
Instructions
- Preheat your oven to 350°F (175°C) and prepare a 12-cup muffin tin by lining each cup with paper liners.
- In a medium bowl, combine the Biscoff cookie crumbs and melted butter, stirring until the crumbs are evenly coated and the mixture begins to hold together.
- Spoon about one tablespoon of the cookie crumb mixture into each muffin cup and press it down firmly with the back of a spoon to create a solid crust.
- Place the muffin tin in the oven and bake for 5 minutes to set the crust. After baking, remove the tin from the oven and allow the crusts to cool completely.
- While the crusts cool, beat the cream cheese in a large mixing bowl with an electric mixer until smooth and creamy.
- Add the heavy cream, powdered sugar, and vanilla extract to the cream cheese and beat on medium speed until the mixture thickens and becomes smooth.
- Add the Biscoff spread to the mixture and beat again until fully incorporated and the filling is thick and smooth.
- Spoon or pipe the Biscoff cheesecake mixture onto each cooled cookie crust, filling each cup almost to the top.
- Smooth the tops of the cheesecakes with a spatula, making sure they are even.
- Place the mini cheesecakes in the fridge to chill for at least 3 hours, or until fully set.
- Once chilled, remove the cheesecakes from the fridge and top each one with crumbled Biscoff cookies.
- Serve immediately or store the cheesecakes in an airtight container in the refrigerator until ready to enjoy.
Notes
- Make sure to press the cookie crust firmly to avoid a crumbly base.
- For a richer flavor, you can add an extra tablespoon of Biscoff spread to the filling.
- If you don’t have a muffin tin, use a mini cheesecake pan or a standard cupcake tin.
- Allow the cheesecakes to chill for the full 3 hours to ensure they set properly.
- Top the cheesecakes with whipped cream or caramel sauce for an extra indulgent touch.
- Prep Time: 20 minutes
- Cook Time: 5 minutes
- Category: Dessert
- Method: Baking and Refrigerating
- Cuisine: American
Nutrition
- Serving Size: 1 mini cheesecake
- Calories: 250
- Sugar: 12g
- Sodium: 180mg
- Fat: 18g
- Saturated Fat: 10g
- Unsaturated Fat: 6g
- Trans Fat: 0g
- Carbohydrates: 22g
- Fiber: 1g
- Protein: 3g
- Cholesterol: 60mg