Mini Boston Cream Pie Cups

Introduction to Mini Boston Cream Pie Cups
Are you ready to treat yourself to something delightful? Mini Boston Cream Pie Cups are here to save the day! These adorable, bite-sized desserts encapsulate the beloved flavors of classic Boston cream pie, making them perfect for any occasion. Whether you’re juggling a busy family schedule or looking to impress your guests, these mini treats are quick and simple to whip up. Trust me; your loved ones will delight in every creamy, chocolatey bite, and you’ll relish the joy of sharing something so sweet. Let’s dive into this fun culinary adventure!
Why You’ll Love This Mini Boston Cream Pie Cups
These Mini Boston Cream Pie Cups are the dessert you didn’t know you needed! They’re simple to make, so you can spend less time in the kitchen and more time enjoying life. Each little cup is packed with rich flavors that satisfy your sweet tooth. Plus, they’re perfect for sharing at parties or cozy family gatherings. It’s a sweet escape that’s sure to leave smiles all around!
Ingredients for Mini Boston Cream Pie Cups
Let’s gather everything we need to create these scrumptious Mini Boston Cream Pie Cups! We’ll be using a delightful mix of ingredients that not only work beautifully together but also make your life easier. Here’s what you’ll need:
- Unsalted butter: This is our magic ingredient for a rich, buttery flavor in both the cookie cups and custard.
- Granulated sugar: Sweetness is key, and this sugar helps create that perfect balance in our treats.
- Large eggs: These are essential for binding our ingredients and giving structure to our cups.
- Vanilla extract: A splash of vanilla adds warmth and depth to both the custard and cookie cups.
- All-purpose flour: The backbone of our cookie cups, providing that classic cake-like texture.
- Baking powder: This leavening agent helps the cookie cups rise beautifully in the oven.
- Salt: A pinch enhances flavors and balances out the sweetness in our dessert.
- Whole milk: This creamy goodness is key for achieving a smooth and luscious custard filling.
- Egg yolks: These create a rich and velvety custard, taking our dessert to the next level.
- Cornstarch: A secret thickening agent for our custard, helping it achieve the perfect consistency.
- Semi-sweet chocolate chips: These are for the ganache, providing that rich, chocolaty topping we all love.
- Heavy cream: This adds luxurious creaminess to our ganache, making it irresistibly smooth.
For those who want to switch things up, feel free to use dark chocolate chips for a bolder flavor or opt for a non-dairy milk and butter alternative to make it vegan. More variations and substitutions can be found at the bottom of the article, along with exact measurements for each ingredient!
How to Make Mini Boston Cream Pie Cups
Now that we have our ingredients ready, let’s dive into how to make these delightful Mini Boston Cream Pie Cups. It’s a step-by-step process that’s not only enjoyable but also brings out your inner baking enthusiast. Let’s get started!
Prepare the Mini Muffin Tin
First things first, we’ll need to prep our mini muffin tin. Grease it lightly with butter or cooking spray. This step ensures that our cookie cups come out easily without any pesky sticking. You can even use mini paper liners for an extra touch of class!
Make the Cupcakes
In a large mixing bowl, cream together the softened unsalted butter and granulated sugar until fluffy. This should take about 2–3 minutes with a hand mixer. Mix in the eggs and vanilla extract, blending until fully combined. Next, gently add the all-purpose flour, baking powder, and salt, mixing just until a dough forms. Don’t overdo it; you want a nice, soft dough.
Bake the Cookie Cups
Roll the dough into small balls—about one tablespoon each—and place them in the muffin tin wells, pressing down to shape them into cups. Pop the tin into a preheated oven at 350°F (175°C) and bake for 10 to 12 minutes. Keep an eye on them; you’re looking for a lovely golden color. Use a spoon to gently press down the centers while they’re warm. This trick creates the ideal cup shape. Once done, let them cool for a few minutes.
Prepare the Custard Filling
For the custard, whisk together the whole milk, egg yolks, granulated sugar, and cornstarch in a saucepan over medium heat. Stir constantly until the mixture thickens, about 5-7 minutes. Once thickened, remove it from the heat and stir in the butter and vanilla extract. This will add a delightful creaminess! Transfer the custard to a bowl, cover with plastic wrap (making sure it touches the surface to prevent a skin), and chill until cool.
Make the Chocolate Ganache
To create that luxurious chocolate ganache, heat the heavy cream in a small saucepan until it’s just about to simmer. Remove from heat and pour it over the semi-sweet chocolate chips in a bowl. Let it sit for 2 minutes to allow the chocolate to soften. Then stir it until smooth and glossy. You’ll love the aroma that fills your kitchen!
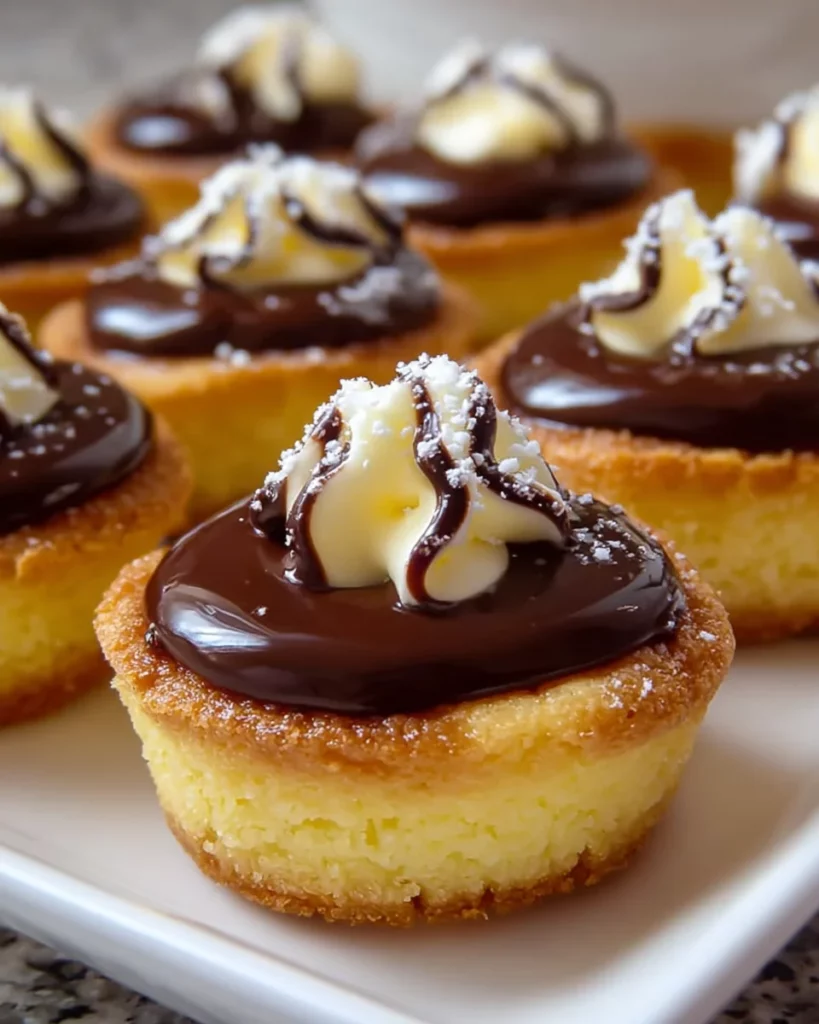
Assemble the Mini Boston Cream Pie Cups
Once your cookie cups have cooled and your custard and ganache are ready, it’s time to assemble! Spoon or pipe the chilled custard filling into each cookie cup, filling them generously. Top each with a dollop of chocolate ganache. You can be as artistic as you want with the ganache! After that, chill the assembled cups for about 20 to 30 minutes to set, or serve immediately if you like a gooey, rich bite. Enjoy every moment of this sweet creation!
Tips for Success
- Make sure your butter is softened for easy mixing.
- Don’t skip chilling the custard; it improves texture!
- Use a spoon or piping bag to neatly fill the cups.
- For an extra touch, sprinkle some chocolate shavings on top.
- Let the ganache set slightly before serving for a killer presentation.
Equipment Needed
- Mini muffin tin: If you don’t have one, a regular muffin tin works too, just adjust baking time.
- Mixing bowls: Any size will do, but a larger bowl makes mixing easier.
- Whisk: You can use a fork if a whisk isn’t available.
- Spatula: A silicone spatula is perfect for scraping down sides.
- Measuring cups and spoons: Accurate measurements make all the difference in baking.
Variations on Mini Boston Cream Pie Cups
- For a fruity twist, add a layer of fresh berries like raspberries or strawberries between the custard and ganache.
- Try making lemon curd instead of custard for a zesty, refreshing flavor profile.
- Substitute gluten-free flour for all-purpose flour to make these treats gluten-friendly.
- Experiment with different types of chocolate, like milk chocolate or white chocolate, for ganache.
- For a nutty flavor, add chopped toasted nuts as a crunchy topping.
Serving Suggestions for Mini Boston Cream Pie Cups
- Pair these delightful cups with a fresh fruit salad for a refreshing contrast.
- A hot cup of coffee or cocoa complements the creamy sweetness beautifully.
- For a stunning presentation, serve on a decorative platter with a dusting of powdered sugar.
- Top with a cherry or berry for an inviting pop of color.
FAQs about Mini Boston Cream Pie Cups
Can I make Mini Boston Cream Pie Cups ahead of time?
Absolutely! You can prepare the cookie cups and custard filling a day in advance. Just assemble them with ganache shortly before serving for the best flavor and texture.
What’s the best way to store leftovers?
Store any leftover Mini Boston Cream Pie Cups in an airtight container in the refrigerator. They’ll stay fresh for up to three days, but trust me, they’ll be gone faster than you can say “chocolate ganache!”
Can I freeze Mini Boston Cream Pie Cups?
Yes, you can freeze the cookie cups without filling. Just place them in an airtight container. When you’re ready to enjoy, thaw and fill with chilled custard and ganache!
Can I use alternative sweeteners in this recipe?
Sure! If you prefer, you can substitute granulated sugar with your choice of alternative sweeteners. Keep in mind, though, that this might slightly alter the texture and taste of the Mini Boston Cream Pie Cups.
How can I adapt this recipe for dietary restrictions?
For a gluten-free version, just swap the all-purpose flour for a gluten-free alternative. You can also use plant-based butter and a non-dairy milk to create a vegan version! Get creative, and these cups will cater to everyone’s preferences!
Final Thoughts
Making Mini Boston Cream Pie Cups is not just about creating a dessert; it’s about crafting sweet memories. Each delightful bite bursts with warmth and nostalgia, reminiscent of family gatherings and joyful celebrations. As you serve these little cups, watch your loved ones light up with every creamy, chocolatey morsel. Whether you’re sharing them with family or enjoying them solo after a long day, these mini treats offer a special escape in every bite. So roll up your sleeves, invite your loved ones to join in, and savor the joy of baking together. You won’t regret it!
Print
Mini Boston Cream Pie Cups
- Total Time: 1 hour
- Yield: 24 mini cups 1x
- Diet: Vegetarian
Description
Mini Boston Cream Pie Cups are delightful bite-sized treats that combine the classic flavors of a Boston cream pie in a fun, mini format.
Ingredients
- 1 cup unsalted butter (softened)
- 1 cup granulated sugar
- 2 large eggs
- 1 tsp vanilla extract
- 2 ½ cups all-purpose flour
- ½ tsp baking powder
- ¼ tsp salt
- 2 cups whole milk
- 3 large egg yolks
- ½ cup granulated sugar
- 3 tbsp cornstarch
- 2 tbsp unsalted butter
- 1 tsp vanilla extract
- 1 cup semi-sweet chocolate chips
- ½ cup heavy cream
Instructions
- Preheat oven to 350°F (175°C). Grease a mini muffin tin.
- In a bowl, cream together butter and sugar until fluffy. Add eggs and vanilla.
- Mix in flour, baking powder, and salt until a dough forms.
- Roll dough into balls and press into mini muffin wells, shaping into small cups.
- Bake 10–12 minutes, until golden. Use a spoon to gently press down the centers while warm. Let cool.
- In a saucepan, whisk milk, egg yolks, sugar, and cornstarch.
- Cook over medium heat, stirring constantly, until thickened.
- Remove from heat, stir in butter and vanilla.
- Transfer to a bowl, cover with plastic wrap (touching surface), and chill until cool.
- Heat cream until just simmering.
- Pour over chocolate chips and let sit 2 minutes. Stir until smooth.
- Spoon or pipe custard into cooled cookie cups.
- Top with a dollop of ganache.
- Chill for 20–30 minutes to set, or serve immediately for a gooey bite.
Notes
- For a richer flavor, use high-quality chocolate for the ganache.
- These cups can be made a day in advance and stored in the refrigerator.
- Feel free to experiment with different fillings or toppings.
- Prep Time: 30 minutes
- Cook Time: 12 minutes
- Category: Dessert
- Method: Baking
- Cuisine: American
Nutrition
- Serving Size: 1 cup
- Calories: 220
- Sugar: 15g
- Sodium: 150mg
- Fat: 10g
- Saturated Fat: 6g
- Unsaturated Fat: 4g
- Trans Fat: 0g
- Carbohydrates: 30g
- Fiber: 1g
- Protein: 3g
- Cholesterol: 50mg