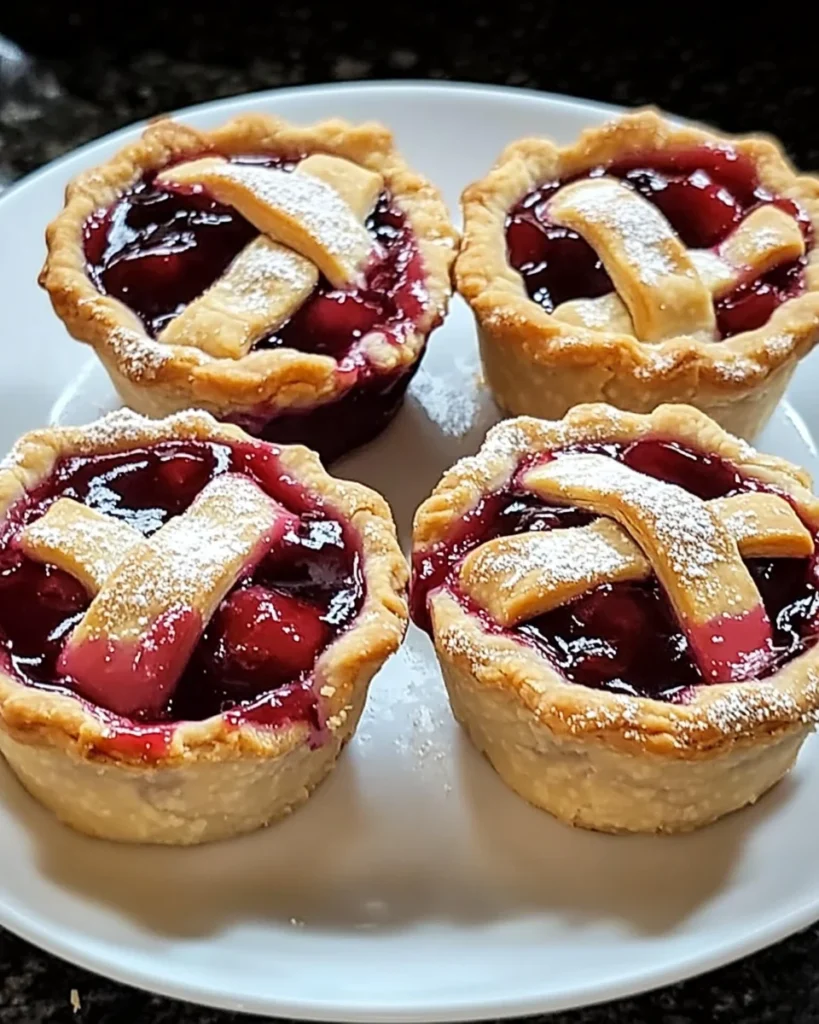
Mini Cherry Pies: Discover the Secret to Perfect Bites!
Introduction to Mini Cherry Pies Recipe
There’s something magical about the aroma of freshly baked pies wafting through the kitchen. It takes me back to my childhood, where my grandmother would whip up her famous Mini Cherry Pies every summer. The vibrant red cherries, nestled in a flaky crust, were a staple at our family gatherings. I remember the excitement of waiting for them to cool, the anticipation building as we gathered around the table, forks in hand.
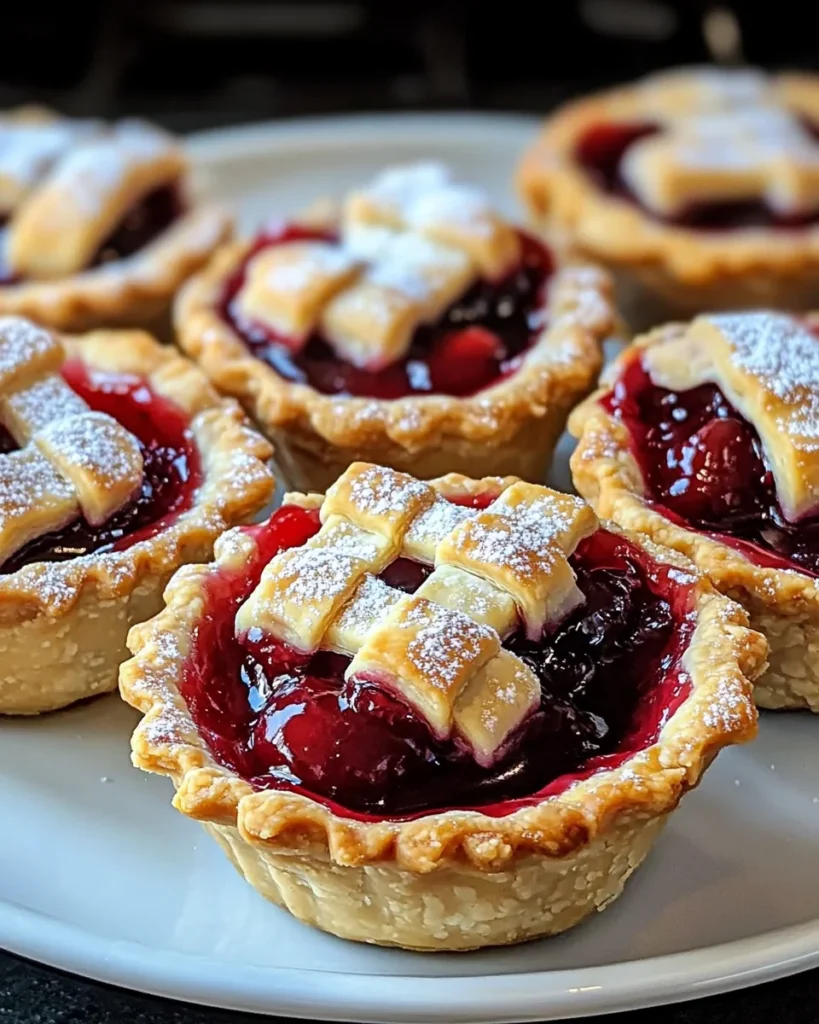
Today, I want to share my version of this cherished treat: Mini Cherry Pies. These delightful little pastries are perfect for any occasion, whether it’s a cozy family dinner or a festive gathering with friends. The best part? They’re incredibly easy to make! With just a few simple ingredients, you can create a batch of these sweet, bite-sized wonders that will have everyone asking for seconds.
What I love most about this recipe is its versatility. You can use store-bought pie crust for a quick and hassle-free option, or if you’re feeling adventurous, you can make your own crust from scratch. The cherry filling is equally flexible; you can use canned cherry pie filling for convenience or fresh cherries when they’re in season for a burst of flavor. Each mini pie is a little canvas, ready for your personal touch!
So, roll up your sleeves and join me on this culinary adventure. Let’s dive into the world of Mini Cherry Pies, where every bite is a sweet reminder of home and happiness. Trust me, once you take that first bite, you’ll be transported to a sunny afternoon filled with laughter and love.
Ingredients for Mini Cherry Pies Recipe
Before we embark on our mini pie-making journey, let’s gather our ingredients. I always find that having everything prepped and ready makes the cooking process smoother and more enjoyable. Here’s what you’ll need to create these delightful Mini Cherry Pies.
Main Ingredients
- 1 package (2 9-inch) store-bought pie crust: This is my go-to for a quick and easy recipe. However, if you’re feeling ambitious, homemade pie dough can add a special touch.
- 2 cups cherry pie filling: You can’t go wrong with this! It’s sweet, vibrant, and saves you time. If you prefer, you can use fresh cherries, just make sure to pit and slice them first.
- 1 egg white, slightly beaten: This will give your pies that beautiful golden finish that makes them look as good as they taste.
- Sugar for sprinkling: A little sprinkle on top adds a delightful crunch and sweetness to the crust.
Optional Add-ons
- Spices: A pinch of cinnamon or nutmeg can elevate the flavor of your cherry filling. I love adding a dash of cinnamon for that warm, cozy taste.
- Almond extract: Just a drop can enhance the cherry flavor beautifully. It’s like a secret ingredient that makes your pies sing!
- Whipped cream or vanilla ice cream: These are perfect accompaniments for serving. They add a creamy contrast to the sweet, tart cherries.
When selecting your ingredients, I always recommend going for quality. Fresh cherries in season can make a world of difference, and a good pie crust can elevate your mini pies to the next level. So, let’s gather these ingredients and get ready to create some delicious memories!

How to Prepare Mini Cherry Pies Recipe
Now that we have our ingredients ready, it’s time to roll up our sleeves and get cooking! Making Mini Cherry Pies is a delightful process that fills your kitchen with warmth and sweet aromas. Let’s break it down step by step, so you can create these little gems with ease.
Step 1: Prepare the Pie Crust
First things first, we need to prepare our pie crust. If you’re using store-bought crust, it’s as simple as unrolling it. If you’re feeling adventurous and want to make your own, I applaud you! Homemade crust can add a special touch to your pies.
Tips for Making the Perfect Crust
- Keep it Cold: If you’re making your own crust, make sure your butter is cold. This helps create a flaky texture.
- Don’t Overwork the Dough: When mixing, just combine until it’s moistened. Overworking can lead to tough crusts.
- Chill the Dough: If you have time, chill your dough for about 30 minutes before rolling it out. This makes it easier to handle.
Step 2: Make the Cherry Filling
Next up is the cherry filling! If you’re using canned cherry pie filling, you can skip this step. But if you’re using fresh cherries, let’s get to work!
Tips for Choosing the Best Cherries
- Look for Bright Color: Choose cherries that are deep red and shiny. They should look inviting and fresh.
- Check for Firmness: Gently squeeze the cherries; they should be firm but not hard. Soft cherries may be overripe.
- Seasonal Matters: If you can, use fresh cherries in season for the best flavor. They’re usually sweeter and juicier!
Step 3: Assemble the Mini Pies
Now comes the fun part—assembling our mini pies! This is where your creativity can shine. Place each dough circle into the muffin tin, and let’s fill them up!
Tips for Proper Sealing
- Don’t Overfill: Fill each crust about ⅔ full to allow room for bubbling. Overfilling can lead to messy pies!
- Seal the Edges: If you’re adding a lattice topping, make sure to press the edges gently to seal. This keeps the filling from leaking out.
- Use a Fork: You can crimp the edges with a fork for a decorative touch and to ensure a good seal.
Step 4: Bake the Mini Cherry Pies
It’s time to bake! Preheat your oven and get ready for the magic to happen. The smell of baking pies is one of life’s greatest joys!
Tips for Achieving a Golden Brown Finish
- Watch the Time: Keep an eye on your pies as they bake. Ovens can vary, so check for that golden color around the 25-minute mark.
- Rotate the Pan: If your oven has hot spots, rotate the muffin tin halfway through baking for even browning.
- Let Them Cool: After baking, let the pies cool in the tin for a bit. This helps them set and makes them easier to remove.
And there you have it! With these steps, you’re well on your way to creating delicious Mini Cherry Pies that will impress everyone. I can’t wait for you to taste them!
Equipment Needed for Mini Cherry Pies Recipe
Before we dive into the baking process, let’s gather the essential tools you’ll need to create these delightful Mini Cherry Pies. Having the right equipment on hand makes everything smoother and more enjoyable. Here’s what you’ll need:
- Muffin Tin: A standard 12-cup muffin tin is perfect for baking your mini pies. If you don’t have one, you can use a mini muffin tin for even smaller treats!
- Rolling Pin: If you’re making your own pie crust, a rolling pin will help you roll out the dough evenly. A wine bottle can work in a pinch if you don’t have one!
- Cookie Cutter or Glass: You’ll need something to cut out those perfect dough circles. A cookie cutter works great, but the rim of a glass can do the trick too.
- Pastry Brush: This is handy for brushing the egg wash on top of your pies. If you don’t have one, a clean paintbrush can be a fun alternative!
- Knife or Pizza Cutter: For cutting the lattice strips, a sharp knife or pizza cutter will make the job easier and quicker.
- Cooling Rack: Once your pies are baked, a cooling rack allows them to cool evenly. If you don’t have one, a plate will work just fine.
With these tools at your side, you’re all set to embark on your mini pie-making adventure. Remember, the joy of cooking comes not just from the end result but from the process itself. So, let’s get started!
Variations of Mini Cherry Pies Recipe
While I adore the classic Mini Cherry Pies, there’s something exciting about experimenting with different flavors and ingredients. Each variation brings a unique twist to this beloved treat, making it even more fun to share with family and friends. Here are a few delightful ideas to inspire your creativity:
- Mixed Berry Mini Pies: Swap out the cherry filling for a mix of berries like blueberries, raspberries, and strawberries. The combination creates a colorful and flavorful explosion!
- Chocolate Cherry Pies: Add a layer of chocolate ganache at the bottom of each crust before spooning in the cherry filling. The rich chocolate pairs beautifully with the tart cherries.
- Almond Cherry Pies: Incorporate a splash of almond extract into the cherry filling for a nutty flavor that complements the sweetness of the cherries. It’s a subtle yet delightful change!
- Peach Cherry Pies: Combine fresh peaches with cherries for a summery twist. The juicy peaches add a lovely sweetness that balances the tartness of the cherries.
- Mini Cherry Crumble Pies: Instead of a top crust, sprinkle a crumbly mixture of oats, flour, and butter over the cherry filling. This adds a delightful crunch and a rustic touch.
These variations not only keep things interesting but also allow you to cater to different tastes and preferences. So, don’t hesitate to get creative and make these Mini Cherry Pies your own! Each bite will be a new adventure, and I can’t wait for you to try them all!
Cooking Notes for Mini Cherry Pies Recipe
As you embark on your mini pie-making journey, there are a few cooking notes that can help ensure your Mini Cherry Pies turn out perfectly every time. These little tips can make a big difference in the final result!
- Use Quality Ingredients: The flavor of your pies largely depends on the quality of your ingredients. Fresh, ripe cherries or high-quality canned filling will elevate your pies.
- Don’t Skip the Egg Wash: Brushing the tops with egg white not only gives your pies a beautiful golden color but also helps the sugar adhere better, creating a lovely sparkle.
- Experiment with Spices: A dash of cinnamon or nutmeg can add warmth to your cherry filling. Don’t be afraid to play around with flavors to find your perfect combination!
- Cool Before Serving: Allow your mini pies to cool for at least 15 minutes before serving. This helps the filling set and makes them easier to handle.
- Store Properly: If you have leftovers (which is rare!), store them in an airtight container in the fridge. They can be enjoyed cold or warmed up in the oven for a few minutes.
With these cooking notes in mind, you’re well on your way to creating delicious Mini Cherry Pies that will impress everyone at your table. Happy baking!
Serving Suggestions for Mini Cherry Pies Recipe
Once your Mini Cherry Pies are baked to perfection, it’s time to think about how to serve them! Presentation can elevate the experience, and I love to get a little creative. Here are some delightful serving suggestions that will make your mini pies shine:
- With a Scoop of Ice Cream: A scoop of vanilla or cherry ice cream on the side adds a creamy contrast to the sweet, tart filling. It’s a classic pairing that never disappoints!
- Drizzled with Whipped Cream: A generous dollop of whipped cream on top of each pie adds a light and airy touch. You can even sprinkle some cocoa powder or cinnamon for an extra flair.
- Fresh Mint Garnish: A sprig of fresh mint on top not only looks beautiful but also adds a refreshing flavor that complements the cherries.
- Dusting of Powdered Sugar: For a simple yet elegant touch, dust the tops of your mini pies with powdered sugar just before serving. It gives them a lovely, snowy appearance!
- Pair with Coffee or Tea: These mini pies make a perfect afternoon treat alongside a warm cup of coffee or tea. The flavors blend beautifully, making for a cozy experience.
These serving suggestions can turn your Mini Cherry Pies into a show-stopping dessert that everyone will love. Whether it’s a family gathering or a casual get-together with friends, these little treats are sure to bring smiles all around!
Tips for Perfecting Mini Cherry Pies Recipe
As I’ve learned through my own baking adventures, there are always little tips and tricks that can elevate your Mini Cherry Pies from good to absolutely delightful. Here are some of my favorite tips to ensure your pies turn out perfectly every time:
- Chill Your Ingredients: Keeping your pie crust ingredients cold helps create a flaky texture. If you’re using butter, make sure it’s straight from the fridge!
- Use a Fork for Ventilation: If you’re not using a lattice top, poke a few holes in the top crust to allow steam to escape. This prevents soggy bottoms and helps the filling bubble beautifully.
- Experiment with Sweetness: Taste your cherry filling before adding it to the crust. Depending on your cherries, you might want to adjust the sweetness with a little extra sugar or a squeeze of lemon juice for balance.
- Keep an Eye on Baking Time: Every oven is different! Start checking your pies a few minutes before the recommended baking time to avoid over-baking.
- Let Them Rest: After baking, let your mini pies cool for at least 15 minutes. This helps the filling set and makes them easier to remove from the muffin tin.
With these tips in your back pocket, you’ll be well on your way to mastering the art of Mini Cherry Pies. Happy baking, and enjoy every delicious bite!
Breakdown of Time for Mini Cherry Pies Recipe
When it comes to baking, timing is everything! I always find it helpful to have a clear idea of how long each step will take. This way, I can plan my baking session and enjoy the process without feeling rushed. Here’s a quick breakdown of the time you’ll need for making these delightful Mini Cherry Pies:
- Prep Time: Approximately 20 minutes. This includes gathering your ingredients, preparing the pie crust, and assembling the mini pies.
- Cooking Time: 25–30 minutes. This is the time your mini pies will spend in the oven, filling your kitchen with that irresistible aroma.
- Total Time: About 50–60 minutes. From start to finish, you can have these delicious treats ready to serve in under an hour!
With this time breakdown, you can easily fit these Mini Cherry Pies into your day. Whether it’s a weekend baking project or a last-minute dessert for a gathering, you’ll be amazed at how quickly they come together. Happy baking!
Nutritional Information for Mini Cherry Pies Recipe
As a passionate home cook, I always like to keep an eye on the nutritional aspects of my recipes. While Mini Cherry Pies are a delightful treat, it’s good to know what you’re indulging in. Here’s a general breakdown of the nutritional information for one mini pie, based on the ingredients listed:
- Calories: Approximately 150–200 calories
- Fat: 7–10 grams (depending on the crust used)
- Carbohydrates: 20–25 grams
- Sugar: 8–12 grams
- Protein: 1–2 grams
Keep in mind that these values can vary based on the specific ingredients you choose, especially if you opt for homemade crust or add any extra toppings. While these mini pies are a sweet indulgence, they can be enjoyed in moderation as part of a balanced diet. So, go ahead and treat yourself to a little slice of happiness!
Frequently Asked Questions about Mini Cherry Pies Recipe
As I’ve shared my love for Mini Cherry Pies, I often get questions from fellow home cooks eager to try their hand at this delightful treat. Here are some of the most common questions I receive, along with my answers to help you on your mini pie-making journey!
Can I use fresh cherries instead of canned filling?
Absolutely! Fresh cherries can add a wonderful burst of flavor to your mini pies. Just make sure to pit and slice them before using. You might want to add a bit of sugar to balance the tartness, depending on the sweetness of the cherries.
How do I store leftover mini pies?
If you have any leftovers (which is rare!), store them in an airtight container in the fridge. They can be enjoyed cold or warmed up in the oven for a few minutes. Just be sure to let them cool completely before storing!
Can I freeze Mini Cherry Pies?
Yes, you can freeze them! Just make sure they are completely cooled before wrapping them tightly in plastic wrap and placing them in a freezer-safe container. They can be frozen for up to three months. When you’re ready to enjoy them, simply thaw in the fridge and reheat in the oven.
What can I use instead of egg wash?
If you prefer not to use egg wash, you can brush the tops with milk or cream for a nice golden color. Some people even use a mixture of water and a bit of sugar for a sweet finish!
How do I know when my mini pies are done baking?
Your mini pies are done when the crust is lightly golden and the filling is bubbling. Keep an eye on them during the last few minutes of baking to avoid over-baking. A golden crust is the perfect indicator of deliciousness!
These FAQs should help clear up any uncertainties you might have as you embark on your Mini Cherry Pie adventure. Remember, baking is all about experimenting and having fun, so don’t hesitate to make this recipe your own!
Conclusion on Mini Cherry Pies Recipe
In the world of baking, few things bring as much joy as a warm, flaky Mini Cherry Pie. This recipe is not just about creating a delicious dessert; it’s about making memories and sharing love with those around you. The vibrant cherries nestled in a golden crust are a feast for the eyes and the taste buds alike.
What I adore most about these mini pies is their versatility. Whether you opt for the convenience of store-bought crust or the satisfaction of making your own, each bite is a reminder of home and happiness. Plus, with endless variations and serving suggestions, you can easily customize them to suit any occasion or palate.
So, gather your ingredients, invite your loved ones into the kitchen, and embark on this delightful baking adventure. I promise that the smiles and laughter that follow will be the sweetest reward of all. Happy baking, and may your Mini Cherry Pies bring as much joy to your table as they have to mine!
Print
Mini Cherry Pies: Discover the Secret to Perfect Bites!
- Total Time: 50-60 minutes
- Yield: 12 mini pies 1x
- Diet: Vegetarian
Description
Mini Cherry Pies are delightful bite-sized pastries filled with sweet cherry filling, perfect for any occasion.
Ingredients
- 1 package (2 9-inch) store-bought pie crust
- 2 cups cherry pie filling
- 1 egg white, slightly beaten
- Sugar for sprinkling
- Spices: A pinch of cinnamon or nutmeg (optional)
- Almond extract (optional)
- Whipped cream or vanilla ice cream (optional)
Instructions
- Prepare the pie crust by unrolling it or making your own.
- Make the cherry filling if using fresh cherries.
- Assemble the mini pies by placing dough circles in a muffin tin and filling them.
- Bake the mini cherry pies in a preheated oven until golden brown.
Notes
- Use quality ingredients for the best flavor.
- Don’t skip the egg wash for a golden finish.
- Experiment with spices to enhance flavor.
- Cool before serving for easier handling.
- Store leftovers in an airtight container.
- Prep Time: 20 minutes
- Cook Time: 25-30 minutes
- Category: Dessert
- Method: Baking
- Cuisine: American
Nutrition
- Serving Size: 1 mini pie
- Calories: 150-200
- Sugar: 8-12 grams
- Fat: 7-10 grams
- Carbohydrates: 20-25 grams
- Protein: 1-2 grams

