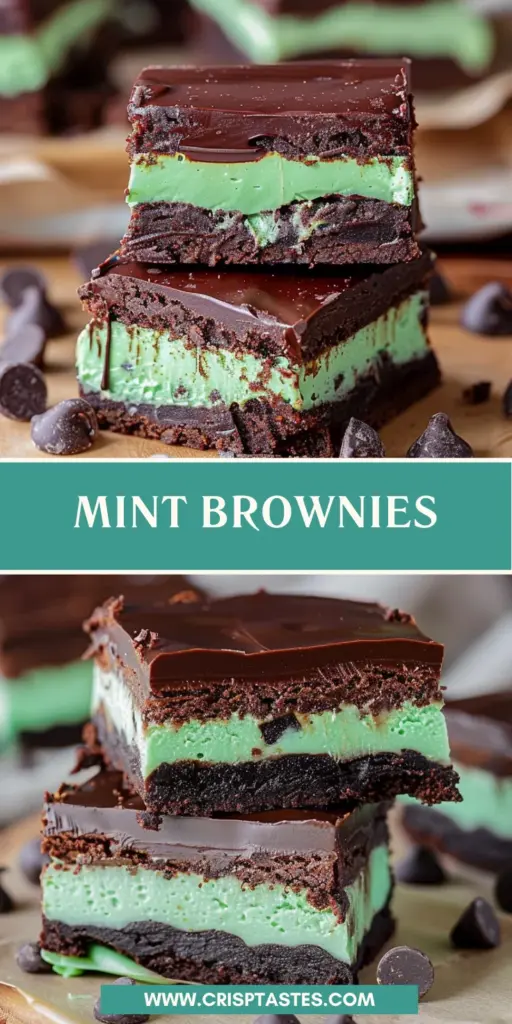
Mint Brownies

Introduction to Mint Brownies
There’s something wonderfully nostalgic about baking, especially when it comes to indulgent treats like mint brownies. These rich, fudgy delights are a perfect solution for a busy day or a special occasion. Trust me, no one can resist that creamy mint filling topped with velvety chocolate ganache!
As a passionate home cook, I cherish the joy these mint brownies bring. They not only satisfy a sweet craving but also impress friends and family alike. So, roll up your sleeves, and let’s create a little magic in the kitchen together!
Why You’ll Love This Mint Brownies
If you’re looking for a quick way to elevate your dessert game, these mint brownies are your answer! They’re simple to whip up, requiring just a handful of ingredients and minimal prep time. Imagine the joy you’ll feel when you slice into those creamy layers, revealing the scrumptious chocolate beneath. Perfect for last-minute gatherings or a cozy night in, they truly bring everyone together!
Ingredients for Mint Brownies
Each ingredient in these mint brownies has a role to play in crafting that unforgettable experience. Let’s dive in, shall we?
- Unsalted Butter: This creamy base adds richness to our brownies. I prefer using unsalted butter to control the saltiness in the batter because you can always add more salt if needed.
- Unsweetened Chocolate: Essential for that deep chocolate flavor, the unsweetened chocolate balances beautifully with the sweetness of the frosting. Trust me, it makes all the difference!
- Andes Creme de Menthe Baking Chips (optional): These little gems elevate the mint flavor and add a pop of color. They’re an optional ingredient, but once you try them, you may never skip them again.
- Granulated Sugar: This is our sweetener, of course! It provides the perfect sweetness level and helps create that fudgy texture we all love.
- Vanilla Extract: A classic flavor booster that rounds out the chocolate taste. It’s one of those essential ingredients you always want on hand.
- Mint Extract: This is where the magic happens! It brings in that refreshing mint flavor that makes these brownies special. Just be careful not to overdo it—too much can be overpowering!
- Large Eggs: These are the binding agents. Room temperature eggs mix more easily, enhancing the overall texture of your brownies.
- All-Purpose Flour: This helps give structure to our fudgy treats. It’s essential for keeping everything together while maintaining that chewy consistency.
- Salt: A pinch of salt balances the sweetness beautifully. It’s a small ingredient but one you don’t want to skip!
- Mint Filling Ingredients: Including softened butter, confectioners’ sugar, mint extract, water, and green gel food coloring. This filling is like the creamy, minty heart of the brownies, making them a true indulgence!
- Chocolate Ganache Ingredients: Comprised of heavy whipping cream and bittersweet chocolate, this ganache adds a glossy finish and makes every bite irresistible!
Each ingredient has been thoughtfully chosen to create a harmonious blend of flavors and textures. If you’re curious about the exact quantities, don’t worry! They’re at the bottom of the article and ready for your printing convenience.
How to Make Mint Brownies
Creating these mint brownies is as enjoyable as eating them! Follow these simple, step-by-step instructions to craft a dessert that your family will adore.
Prepare the Oven and Baking Dish
First things first, preheat your oven to 325°F. This ensures that the brownies bake evenly from the moment they hit the heat.
Next, take an 8-inch or 9-inch baking dish and spray it with cooking spray. Make sure to line it with parchment paper, leaving some overhang. This little trick helps prevent sticking and makes for easy brownie removal later!
Melt Ingredients Together
Now it’s time to melt the butter and chocolate. You can use a double boiler for this or simply pop everything into the microwave. If you choose the microwave, melt at 50% power in 20-second intervals, stirring between each one. This gentle method helps avoid scorching.
If you’re using Andes baking chips, throw those in with the other ingredients too. They’ll make those mint brownies just a little more special!
Combine Wet Ingredients
Once your chocolate and butter are beautifully melted, stir in the granulated sugar. Add in the vanilla and mint extracts as well. Mix everything until it’s a smooth, inviting mixture!
Mix in Eggs
Next, crack the eggs into your batter, adding them one at a time. Trust me; this step is crucial. Mixing thoroughly ensures that every bit amalgamates beautifully, leaving no eggy taste behind.
Add Dry Ingredients
Now for the flour and salt! Gradually mix them into your wet ingredients. You want a smooth batter here, so combine until it’s well-blended and velvety. Avoid overmixing, though, to keep your brownies tender!
Bake the Brownies
Pour your brownie batter into the prepared pan, spreading it evenly. Bake in the oven for about 25 to 30 minutes. How to know if they’re done? Insert a toothpick; it should come out with a few moist crumbs. This tells you they’ve baked just right!
Prepare the Mint Filling
While the brownies cool, it’s time to whip up that mint filling. Beat the softened butter until it’s fluffy. Then gradually add in confectioners’ sugar, mint extract, and one tablespoon of water. If you like a bit of color, drop in four drops of green gel food coloring to make your filling pop!
Spread and Chill
Spread that luscious mint filling over the cooled brownies evenly. Once satisfied, pop the pan in the fridge while you prepare the ganache. This chilling time helps the filling set perfectly.
Make the Chocolate Ganache
To create the ganache, place your chopped chocolate in a medium bowl. Heat your heavy whipping cream until it just simmers, either on the stovetop or in the microwave.
Pour the hot cream over the chocolate and let it sit for about two minutes. This allows the chocolate to soften. Then, whisk until the mixture turns silky smooth!
Assemble the Brownies
Carefully pour the ganache over the mint layer, spreading it evenly with a spatula. Feel free to sprinkle Andes mints on top, if you desire. Let the ganache set for about 10 minutes.
Slice and Serve
After everything has chilled together for at least 30 more minutes, it’s time to cut your brownies. Use a sharp knife for clean slices. Remember, these treats are rich, so smaller pieces are the way to go!
Tips for Success
- Always preheat your oven for even baking.
- Use room temperature ingredients for better mixing.
- Don’t overmix the batter; it can lead to tough brownies.
- Chill the brownies well; it enhances texture and flavor.
- Store leftovers in an airtight container to keep them fresh.
- For extra minty flavor, feel free to add more mint extract—but start small!
Equipment Needed
- 8-inch or 9-inch baking dish – A square pan works best, but you can use any similar-sized dish.
- Double boiler or microwave-safe bowl – For melting chocolate and butter smoothly.
- Mixing bowls – Any size will do! Just ensure they’re large enough for mixing.
- Whisk – Essential for aerating the batter and mixing ganache.
- Spatula – Perfect for spreading the mint filling and ganache evenly.
Variations of Mint Brownies
- Gluten-Free Mint Brownies: Substitute all-purpose flour with a gluten-free baking blend. This keeps the fudgy texture while accommodating dietary needs.
- Vegan Mint Brownies: Replace the eggs with flaxseed meal and use dairy-free butter and chocolate. You won’t miss the eggs in these delicious brownies!
- Mint Chocolate Chip Brownies: Fold in mini chocolate chips into the brownie batter for an extra chocolatey crunch. It adds a delightful texture!
- Peanut Butter Mint Brownies: Swirl in some peanut butter before baking for a rich and nutty twist. The combination of mint and peanut butter is surprisingly amazing!
- Mint Mocha Brownies: Add a teaspoon of instant coffee granules to the brownie batter for a mocha flavor. This added flavor will create a unique and delightful profile!
Serving Suggestions for Mint Brownies
- Pair these delightful brownies with a scoop of vanilla ice cream for a comforting contrast.
- Serve with fresh mint sprigs on the side for a beautiful presentation.
- A drizzle of chocolate syrup on top adds an elegant touch.
- For drinks, try serving them with peppermint tea or a rich mocha coffee.
FAQs about Mint Brownies
Can I use different types of chocolate for the brownies?
Absolutely! While I recommend unsweetened chocolate for that rich flavor, you can use dark or semi-sweet chocolate for a sweeter touch. Just remember to adjust the sugar in the recipe slightly, depending on your choice!
How long do mint brownies last?
If stored properly in an airtight container, mint brownies will stay fresh for about 3-5 days. After that, they may start losing their texture, but trust me, they won’t last that long!
Can I freeze mint brownies?
You sure can! Slice them into squares, wrap individually, and store in the freezer for up to two months. Just allow them to thaw slowly in the refrigerator for the best texture!
Is it okay to use mint extract instead of peppermint extract?
Yes, mint extract works great in this recipe. Just be careful with the amount if you’re not a huge mint fan, as its flavor can be a bit stronger than peppermint!
How do I know when the brownies are done baking?
The best way to check is to insert a toothpick into the center. If it comes out with a few moist crumbs, your mint brownies are perfectly done. Remember not to overbake, or they could turn dry!
Final Thoughts
Indulging in these mint brownies is more than just satisfying a sweet tooth; it’s about creating cherished moments. From the rich chocolate to the creamy mint filling, each bite transports me back to family gatherings filled with laughter and love. Whenever I’m in the kitchen whipping these up, I know I’m crafting happiness. Whether for a special occasion or an everyday treat, these brownies are truly a celebration of flavor and nostalgia. So, gather your loved ones and share the joy of mint brownies together—trust me, they’ll leave everyone smiling and coming back for more!
Print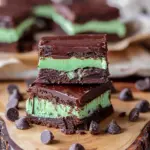
Mint Brownies
- Total Time: 1 hour
- Yield: 16 servings 1x
- Diet: Vegetarian
Description
Decadent mint-flavored brownies topped with creamy mint filling and rich chocolate ganache.
Ingredients
- ½ cup unsalted butter (1 stick, cut into pieces)
- 4 ounces unsweetened chocolate (chopped)
- ¼ cup Andes creme de menthe baking chips (optional)
- 1¼ cups granulated sugar
- 1 teaspoon vanilla extract
- ½ teaspoon mint extract
- 2 large eggs (room temperature)
- ½ cup all-purpose flour (65 grams)
- ¼ teaspoon salt
- Mint Filling:
- ½ cup unsalted butter (1 stick, softened)
- 2 cups confectioners’ sugar
- ½ teaspoon mint extract
- 1 tablespoon water
- 4 drops green gel food coloring
- Chocolate Ganache:
- 1 cup heavy whipping cream
- 1 cup bittersweet chocolate (8 ounces, chips or block, roughly chopped)
- Topping: ½ cup Andes creme de menthe baking chips (optional)
Instructions
- Preheat oven to 325°F. Prepare an 8 inch or 9 inch baking dish by spraying with cooking spray and lining with parchment paper. Set aside.
- Using a double boiler, melt the butter, chocolate, and baking chips (if using) together. Remove from heat. (You can also melt in the microwave. Heat at 50% power in 20 second increments, stirring in between.)
- Stir in the granulated sugar, vanilla and mint extracts until combined.
- Add the eggs in one at a time making sure they are well incorporated.
- Finally mix in the flour and salt and beat until smooth and combined.
- Pour the brownie batter evenly into the prepared pan and bake for about 25 to 30 minutes or until an inserted toothpick comes out with a few moist crumbs. Place on a wire rack to cool completely.
- For the mint filling, beat the butter until fluffy. Add the remaining ingredients into the mixing bowl and mix until nice and creamy.
- Spread the mint filling over the cooled brownies and refrigerate while preparing the ganache.
- For the chocolate ganache, place the chocolate in a medium bowl. Bring the whipping cream just to a simmer on the stove top or in the microwave.
- Pour the hot whipping cream over the chocolate and let sit for 2 minutes. Whisk until smooth.
- Let the ganache cool in the bowl for 10 to 20 minutes before pouring over the mint layer.
- If desired, add Andes mints to the top after letting the ganache set for 10 minutes.
- Refrigerate the finished brownies for at least another 30 minutes before slicing and serving.
- Cut into small pieces as they are very rich!
Notes
- The brownies are very rich, so smaller portions are recommended.
- Chilling the brownies helps to set the ganache.
- Optional toppings can include additional Andes mints for decoration.
- Prep Time: 30 minutes
- Cook Time: 30 minutes
- Category: Dessert
- Method: Baking
- Cuisine: American
Nutrition
- Serving Size: 1 piece
- Calories: 250
- Sugar: 22g
- Sodium: 120mg
- Fat: 13g
- Saturated Fat: 7g
- Unsaturated Fat: 4g
- Trans Fat: 0g
- Carbohydrates: 30g
- Fiber: 1g
- Protein: 2g
- Cholesterol: 50mg