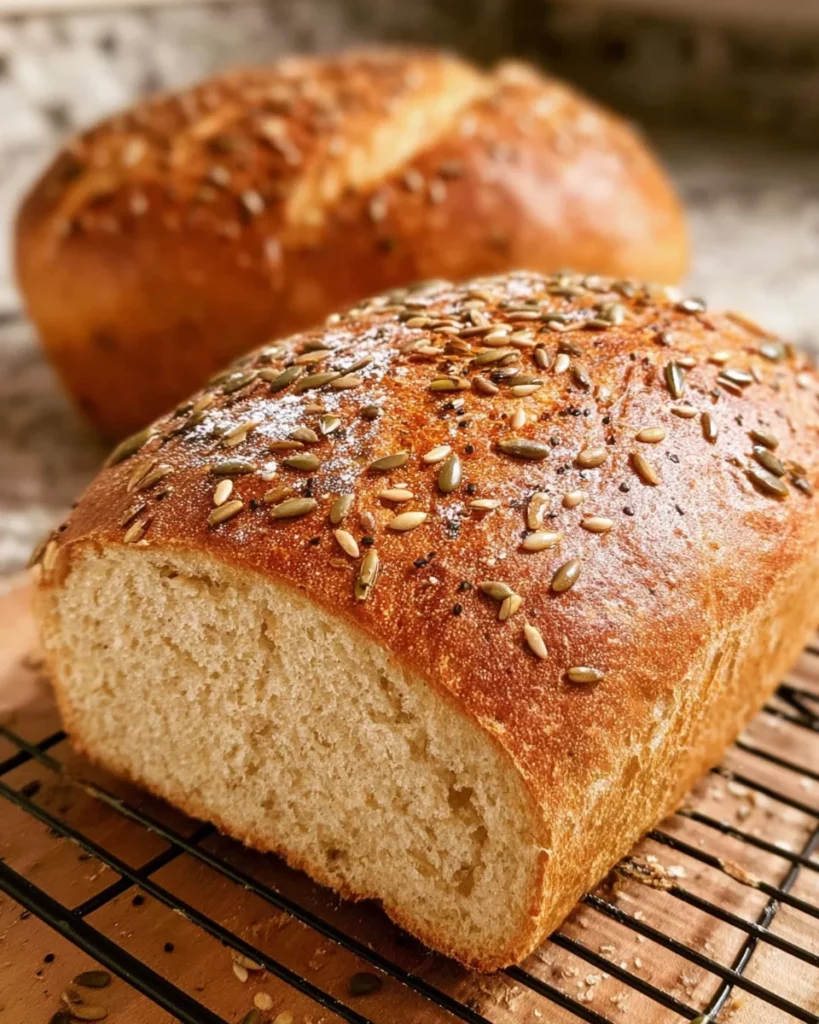
Multi-Seed Honey Wheat Bread: A Nutritious Delight!

Introduction to Multi-Seed Honey Wheat Bread
As a busy mom myself, I understand the challenge of whipping up something wholesome and delightful. That’s why this Multi-Seed Honey Wheat Bread has become my go-to recipe. It’s not just a loaf of bread; it’s a warm hug that fills your kitchen with an inviting aroma. Perfect for any day, whether you’re preparing breakfast, lunch, or a special dinner. Plus, it’s a wonderful way to sneak in healthy ingredients without anyone noticing! Let’s dive into making this nutritious delight that your family will adore.
Why You’ll Love This Multi-Seed Honey Wheat Bread
This Multi-Seed Honey Wheat Bread is a lifesaver for busy days! It’s not only easy to make, but it also fills your home with a warm, comforting aroma that invites everyone to the kitchen. The sweet hint of honey paired with the crunch of seeds creates a flavor explosion. Plus, it’s a nutritious option that makes on-the-go breakfasts or easy sandwiches a breeze. Who wouldn’t love that?
Ingredients for Multi-Seed Honey Wheat Bread
Let’s gather our ingredients! Each one plays a vital role in making this Multi-Seed Honey Wheat Bread not just delicious, but also nutritious. Here’s what you’ll need:
- Warm milk: The backbone of our bread, it activates the yeast. Just remember, it should be warm, not hot!
- Instant yeast: This magical ingredient helps the bread rise beautifully, giving it that soft texture we all love.
- Sugar: Just a pinch feeds the yeast, ensuring a good rise and adding a touch of sweetness.
- Whole wheat flour: Packed with nutrients and fiber, it gives the bread a hearty base and a lovely, nutty flavor.
- Bread flour: This is the secret for that slightly chewy texture and helps create a nice structure.
- Sunflower seeds: A delightful crunch and a wealth of healthy fats that boost flavor.
- Pepitas: These pumpkin seeds add a lovely, slightly sweet flavor and are packed with vitamins.
- Sesame seeds: A little nutty taste and a sprinkle of nostalgia, bringing warmth to our loaf.
- Poppy seeds: Tiny but mighty, they add a burst of flavor and give our bread a unique look.
- Flax seeds: Not only do they add crunch, but they’re a great source of omega-3 fatty acids!
- Salt: Enhances all the flavors and balances out the sweetness from the honey.
- Honey: Adds a natural sweetness and moisture, making each slice a golden treat.
- Canola oil: Keeps the bread soft and tender, ensuring a delightful bite every time.
- Egg wash: This is just a whisked egg with water for that golden crust, making your bread look bakery-fresh!
- Extra seeds: For sprinkling on top, giving your bread that extra flair and crunch.
For exact quantities, check the bottom of the article where you can find everything you need for your baking adventure!
How to Make Multi-Seed Honey Wheat Bread
Let’s roll up our sleeves and start making this delightful Multi-Seed Honey Wheat Bread! Don’t worry; it’s pretty straightforward. Each step brings us closer to enjoying that fresh, warm loaf.
Step 1: Prepare the Yeast Mixture
First things first! In a small bowl, combine your instant yeast and sugar, then pour in the warm milk. Give it a little swirl, and let it sit for about 3 to 5 minutes. You’ll know it’s ready when it becomes frothy. That’s the yeast doing its happy dance!
Step 2: Combine the Dry Ingredients
While the yeast is getting cozy, grab your mixer bowl. Whisk together the whole wheat flour, 2 cups of bread flour, all the seeds, and salt. This blend not only smells amazing but also sets a strong base for our bread.
Step 3: Mix Wet and Dry Ingredients
Now it’s time to introduce the wet side! Pour in your yeast mixture, add the canola oil, and drizzle in the honey. With a dough hook, mix everything on low speed until it starts coming together. If you’ve got just the right rhythm, it’s like a dance between the ingredients!
Step 4: Knead the Dough
Once mixed, it’s kneading time! Slowly add the extra bread flour a little at a time, just until the dough pulls away from the sides of the bowl. Keep kneading on low for about 5 minutes. You want it smooth and slightly tacky, almost like a comforting pillow.
Step 5: First Rise
Now the dough needs to rest and rise! Spray the bowl with non-stick spray, cover it with a towel, and let it sit in a warm spot for about an hour or until it’s doubled in size. This is the perfect time to steal a few minutes for yourself—possibly with a cup of tea!
Step 6: Shape the Loaves
After your dough has risen beautifully, it’s time to shape it. Punch it down gently to release any air. Divide it into two equal pieces, then shape each piece into a loaf. Place them in your prepared bread pans, nestled like they’re ready for a cozy nap.
Step 7: Second Rise
Cover those loaves again with a towel and let them rise for another 30 to 45 minutes. They should puff up nicely during this time—like little bread pillows, ready to be baked!
Step 8: Bake the Bread
Preheat your oven to 350°F. Gently brush the tops of the loaves with the egg wash. If you want that extra crunch, sprinkle on some seeds. Now, it’s showtime! Bake your loaves for 28 to 30 minutes. You’ll know they’re done when they’re golden brown and sound hollow when tapped.
Step 9: Cooling and Serving
Once baked, remove the bread from the pans immediately. Let them cool completely on a wire rack before slicing. The aroma? Heavenly! Your Multi-Seed Honey Wheat Bread is ready to shine on your table.
Tips for Success
- Use a kitchen thermometer to check your milk temperature—110°F is perfect for activating yeast.
- For a lighter texture, make sure to knead the dough just until it’s smooth.
- Don’t rush the rising times; patience is key for fluffy bread.
- Experiment with different seeds to customize the flavor and texture.
- Keep extra loaves in the freezer for a quick, homemade bread fix!
Equipment Needed
- Mixing bowl: Use a large bowl for mixing your ingredients. A glass bowl works well!
- Dough hook mixer: A stand mixer makes life easier, but your hands can knead just fine.
- Measuring cups and spoons: Accurate measuring is key—consider using a digital scale for precision!
- Bread pans: Two standard loaf pans are ideal, but any oven-safe dish can work.
- Wire rack: Essential for cooling your bread; a cutting board can do the trick too.
Variations
- Herbed Bread: Add dried herbs like rosemary or thyme for a savory twist to your Multi-Seed Honey Wheat Bread.
- Cheesy Delight: Incorporate shredded cheese, like cheddar or mozzarella, into the dough for a cheesy version that’s perfect for sandwiches.
- Nuts Galore: Swap in chopped walnuts or pecans for an added crunch and richness.
- Sweeten It Up: For a sweeter take, drizzle in a little maple syrup alongside the honey.
- Gluten-Free Option: Use a gluten-free flour blend and ensure the yeast is gluten-free for a delightful alternative.
- Fruit & Nut Bread: Add dried fruits, like cranberries or apricots, along with nuts for a delightful breakfast treat.
Serving Suggestions for Multi-Seed Honey Wheat Bread
- Enjoy warm slices with butter and your favorite jam for a cozy breakfast.
- Pair with a fresh garden salad for a light lunch that feels gourmet.
- Create delicious sandwiches with turkey, avocado, and fresh veggies.
- Toast slices and top with smashed avocado and a sprinkle of salt.
- Serve alongside hearty soups or stews for a wholesome dinner experience.
FAQs about Multi-Seed Honey Wheat Bread
Can I use regular yeast instead of instant yeast?
Absolutely! Just activate regular yeast in warm milk with a bit of sugar until it becomes frothy before adding it to your dry ingredients. This Multi-Seed Honey Wheat Bread will still rise beautifully!
How do I store Multi-Seed Honey Wheat Bread?
Store your bread at room temperature in a bread box or airtight container for a few days. If you plan to keep it longer, slice it and freeze it in a zip-top bag. It’ll still taste fresh when you defrost it!
Can I make this bread without the seeds?
Sure! While the seeds add flavor and nutrients, you can make a simple honey wheat bread by leaving them out. You’ll still have a delicious loaf full of wholesome goodness.
Why did my bread not rise properly?
This can happen for a few reasons. If the yeast wasn’t activated properly or if your kitchen was too cold, it may have affected the rise. Next time, just ensure your milk is the right temperature and let the dough rise in a warm spot!
Is this Multi-Seed Honey Wheat Bread suitable for sandwiches?
Definitely! It’s hearty yet soft, making it perfect for sandwiches. Add your favorite fillings, and you have a nutritious meal ready in no time!
Final Thoughts
Baking this Multi-Seed Honey Wheat Bread has become a cherished ritual in my home. It’s more than just nourishing our bodies; it’s about making memories with loved ones around the kitchen table. The satisfaction of pulling out a warm loaf, the air rich with the scent of honey and seeds, fills my heart with joy. Each slice offers a moment of comfort—a reminder that with just a little effort, we can create something truly delightful. I hope this recipe brings as much warmth and happiness to your home as it has to mine!
Print
Multi-Seed Honey Wheat Bread
- Total Time: 1 hour 45 minutes
- Yield: 2 loaves 1x
- Diet: Vegetarian
Description
A nutritious and delicious multi-seed honey wheat bread that blends wholesome ingredients for a flavorful treat.
Ingredients
- 2 cups warm milk (about 110 degrees)
- 1 Tbsp instant yeast
- 1 tsp sugar
- 2–1/2 cups whole wheat flour
- 2 to 3 cups bread flour
- 6 Tbsp shelled sunflower seeds
- 6 Tbsp pepitas
- 2 Tbsp sesame seeds
- 1 Tbsp poppy seeds
- 1 Tbsp flax seeds
- 2 tsp salt
- 1/4 cup honey
- 1/4 cup canola oil
- Egg wash: 1 egg whisked together with 1 Tbsp water
- Extra seeds for sprinkling over the top
Instructions
- Add the yeast and sugar to the warm milk and give a stir, let sit for 3-5 minutes until foamy or frothy.
- In your mixer bowl, whisk together all of the whole wheat flour, 2 cups of the bread flour, the seeds, and salt.
- Add in the milk/yeast mixture, canola oil, and honey.
- Use the dough hook on low speed to mix everything together, scraping down the sides as needed.
- Slowly add in up to another cup of bread flour. You probably will not need all of it – just add enough until the dough pulls away from the sides of the mixer and comes together as a ball of dough.
- Let the dough knead with the dough hook on low for 5 minutes.
- Remove the bowl from the mixer, remove the hook, and spray around and under the dough with non-stick spray.
- Cover with a towel and let rise for an hour or until double in size.
- Spray two bread pans with non-stick spray and sprinkle a few seeds in the bottom.
- Punch down the dough and divide it into two equal size pieces.
- Shape each piece into a loaf and place each loaf in one of the prepared pans.
- Cover and allow the bread to rise for an additional 30-45 minutes or until doubled in size again.
- Preheat the oven to 350°F.
- Gently brush the egg wash over the bread and sprinkle with additional seeds if desired.
- Bake the loaves at 350°F for 28-30 minutes or until the bread is golden brown and cooked through (it should sound hollow when you tap the bottom of the loaf).
- Immediately remove bread from pans and allow the bread to cool completely on the cooling rack before slicing.
Notes
- Make sure the milk is warm, not hot, to avoid killing the yeast.
- Feel free to customize the seeds based on your preference.
- This bread can be stored at room temperature for a few days or frozen for longer storage.
- Prep Time: 15 minutes
- Cook Time: 30 minutes
- Category: Breads
- Method: Baking
- Cuisine: American
Nutrition
- Serving Size: 1 slice
- Calories: 180
- Sugar: 5g
- Sodium: 200mg
- Fat: 7g
- Saturated Fat: 1g
- Unsaturated Fat: 6g
- Trans Fat: 0g
- Carbohydrates: 25g
- Fiber: 3g
- Protein: 6g
- Cholesterol: 20mg