Mummy Jars: Create Adorable Nightlights for Halloween Fun!

Introduction to Mummy Jars
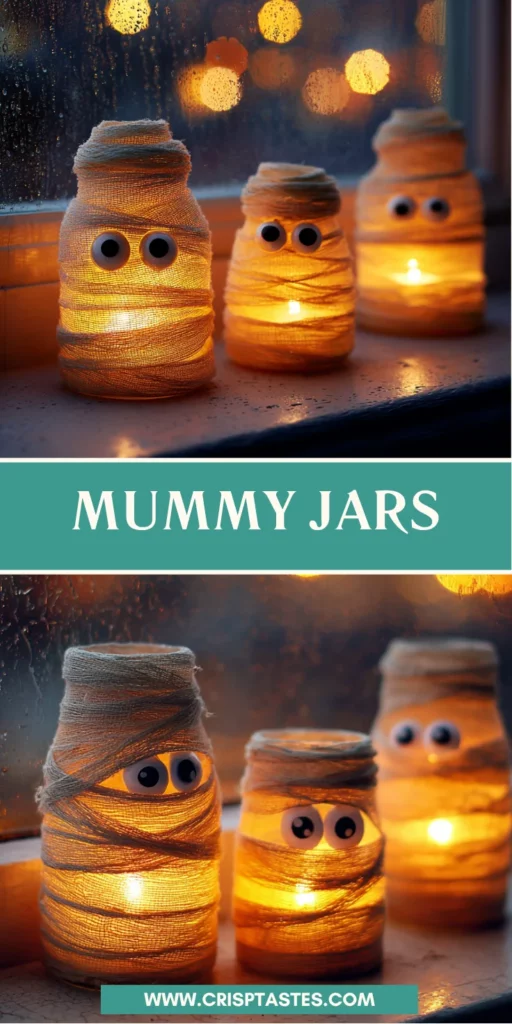
I’ve got the Halloween bug and can’t help it! I love this time of year for cool projects like Mummy Jars– one of my all-time favorites. These little nightlights are as adorable as they are creepy! That’s the way to do it for the season!
For us busy moms, an activity we can prepare in no time at all. Bonding with the kids to create the Halloween vibe can be quite fun and not overwhelming. There’s magic in simple jars coming to life.
Why You’ll Love This Mummy Jars
Mummy Jars are the best things to do, easy, and fun to create! Quick Halloween decorations that are sweet nightlights –children and grown-ups will love them.
The cuteness of these jars will win hearts over but the slight creepiness to them does add a touch of spookiness perfect for Halloween. And they most importantly create opportunities for creativity bonding time with your little one that makes making memories of crafting as delightful as the finished product!
Ingredients for Mummy Jars
Gathering the ingredients for Mummy Jars is incredibly easy, and I love how accessible they are! You’ll need some jars, which can be anything from empty mason jars to old sauce jars—just make sure they’re clean.
Next, grab some gauze or fabric. This adds the mummy-like wrap; however, you could also use an old white t-shirt or even crepe paper as a fun substitute.
Add some googly eyes to bring your mummy to life—because what’s a mummy without its iconic stare? Lastly, don’t forget LED candles to safely illuminate your creation. You can find all these materials at craft stores or even around your home!
How to Make Mummy Jars
Creating Mummy Jars is a straightforward and fun project that anyone can dive into, whether you’re a crafting novice or a DIY pro. I promise, with just a bit of imagination, your jars will transform into whimsical Halloween nightlights. Follow these simple steps to get started!
Step 1: Prepare Your Jar
Begin by selecting your jar. Clean it thoroughly and remove any labels. This creates a blank canvas for your mummy. If you’re feeling creative, you can also paint the jar for a unique twist!
Step 2: Wrap the Jar with Gauze
Take your gauze or fabric and start wrapping it around the jar. Don’t stress about making it perfect; a little unevenness adds character to your mummy. Be sure to leave gaps for an authentic look and to allow the light to shine through.
Step 3: Add Googly Eyes
Next, it’s time for some fun! Place your googly eyes on the jar to give your mummy personality. This is where you can get creative—mix different sizes or positions to make each jar unique and full of character.
Step 4: Insert an LED Candle
Once your jar is wrapped and has its eyes, gently place an LED candle inside. These flameless lights are a safe option for children and perfect to create an eerie glow.
Step 5: Final Touches
Now comes the fun part! Personalize your Mummy Jars by adding extra decorations, like little stickers, glitter, or even a spooky message. Let your imagination run wild, and watch as each jar tells its own story!
Tips for Success
Here are some quick tips to ensure your Mummy Jars turn out fabulous:
- Keep the gauze tight but not too tight; this helps create a nice texture.
- Mix and match different fabrics for a unique look.
- Consider adding themed stickers or embellishments for extra fun.
- Experiment with the placement of the googly eyes—make them silly or spooky!
- Use a clear jar for a more vibrant glow from the LED candle.
Equipment Needed
- Scissors for cutting gauze or fabric.
- Glue for securing the gauze (or adhesive tape as an alternative).
- A clean jar, like a mason or sauce jar.
- LED candles for lighting your Mummy Jars.
- A surface for crafting—preferably a table covered with newspaper.
Variations
- Try using colored gauze for a twist—think orange or purple for a vibrant Halloween vibe.
- For a spooky twist, use darker fabrics like black or navy to create ghostly mummies.
- Consider placing the LED candles on different levels inside the jars for a layered light effect.
- Add stickers or paint to reflect themes like monsters or pumpkins!
Serving Suggestions
Displaying your Mummy Jars can truly elevate your Halloween decor! Here are some fun ideas to showcase these adorable nightlights:
- Place Mummy Jars on tables to create a spooky centerpiece for family gatherings.
- Set them on your porch or steps to greet trick-or-treaters with a warm glow.
- Position jars on windowsills to cast enchanting shadows inside your home.
- Surround them with mini pumpkins or fall leaves for added ambiance.
FAQs about Mummy Jars
As I’ve dived into crafting Mummy Jars, I’ve encountered a few questions that come up quite often. Here are my most frequently asked questions to help guide your spooky crafting journey!
How can I make my Mummy Jars more durable?
To enhance durability, consider using waterproof glue for the gauze and opting for glass jars. This way, your mummies can handle a bit more wear, especially if you plan to display them year after year.
How do I store my Mummy Jars after Halloween?
Packing them carefully in a box with tissue paper can protect your creations from damage. Storing them in a cool, dry place will help maintain their charm until next season.
Are there any safety concerns with using LED candles?
Not at all! LED candles bring a cozy glow without the fire risk, making them perfect for little ones to enjoy. Plus, they keep the adventure going without any mess!
Final Thoughts
Crafting Mummy Jars is more than just a simple activity; it’s a delightful way to create lasting memories with your family during Halloween. As those adorable nightlights illuminate your home, they reflect the joy and creativity that comes from working together.
Think of each jar as a tiny treasure, telling a story of laughter and imagination. I encourage you to embrace the process, letting your playful spirit shine through. After all, the beauty of Halloween lies not just in the decorations, but in the magical moments we share while making them!
Print
Mummy Jars: Create Adorable Nightlights for Halloween Fun!
- Total Time: 10 minutes
- Yield: 1 Mummy Jar
- Diet: Vegetarian
Description
Create adorable nightlights for Halloween fun with these Mummy Jars that are cute and creepy.
Ingredients
- Jars
- Gauze or fabric
- Googly eyes
- Glue
- LED candles
Instructions
- Wrap a jar with gauze.
- Add googly eyes to the jar.
- Insert an LED tea light inside the jar.
Notes
- These jars are a fun and simple craft for kids.
- They make great decorations for Halloween and cozy fall nights.
- Prep Time: 10 minutes
- Cook Time: 0 minutes
- Category: Craft
- Method: DIY
- Cuisine: Halloween
Nutrition
- Serving Size: N/A
- Calories: N/A
- Sugar: N/A
- Sodium: N/A
- Fat: N/A
- Saturated Fat: N/A
- Unsaturated Fat: N/A
- Trans Fat: N/A
- Carbohydrates: N/A
- Fiber: N/A
- Protein: N/A
- Cholesterol: N/A