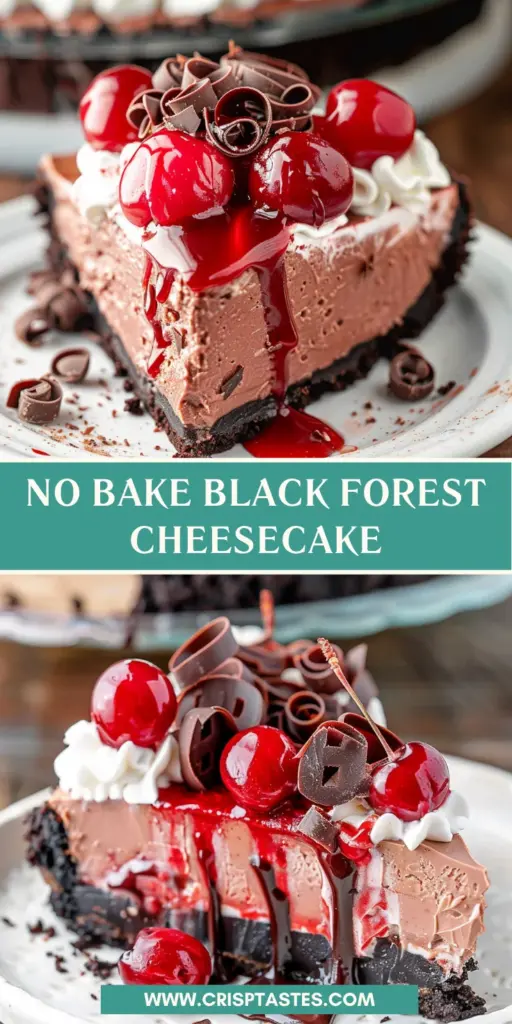
No Bake Black Forest Cheesecake

Introduction to No Bake Black Forest Cheesecake
Welcome to the delightful world of desserts! If you’re searching for an indulgent treat that brings smiles to faces without requiring an oven, look no further than my No Bake Black Forest Cheesecake. This luscious dessert is the perfect solution for special occasions or relaxed family gatherings. Imagine rich chocolate creaminess, sweet cherry bursts, all resting on a crunchy Oreo crust, making every bite a bite of bliss. Whether it’s a birthday or simply a cozy family dinner, this no-bake wonder invites warmth and joy to your table. Let’s dive in and create something unforgettable!
Why You’ll Love This No Bake Black Forest Cheesecake
If you’re like me, you’re often juggling a million things at once. That’s what makes this No Bake Black Forest Cheesecake a dream come true! It takes only 20 minutes of prep and delivers a stunning dessert that tastes like a slice of heaven. The combination of rich chocolate and juicy cherries creates an experience that’s simply delightful. Plus, there’s no baking involved, which means less fuss and more time to enjoy with your loved ones!
Ingredients for No Bake Black Forest Cheesecake
Gathering quality ingredients is one of the most rewarding parts of making my No Bake Black Forest Cheesecake. Let’s break down what you’ll need to create this masterpiece.
- 32 Oreos: This classic cookie provides a rich, chocolatey crust with a delightful crunch.
- 4 tablespoons salted butter: Melted butter helps bind the crumbles together for a solid base.
- 16 ounces cream cheese: At room temperature, it adds that irresistibly creamy texture we crave in cheesecakes.
- ¾ cup granulated sugar: This brings the sweetness to balance out the cocoa and cherries.
- ½ cup unsweetened cocoa powder: For true chocolate lovers, this intensifies the rich chocolate flavor.
- 1 cup sour cream or plain Greek yogurt: Both options add a tangy creaminess that complements the richness of the cheesecake.
- 1 cup cherry pie filling: This serves as the fruity star of the show, bursting with sweetness and juiciness.
- 8 ounces whipped topping: Lightens the filling, adding a fluffy quality to each bite.
- Optional Garnish: Chocolate shavings bring an elegant touch and an extra chocolatey kick.
Don’t worry; you’ll find detailed measurements at the bottom of the article for your convenience. With these ingredients, you’re set to whip up a delicious dessert that everyone will adore!
How to Make No Bake Black Forest Cheesecake
Prepare the Crust
Let’s kick things off with the crust, which sets the tone for our No Bake Black Forest Cheesecake. Start by lightly spraying a 9-inch springform pan with nonstick cooking spray. This ensures easy removal, so you can reveal your gorgeous creation later.
Next, take those 32 Oreos and toss them into a food processor. If you don’t have a food processor, no sweat! Place them in a large Ziploc bag and crush them up with a rolling pin. Pulse or smash until only small crumbs remain, mimicking the texture of wet sand. Then, add in the 4 tablespoons of melted salted butter and mix until everything is evenly coated.
Now, scoop that crumbly goodness into your prepared pan. Use the back of a measuring cup or your hands to press the mixture firmly over the bottom. An even layer is crucial, so the crust holds its shape when serving. Cover it with plastic wrap and allow it to chill in the freezer while we create the heavenly filling.
Create the Cheesecake Filling
Now, let’s whip up the cheesecake filling! In a large mixing bowl, combine 16 ounces of room temperature cream cheese, ¾ cup of granulated sugar, and ½ cup of unsweetened cocoa powder. Using a hand mixer or a stand mixer on medium speed, beat this mixture for about 3 to 5 minutes. You’re aiming for light and fluffy here, so don’t skip this step!
Once you’ve achieved that heavenly texture, it’s time to fold in the creamy elements. Add 1 cup of sour cream or plain Greek yogurt, whichever you choose, and mix until combined. This will enhance that creamy richness.
Then, take 1 cup of cherry pie filling and gently fold it into the cream mixture. Be careful not to crush the cherries; we want those juicy bursts in every bite! Finally, fold in 8 ounces of whipped topping until everything is just combined. This will add a lightness that’s simply irresistible.
Assemble the Cheesecake
It’s assembly time! Retrieve that crust from the freezer and spoon your luscious cheesecake filling into it. Spread the filling into an even layer with a spatula, taking care to make it as smooth as possible. This is where the magic begins to happen!
Once the filling is evenly spread, cover the cheesecake again with plastic wrap. Pop it into the refrigerator and let it set for a minimum of 4 hours. For the best flavor, I recommend letting it chill overnight. The longer it sits, the more those delicious flavors meld together!
Refrigerate to Set
With your cheesecake tucked away in the fridge, you can take a breath and relax. This is a great time to catch up on your favorite show or plan your next gathering. The anticipation builds with every passing hour, and I promise you’ll find it worth the wait when you finally dig in!
Final Garnishing and Serving
The big day has arrived, and now it’s time for the final touches! Remove the cheesecake from the fridge and gently take off the springform pan. For that extra touch, grab a piping bag, fill it with whipped cream, and pipe large swirls around the edge of the cheesecake. This adds a beautiful contrast against the dark filling.
To finish, carefully spoon 1 cup of cherry pie filling into the center of the cheesecake, spreading it towards the edge of the whipped cream swirls. If you’re feeling fancy, add some chocolate shavings on top for an elegant presentation. Slice it into pieces, serve, and get ready for the compliments to roll in!
Tips for Success
To make your No Bake Black Forest Cheesecake a showstopper, keep these quick tips in mind:
- Ensure your cream cheese is at room temperature for easy mixing.
- Use a food processor for a fine crust but a Ziploc bag and rolling pin works just fine too!
- For richer flavor, consider using dark chocolate cocoa powder instead of regular.
- Don’t skip chilling; allowing it to sit overnight enhances the flavor.
Equipment Needed
Let’s gather the tools to make this No Bake Black Forest Cheesecake a reality! Here’s a quick list of what you’ll need:
- 9-inch springform pan or a standard pie dish
- Food processor or large Ziploc bag and rolling pin
- Large mixing bowl
- Hand or stand mixer
- Piping bag or simply a resealable bag with a corner cut off
- Spatula for spreading
These items keep it simple, allowing you to focus on creating your delicious dessert!
Variations
Creativity knows no bounds in the kitchen! Here are some delightful variations of my No Bake Black Forest Cheesecake to suit various tastes and dietary needs:
- Healthier Option: Swap the cream cheese for Greek yogurt and use a sugar substitute to lighten things up.
- Gluten-Free: Use gluten-free cookies for the crust while keeping all other ingredients unchanged.
- Seasonal Twist: Substitute cherry pie filling with fresh strawberries or blueberries in summer.
- Extra Chocolate: Drizzle melted dark chocolate over the top before serving.
Feel free to mix and match these ideas to make it uniquely yours!
Serving Suggestions
To elevate your No Bake Black Forest Cheesecake experience, consider pairing it with fresh berries or a scoop of vanilla ice cream on the side for added indulgence. A cup of rich coffee or a glass of sweet dessert wine complements its flavor beautifully. For presentation, use a cake stand and garnish with a sprig of mint!
FAQs about No Bake Black Forest Cheesecake
As a passionate home cook, I’m often asked about the best ways to prepare and store my No Bake Black Forest Cheesecake. Here are some common questions that can help you achieve cheesecake perfection!
How long can I store the cheesecake?
You can store the No Bake Black Forest Cheesecake in the fridge for up to 5 days. Just make sure it’s covered to prevent it from absorbing other odors.
Can I freeze it?
Yes, you can freeze the cheesecake! Before serving, chill it in the fridge overnight for the best texture. To freeze, wrap it tightly in plastic wrap and aluminum foil. It will keep for about a month. Just thaw it in the fridge before serving.
What can I use instead of cherry pie filling?
If you’re not a fan of cherry pie filling, you can easily substitute it with fresh fruit, like raspberries or strawberries, or even other pie fillings like blueberry or peach for a fun twist.
Can I use low-fat ingredients?
Absolutely! You can substitute with low-fat cream cheese and whipped topping. Just keep in mind that the texture and flavor might be slightly different, yet still delicious!
How do I prevent the crust from crumbling?
Make sure to press the Oreo crust mixture down firmly and evenly into the pan. Letting it chill in the freezer helps it hold its shape before adding the filling.
Final Thoughts
Creating and sharing my No Bake Black Forest Cheesecake brings such joy into my kitchen and home. There’s something magical about seeing the smiles on my loved ones’ faces when they take that first bite, a rich dance of chocolate and cherry bursting with flavor. It’s the little moments spent together—whether celebrating milestones or enjoying a cozy evening—that make this dessert truly special. I find it heartwarming to know that with each slice, I’m serving up not just a treat, but also cherished memories. Dive into this blissful creation and watch the smiles unfold!
Print
No Bake Black Forest Cheesecake
- Total Time: 4 hours 20 minutes
- Yield: 12 servings 1x
- Diet: Vegetarian
Description
A delicious no-bake dessert that combines a rich chocolate cheesecake with cherry pie filling and a crunchy Oreo crust.
Ingredients
- 32 Oreos the whole cookie, filling included
- 4 tablespoons salted butter melted
- 16 ounces cream cheese room temperature
- ¾ cup granulated sugar
- ½ cup unsweetened cocoa powder
- 1 cup sour cream or plain Greek yogurt
- 1 cup cherry pie filling
- 8 ounces whipped topping thawed
- 1 cup whipped cream or whipped topping
- 1 cup cherry pie filling
- Optional Garnish: chocolate shavings
Instructions
- Lightly spray a 9 inch springform pan with nonstick cooking spray. Set aside.
- For the OREO Crust: Place OREOS in a food processor and pulse until only small crumbs remain. (Can also place in a large ziploc bag and crush with a rolling pin.)
- Add in the melted butter and pulse together until fully incorporated. Mixture should look like wet sand.
- Evenly press the crust mixture into the prepared springform pan. Cover with plastic wrap and place in the freezer while you prepare the filling.
- For the Cheesecake Filling: Combine cream cheese, granulated sugar, and cocoa powder in a large bowl. Using a hand or stand mixer, beat together for 3 to 5 minutes, or until light and fluffy.
- Add in the sour cream and beat until thoroughly combined.
- Gently fold in the one cup of cherry pie filling being careful not to crush the cherries and then fold in the whipped topping.
- Transfer the filling to the frozen crust and spread evenly. Cover again with plastic and refrigerate for a minimum of 4 hours (overnight preferred).
- On Serving Day: Transfer the whipped cream to a piping bag and pipe large swirls on the edge of the cheesecake.
- Spoon the cherry pie filling to the middle of the cheesecake and gently spread towards the whipped cream.
- Garnish with chocolate shavings, cut into slices, and serve.
Notes
- For a richer flavor, you can use dark chocolate cocoa powder.
- Make sure the cream cheese is at room temperature for easier mixing.
- This cheesecake can be made a day in advance to let the flavors meld.
- Prep Time: 20 minutes
- Cook Time: 0 minutes
- Category: Dessert
- Method: No Bake
- Cuisine: American
Nutrition
- Serving Size: 1 slice
- Calories: 320
- Sugar: 22g
- Sodium: 300mg
- Fat: 20g
- Saturated Fat: 10g
- Unsaturated Fat: 8g
- Trans Fat: 0g
- Carbohydrates: 30g
- Fiber: 1g
- Protein: 4g
- Cholesterol: 40mg