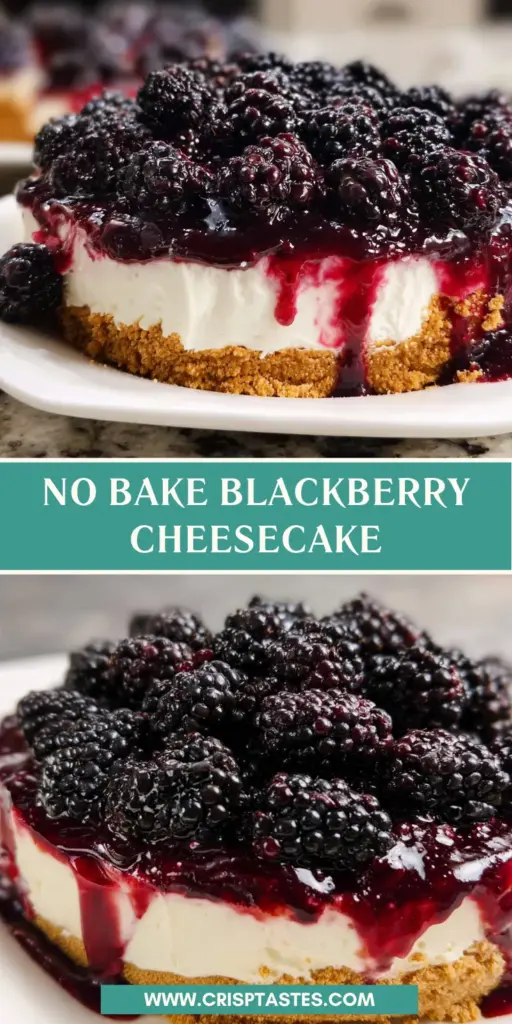
No Bake Blackberry Cheesecake: A Delicious Easy Recipe!

Introduction to No Bake Blackberry Cheesecake
Hey there, fellow food lovers! If you’re looking for a delicious and easy dessert, my No Bake Blackberry Cheesecake is just the ticket. It’s one of those recipes that saves the day, especially when life gets busy. Imagine a dessert that’s not just a treat for the taste buds but also a showstopper for your gatherings. This cheesecake requires no baking, which means less time in the kitchen and more time enjoying with family and friends. Trust me, this delightful recipe will have everyone asking for seconds!
Why You’ll Love This No Bake Blackberry Cheesecake
This delightful No Bake Blackberry Cheesecake is a lifesaver for busy days. It’s quick to prepare, taking only about half an hour, and offers a refreshing burst of flavor. With each bite, you taste the creamy richness paired with the tart blackberries. Plus, there’s no oven required, which means less hassle and cleanup for you. It’s the perfect dessert to impress your loved ones without breaking a sweat!
Ingredients for No Bake Blackberry Cheesecake
Gathering the ingredients for this No Bake Blackberry Cheesecake is half the fun. Here’s what you’ll need to create this delightful treat:
- Fresh blackberries: Nothing beats the flavor of fresh blackberries! They provide a sweet-tart kick that complements the richness of the cheesecake.
- Granulated sugar: This sweetener is essential for balancing flavors and adding that lovely sweetness to both the crust and the filling.
- Vanilla extract: A splash of vanilla adds warmth and depth to your cheesecake, making it taste even more divine.
- Ground cinnamon: Just a hint of cinnamon enhances the flavor profile of your cheesecake and creates a warm, comforting aroma.
- Water: It helps to dissolve the cornstarch and create a smooth blackberry sauce, helping everything come together beautifully.
- Cornstarch: This thickening agent is magical in turning your blackberry sauce into a silky topping that stays in place.
- Cream cheese: The star of the show! Make sure it’s softened to achieve a creamy, smooth texture in your filling.
- Powdered sugar: This type of sugar gives sweetness without any graininess, ensuring a silky mouthfeel.
- Sour cream: A touch of tanginess in the filling, which balances the sweetness and adds a delightful creaminess.
- Heavy whipping cream: This is what makes our cheesecake light and fluffy. Use it cold for best results!
- Graham cracker crumbs: These form the crumbly base of your cheesecake! They add a crunchy texture that contrasts beautifully with the creamy filling.
- Salted butter: This adds richness to your crust, enhancing the overall flavor. Unsalted butter can also be used if preferred.
Each ingredient plays its part in creating the mouthwatering symphony that is this cheesecake. For exact measurements, glance towards the bottom of this article, where you’ll find all the details ready for printing!
How to Make No Bake Blackberry Cheesecake
Step 1: Prepare the Crust
Let’s kick things off with the crust. Grab a mixing bowl and combine those graham cracker crumbs with some granulated sugar.
For a super simple approach, you can mix them right in your 9×13 baking dish. Less cleanup is always a win!
Next, melt your butter in the microwave. Once it’s nice and gooey, pour it into the crumb mixture. Stir until everything is well coated.
Now, press this mixture evenly across the bottom of your baking dish. I like using the back of a measuring cup to get an even layer. Pop it into the freezer for a bit while we move on.
Step 2: Prepare the Cheesecake Filling
Time to whip up the filling! In a medium mixing bowl, add in the softened cream cheese, powdered sugar, vanilla extract, and sour cream.
Use a hand mixer or a standing mixer to beat this mixture until it’s smooth and creamy.
This is where the magic happens – your cheesecake filling should be velvety and free of lumps. Make sure to scrape the sides of the bowl as you go!
Step 3: Whip the Cream
Now, let’s make that dreamy whipped cream. Pour the heavy whipping cream into a chilled mixing bowl.
Using either a handheld mixer or a standing mixer with a whisk attachment, beat it on medium-high speed.
Keep going until you see those stiff peaks forming. It’s like watching clouds transform into whipped cream heaven.
Step 4: Combine and Spread
Time to bring it all together! Gently fold the whipped cream into the cream cheese mixture. Use a spatula and be kind to the whipped cream – you want to keep that light and airy texture.
Once combined, carefully spread the cheesecake filling over your crust. An offset spatula is perfect for getting an even, smooth top.
Step 5: Chill to Set
Your cheesecake needs some time to chill out and set. Cover the dish and pop it into the refrigerator for at least 4 hours.
If you’re in a pinch, you can freeze it for at least 2 hours, but the texture is best after a good chill.
Step 6: Make the Blackberry Topping
While your cheesecake firms up, let’s tackle that scrumptious blackberry topping.
In a medium saucepan, combine fresh blackberries, granulated sugar, vanilla extract, ground cinnamon, water, and cornstarch.
Bring this mixture to a boil over medium heat, stirring constantly. The blackberries will break down, and your sauce will thicken to a delightful jam-like consistency.
Step 7: Final Assembly
Once your cheesecake is set and the blackberry topping has cooled completely, it’s time for the grand finale!
Spread the cooled blackberry topping evenly over the cheesecake. Cut it into pieces, serve, and bask in the compliments!
Tips for Success
- Ensure your cream cheese is softened for easy mixing and a smooth texture.
- Use a chilled bowl for whipping cream; it helps create lighter, fluffier peaks.
- Don’t skip chilling time; it’s crucial for the cheesecake to set properly.
- For an easy clean-up, mix your crust ingredients directly in the baking dish.
- Experiment with different berries for unique toppings!
Equipment Needed for No Bake Blackberry Cheesecake
- Mixing Bowls: A medium mixing bowl for the filling and a larger one for whipped cream; if you’re in a pinch, any large bowl will do.
- Electric Mixer: A hand mixer or standing mixer makes whipping up the cream a breeze.
- 9×13 Baking Dish: Perfect for shaping your cheesecake. Alternatively, you can use a springform pan for easier slicing.
- Spatula: An offset spatula is great for smoothing the filling and topping.
Variations of No Bake Blackberry Cheesecake
- Berry Medley: Swap the blackberries for a mix of your favorite berries, like strawberries, raspberries, or blueberries for a colorful twist.
- Chocolate Lovers: Mix in a layer of chocolate ganache between the crust and the cheesecake filling for a decadent flavor.
- Lower Sugar: Use a sugar substitute or a sugar-free gel for the topping to make this dessert lighter.
- Gluten-Free Option: Substitute traditional graham cracker crumbs with gluten-free alternatives to cater to dietary needs.
- Vegan Delight: Use a plant-based cream cheese and whipped coconut cream for a dairy-free version that everyone can enjoy.
Serving Suggestions for No Bake Blackberry Cheesecake
- Pair your cheesecake with a dollop of whipped cream for an extra creamy touch.
- Serve with a scoop of vanilla ice cream on the side for a delightful contrast.
- Garnish with fresh mint leaves for a pop of color and freshness.
- Enjoy alongside a glass of sweet iced tea or a refreshing lemonade.
- Present on a decorative platter with additional blackberries sprinkled around for an elegant touch.
FAQs about No Bake Blackberry Cheesecake
Can I make this No Bake Blackberry Cheesecake ahead of time?
Absolutely! This cheesecake can be made a day in advance and stored in the refrigerator. The flavors actually improve as it sits. Just add the blackberry topping right before serving for the freshest taste.
How do I store leftovers?
Store any leftover cheesecake in an airtight container in the fridge for up to five days. You can also freeze individual slices for a quick dessert later on.
Can I use frozen blackberries instead of fresh?
Sure! Just remember that frozen blackberries may yield more liquid. Thaw them first, drain excess juice, and then follow the topping instructions. Your cheesecake will still be delicious!
Is it possible to modify the flavor of the filling?
Definitely! You can infuse different flavors into the filling by adding a little lemon zest, almond extract, or even a splash of fruit juice. Get creative with what you love!
Can I substitute cream cheese with another type of cheese?
If you’re looking for a lighter alternative, you can use ricotta cheese for a unique texture. However, keep in mind that it may alter the flavor slightly!
Final Thoughts on No Bake Blackberry Cheesecake
Making this No Bake Blackberry Cheesecake is more than just whipping up a dessert; it’s about creating sweet memories with loved ones. The joy of sharing this luscious treat, with its creamy filling and vibrant blackberry topping, is simply unmatched. Its effortless elegance makes it a go-to for gatherings or quiet evenings at home. Plus, you’ll love how easy it is to prepare! With each slice, you bring a little bliss to the table, reminding everyone that life’s best moments are often the simplest ones—especially when they’re made with love and a dollop of cheesecake!
Print
No Bake Blackberry Cheesecake
- Total Time: 4-6 hours (includes chilling time)
- Yield: 12 servings 1x
- Diet: Vegetarian
Description
A delightful and easy recipe for no-bake blackberry cheesecake, perfect for any occasion.
Ingredients
- 4 cups fresh blackberries (about 24 oz.)
- 1 ½ cups granulated sugar
- 2 teaspoons vanilla extract
- ¼ teaspoon ground cinnamon
- ½ cup water
- 5 tablespoons cornstarch
- 3 8-ounce packages cream cheese, softened
- 1 ½ cups powdered sugar
- 1 teaspoon vanilla extract
- ⅓ cup sour cream
- 2 cups heavy whipping cream, cold
- 2 cups graham cracker crumbs
- ½ cup granulated sugar
- ¾ cup salted butter, melted
Instructions
- Combine graham cracker crumbs and granulated sugar in a mixing bowl (or right in a 9×13 baking dish to reduce dishes).
- Melt butter in a heat-proof bowl in the microwave. Pour melted butter into the graham cracker mixture and stir until evenly combined.
- Press graham cracker mixture evenly across the bottom of a 9×13 baking dish. Place baking dish in the freezer to firm up the crust while making the cheesecake mixture.
- In a medium mixing bowl, beat together cream cheese, 1 ½ cups of powdered sugar, vanilla extract, and sour cream until thoroughly combined.
- Pour 2 cups of heavy whipping cream into a chilled mixing bowl. Beat on medium high speed (either with a standing mixer whisk attachment or with a handheld mixer). Continue beating until whipped cream forms stiff peaks.
- Gently fold the whipped cream into the cream cheese mixture.
- Spread the cheesecake filling evenly over the chilled graham cracker crust. Use an offset spatula to smooth the top of the cheesecake.
- Place cheesecake in the refrigerator for at least 4 hours or in the freezer for at least 2 hours to set.
- While cheesecake is chilling, prepare the blackberry topping.
- Place blackberries, 1 ½ cups sugar, 2 teaspoons vanilla extract, ¼ teaspoon cinnamon, water, and cornstarch in a medium saucepan.
- Bring mixture to a boil, stirring constantly. Reduce heat and simmer for 8-10 minutes, stirring occasionally, until blackberries are broken down and juices have thickened to a jam-like consistency.
- Remove from heat and let cool completely.
- Spread cooled blackberry topping over the chilled cheesecake. Cut into pieces and serve.
Notes
- For a thicker crust, use more graham cracker crumbs.
- Make sure the cream cheese is softened for easier mixing.
- You can substitute other berries for the topping if desired.
- Prep Time: 30 minutes
- Cook Time: 10-15 minutes
- Category: Dessert
- Method: No Bake
- Cuisine: American
Nutrition
- Serving Size: 1 slice
- Calories: 380
- Sugar: 25g
- Sodium: 200mg
- Fat: 22g
- Saturated Fat: 13g
- Unsaturated Fat: 6g
- Trans Fat: 0g
- Carbohydrates: 44g
- Fiber: 2g
- Protein: 5g
- Cholesterol: 60mg