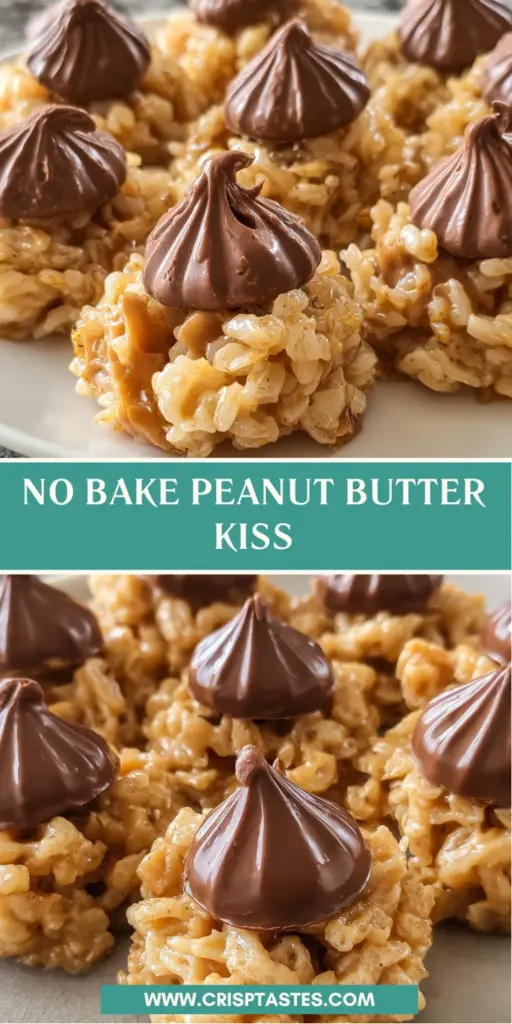
No Bake Peanut Butter Kiss

Introduction to No Bake Peanut Butter Kiss
Hey there, fellow busy bees! If you’re juggling work, family, and the never-ending to-do list, let me introduce you to my secret weapon: the No Bake Peanut Butter Kiss. This delightful treat is the perfect solution for a quick dessert when time is short but cravings are high. Imagine that luscious blend of creamy peanut butter and chocolate, all without a single oven on! It’s a no-fuss recipe that will impress your loved ones and satisfy those sweet tooth missions. Trust me; you won’t need to spend hours in the kitchen to whip up this deliciousness.
Why You’ll Love This No Bake Peanut Butter Kiss
This No Bake Peanut Butter Kiss is a dream come true for busy moms and professionals like us! It’s ridiculously easy to make, taking just 15 minutes from start to finish. Plus, the flavors of peanut butter and chocolate are an irresistible combo that will have everyone begging for more. These treats can be our little secret, perfect for any occasion or just because we deserve a sweet pick-me-up!
Ingredients for No Bake Peanut Butter Kiss
Now, let’s dive into the delicious details of what you’ll need to whip up these irresistible No Bake Peanut Butter Kisses. Don’t worry; this list is simple and straightforward, just like the recipe itself!
- Brown Sugar: This adds a rich sweetness and a hint of molasses flavor to the mix. It also helps to create that gooey texture we love.
- Light Corn Syrup: This sticky ingredient helps hold everything together. It adds sweetness without causing the mixture to crystallize.
- Creamy Peanut Butter: The star of the show! Choose your favorite brand for that nutty goodness. Peanut butter makes these treats creamy and rich.
- Crisped Rice Cereal: This provides the crunch factor. It gives our cookie balls a delightful texture that contrasts beautifully with the smooth peanut butter.
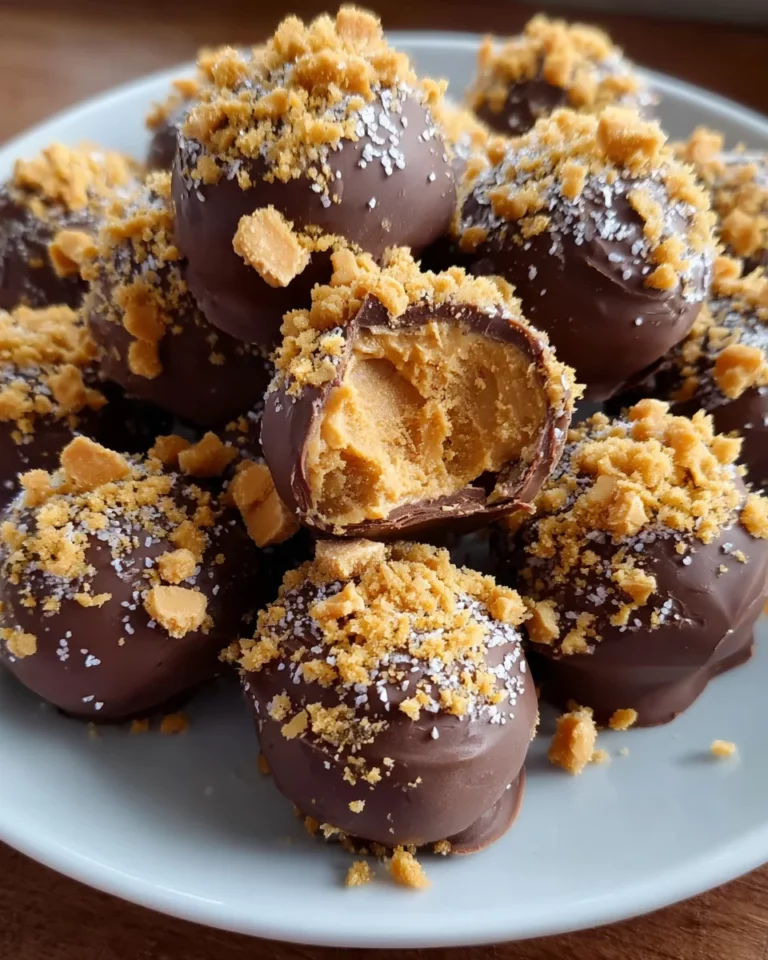
- Hershey’s Kisses: These chocolate gems will melt your heart! Their creamy center and delightful flavor make the perfect topping for our peanut butter balls.
For those who like to experiment, consider adding some optional ingredients. Nuts can bring in a delightful crunch, and mini chocolate chips can add even more chocolatey goodness.
Exact measurements for each ingredient are at the bottom of the article if you’d prefer to print them out. Happy baking— or in this case, no-baking!
How to Make No Bake Peanut Butter Kiss
Step 1: Prepare the Cereal Mixture
First things first, grab a large mixing bowl. Measure out your crisped rice cereal and pour it in, giving it a gentle stir to break any clumps. This cereal will provide the delightful crunch that balances the creamy richness of peanut butter. Trust me, it’s the magic touch that makes the No Bake Peanut Butter Kiss so wonderful!
Step 2: Cook the Peanut Butter Mixture
Now, let’s move to the stove. In a medium saucepan, combine light corn syrup and brown sugar. Heat them over medium heat while stirring continuously. This will help dissolve the sugar completely. When the mixture reaches a rolling boil, you’ll know it’s time to tackle the next challenge. Reduce the heat to low and add the creamy peanut butter, stirring until everything is smoothly blended. It should look luscious and inviting!
Step 3: Combine Mixtures
Once your peanut butter mixture is ready, it’s time for the fun part! Carefully pour the hot mixture over the already-prepared crisped rice cereal. Use a spatula to gently mix everything together until every piece of cereal is coated with that dreamy peanut butter goodness. The warmth will make the cereal slightly sticky, holding everything together beautifully.
Step 4: Shape into Balls
Now comes the shaping! Using a tablespoon-sized scoop, take portions of the mixture and roll them into small balls with your hands. They don’t need to be perfect, but make them about the size of a golf ball for easy handling. Each sphere is a tiny delight just waiting to be topped with a Hershey’s Kiss!
Step 5: Add the Kisses
Here’s the best part! Grab those unwrapped Hershey’s Kisses and gently press one into the center of each cookie ball. Feel free to shape the mixture slightly around the base of the chocolate to secure it in place. The result? A heavenly treat that combines creamy chocolate with the richness of peanut butter in every bite.
Step 6: Cool and Set
Finally, it’s time for the treats to cool. Place your baking sheet with the cookie balls in a cool area, allowing them to set for about 15 minutes. This will give them the time to firm up. After they’ve cooled, they’ll be ready for you to indulge! You’ll be thrilled to taste the delightful combination of flavors in every blissful bite.
Tips for Success
- Always measure your ingredients accurately for consistent results.
- Keep a bowl of warm water nearby to dampen your hands when rolling the balls. This prevents sticking!
- Let the peanut butter mixture cool slightly before combining with the cereal to avoid burns.
- For a fun twist, mix in some mini chocolate chips or chopped nuts for extra flavor.
- Store your treats in an airtight container to keep them fresh and tasty.
Equipment Needed
- Mixing Bowl: A large bowl works best; even a pot can double as one in a pinch.
- Medium Saucepan: Use any sturdy pan you have for cooking the peanut butter mixture.
- Spoon or Spatula: A wooden spoon is great for mixing, but any large spoon will do.
- Baking Sheet: A sheet lined with parchment paper; don’t have one? Use any flat dish.
- Measuring Cups: Get precise measurements for success; can also use standard cups if needed.
Variations of No Bake Peanut Butter Kiss
- Nutty Delight: Incorporate chopped peanuts or almonds for an extra crunch. This will enhance the peanut flavor and add texture.
- Chocolate Lovers: Mix in mini chocolate chips before shaping into balls for a double chocolate experience!
- Healthy Twist: Substitute honey for light corn syrup for a more natural sweetener. It’ll give a different flavor and a slightly sticky texture.
- Gluten-Free Option: Use gluten-free crisped rice cereal to accommodate dietary restrictions, ensuring everyone can enjoy these treats!
- Peanut Butter Alternatives: Swap out peanut butter for almond butter or sunflower seed butter if you’re looking for a nut-free version. Each option brings a unique flavor!
Serving Suggestions for No Bake Peanut Butter Kiss
- Pair these treats with a cold glass of milk for a classic combo that’s sure to please.
- Serve on a fun, colorful platter to add a pop of joy when entertaining guests.
- For added flair, drizzle some melted chocolate over the top before serving.
- These treats also make an excellent addition to lunchboxes for a sweet surprise.
- Enjoy them alongside fresh fruit for a balanced snack that satisfies!
FAQs about No Bake Peanut Butter Kiss
As you embark on your no-bake adventure, you may have a few questions. Don’t worry; I’ve got you covered with the most common queries around these delightful treats!
Can I use crunchy peanut butter instead of creamy? Absolutely! Using crunchy peanut butter will add texture and a lovely nutty flavor to your No Bake Peanut Butter Kiss. Just remember, the crunchy bits may alter the overall smoothness a bit.
How long do these treats last? If stored properly in an airtight container, your no-bake wonders can last up to a week at room temperature. But honestly, they might disappear long before then!
Can I freeze No Bake Peanut Butter Kisses? Yes, you can! These treats freeze well. Just ensure they’re in an airtight container, and you can enjoy them later. When you’re ready to indulge, simply let them thaw at room temperature.
What can I use instead of light corn syrup? If corn syrup is not your thing, honey or agave syrup can be great alternatives. They will provide sweetness and help bind the ingredients together for your No Bake Peanut Butter Kiss.
Are these treats suitable for kids? Definitely! These no-bake treats are a hit with kids and adults alike. Just be cautious about any nut allergies among your little ones, and have fun making them together!
Final Thoughts on No Bake Peanut Butter Kiss
The No Bake Peanut Butter Kiss is more than just a dessert; it’s a sweet moment of joy in our bustling lives. The delightful blend of creamy peanut butter and chocolate will have you grinning with each bite. Whether it’s a treat for your family or a sweet surprise for an afternoon snack, this recipe brings comfort and happiness to any occasion. With its simplicity and richness, it’s a delightful reminder that even in our busiest moments, we can share a little sweetness and create lasting memories together. So, go ahead, indulge in these delicious bites!
Print
No Bake Peanut Butter Kiss
- Total Time: 15 minutes
- Yield: Approximately 45 cookie balls 1x
- Diet: Vegetarian
Description
No Bake Peanut Butter Kiss is a delightful treat combining the rich flavors of creamy peanut butter and chocolate, all without baking.
Ingredients
- 1 cup (200 g) packed brown sugar
- 1 cup (340 g) light corn syrup
- 2 cups (500 g) creamy peanut butter
- 5 cups (125 g) crisped rice cereal
- 45 pieces Hershey’s Kisses, unwrapped
Instructions
- Measure crisped rice cereal into a large mixing bowl and set aside. Unwrap chocolate kisses and reserve.
- In a medium saucepan over medium heat, combine light corn syrup and brown sugar. Stir continuously until mixture reaches a full boil.
- Reduce heat to low. Add peanut butter to the pan, stirring until fully integrated, then remove mixture from heat.
- Immediately pour the hot peanut butter mixture over the crisped rice cereal. Gently mix until the cereal is evenly coated.
- Using a tablespoon-sized scoop, form mixture into small balls and place onto a parchment-lined baking sheet.
- Press one unwrapped Hershey’s Kiss into the center of each cookie ball, gently shaping the mixture around the base of the chocolate.
- Allow cookies to cool at room temperature for 15 minutes until set before serving.
Notes
- Store leftover treats in an airtight container at room temperature.
- Variation: Add chopped nuts or mini chocolate chips for added texture.
- Prep Time: 10 minutes
- Cook Time: 5 minutes
- Category: Dessert
- Method: No Bake
- Cuisine: American
Nutrition
- Serving Size: 1 cookie ball
- Calories: 140
- Sugar: 10 g
- Sodium: 60 mg
- Fat: 7 g
- Saturated Fat: 2 g
- Unsaturated Fat: 5 g
- Trans Fat: 0 g
- Carbohydrates: 16 g
- Fiber: 0 g
- Protein: 3 g
- Cholesterol: 0 mg