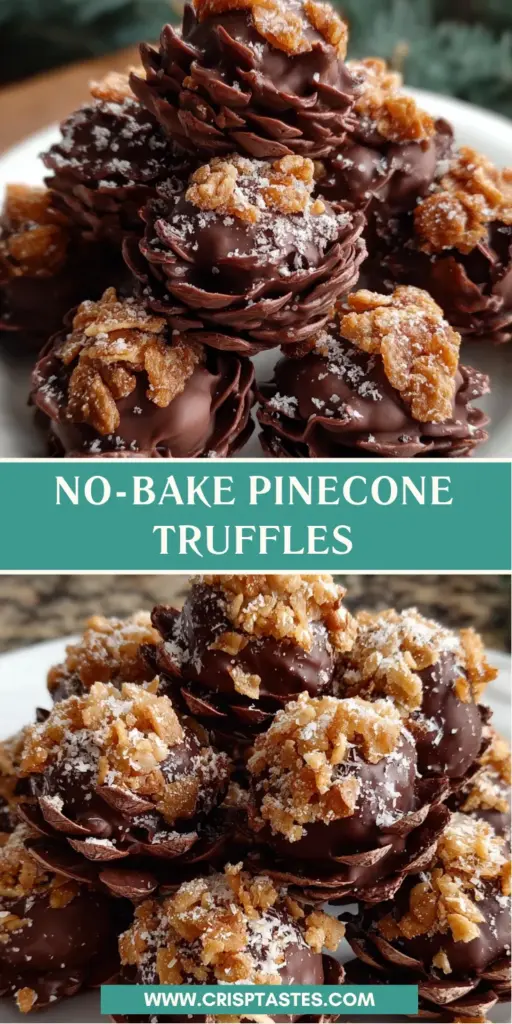
No-Bake Pinecone Truffles: A Delightful Festive Treat!

Introduction to No-Bake Pinecone Truffles
Let’s be honest: the holidays can be a whirlwind of to-do lists, family gatherings, and endless planning. That’s where my No-Bake Pinecone Truffles come in! These delightful festive treats not only make a stunning centerpiece on your dessert table, but they also save you precious time—no baking required! I love how simple they are to whip up, and they’re sure to impress your loved ones, no matter how busy life gets. So, grab your apron, and let’s embark on this tasty adventure together!
Why You’ll Love This No-Bake Pinecone Truffles
There’s something magical about No-Bake Pinecone Truffles that brings joy without the hassle. They’re incredibly easy to prepare, making them perfect for busy moms like us who want to impress without spending hours in the kitchen. The rich, creamy filling combined with the crunch of cornflakes creates a delightful flavor and texture experience that’s simply irresistible. Plus, they look so fancy, your guests will think you spent all day crafting them!
Ingredients for No-Bake Pinecone Truffles
Creating these No-Bake Pinecone Truffles is a breeze, thanks to just a handful of ingredients. Here’s what you’ll need:
- Vegan chocolate biscuits: These form the base of our truffles. You can opt for gluten-free biscuits if that’s your preference.
- Dairy-free cream cheese: This gives our truffles a luscious, creamy texture. Look for nut-free options if allergies are a concern!
- Unsweetened cocoa powder: Adding cocoa powder enhances the chocolatey flavor without any added sweetness.
- Dairy-free dark chocolate: Essential for dipping, this rich chocolate will give our truffles that beautiful coating. Be sure to choose a high-quality brand!
- Vegan cornflakes: These act as the delightful “scales” for our pinecone appearance. Gluten-free cornflakes are also available!
- Icing sugar: A light dusting of icing sugar at the end adds a touch of sweetness and visual appeal.
Check the bottom of the article for exact measurements, which are available for printing. Now, let’s gather these ingredients and transform them into something magical!
How to Make No-Bake Pinecone Truffles
Let’s dive into the fun part—making these adorable No-Bake Pinecone Truffles! Each step is easy to follow, and I promise you’ll feel like a dessert artisan by the time you’re done. Ready? Let’s get started!
Prepare the Baking Tray
First things first, line a baking tray with greaseproof paper to keep our truffles from sticking. This step may seem small, but trust me, it’ll save you a headache later!
Process the Biscuit Mixture
Grab your food processor and toss in the vegan chocolate biscuits. Blend them until they resemble fine crumbs. If you don’t have a processor, a rolling pin works just as well—just put the biscuits in a sealed bag and crush away! Once you’ve got those crumbs, transfer them to a large mixing bowl.
Form the Truffles
Now, it’s time to bring it all together. Add the dairy-free cream cheese and unsweetened cocoa powder into the bowl. Mix everything until it forms a combined mixture that holds its shape when pressed. Using clean hands, roll tablespoon-sized portions (around 20g each) into balls and pinch the tops to create an oval shape. Place them on your prepared tray, looking all rustic and cute!
Create the Pinecone Texture
This is where the magic happens! Start at the bottom of each truffle and gently press cornflakes into the mixture. Layer them upwards, using smaller flakes as you get closer to the top. It’s like creating a tiny, edible sculpture—how fun is that?
Chill the Truffles
Once you’ve created your pinecone beauties, pop the tray into the freezer for about 25 minutes. This helps them firm up before we coat them in chocolate, ensuring they hold their shape beautifully.
Melt the Chocolate
While they’re chilling, let’s melt that rich dairy-free dark chocolate! You can either use a heatproof bowl over simmering water (bain-marie style) or pop it in the microwave, checking every 20 seconds. Stir until smooth. The melted chocolate adds a velvety layer to the truffles and makes them extra delicious.
Coat the Truffles
Once the truffles are firm, it’s dipping time! Using a fork, dip each chilled truffle into the melted chocolate, spooning it over to fully coat. Allow any excess chocolate to drip back into the bowl. This step adds that luxe finish that makes them look professionally made!
Final Touches
Return the coated truffles to the tray and place them back in the freezer for another 5 to 10 minutes, until the chocolate sets. Once they’re firm, take a moment to dust them lightly with icing sugar. This added touch not only sweetens the deal but makes these delights sparkle on your dessert table!
Tips for Success
- Make sure your cream cheese is at room temperature for easier mixing.
- Choose high-quality dairy-free dark chocolate for the best flavor.
- Don’t skip the chilling time; it ensures the truffles hold their shape when coated.
- Experiment with different toppings like crushed nuts or sprinkles for a festive twist.
- Have fun with the cornflakes! Mix large and small flakes for a more realistic texture.
Equipment Needed
- Food processor: A blender works too if you don’t have one.
- Baking tray: Any flat tray will suffice for chilling.
- Heatproof bowl: You can use a microwave-safe bowl for melting chocolate.
- Parchment paper: Regular wax paper can be used as a substitute.
- Fork: Chopsticks can be a fun alternative for dipping!
Variations
- For a nutty kick, try adding some almond or cashew butter into the mixture for extra creaminess.
- Switch out the cornflakes for crushed gluten-free pretzels for a sweet and salty combination.
- Add a sprinkle of sea salt on top of the chocolate coating for a delightful contrast in flavors.
- Mix in some finely chopped dried fruits like cranberries or apricots to add a chewy texture.
- For a minty twist, add a few drops of peppermint extract to the chocolate coating.
Serving Suggestions for No-Bake Pinecone Truffles
- Pair the truffles with a hot cup of cocoa or your favorite herbal tea for a cozy treat.
- Serve on a rustic wooden board for an elegant presentation during holiday gatherings.
- Add some fresh berries as a vibrant contrast to the chocolatey treats.
- For a festive touch, sprinkle with edible glitter before serving.
- Offer a variety of truffles as part of a dessert platter with other bite-sized sweets.
FAQs about No-Bake Pinecone Truffles
Can I make No-Bake Pinecone Truffles in advance?
Absolutely! These truffles can be made a few days ahead of time. Just store them in an airtight container in the refrigerator. They taste even better after chilling!
What if I have a gluten intolerance?
No worries! Simply use gluten-free vegan chocolate biscuits and cornflakes. There are plenty of delicious gluten-free options available that work perfectly for this recipe.
Can I use regular cream cheese instead of dairy-free?
If you’re not dairy-free, feel free to substitute regular cream cheese! The texture will still be creamy and luxurious, keeping that blissful taste.
How do I store any leftover truffles?
Keep your leftover No-Bake Pinecone Truffles in an airtight container in the fridge for up to a week. Just make sure they’re all set before you stack them to avoid any melty mess!
Can kids help make these truffles?
Yes! This recipe is a great way to involve kids in the kitchen. They’ll love rolling the truffles and decorating with cornflakes. Just keep an eye on the melting chocolate part!
Final Thoughts
Every time I whip up a batch of No-Bake Pinecone Truffles, I’m reminded of the joy that comes with creating something special with my family. These treats not only satisfy our sweet cravings but also bring a festive spirit to our gatherings. I love seeing the smiles on my loved ones’ faces as they bite into these delightful morsels. Plus, the simplicity of making them allows me to savor the little moments during the busy holiday season. So, gather your ingredients, invite your friends, and enjoy this delightful culinary adventure together!
Print
No-Bake Pinecone Truffles
- Total Time: 30 minutes + 30 minutes chilling time
- Yield: 15–20 truffles 1x
- Diet: Vegan
Description
No-Bake Pinecone Truffles are delightful festive treats that resemble pinecones, perfect for holiday gatherings or as a fun dessert.
Ingredients
- 150g vegan chocolate biscuits, finely crushed (use gluten-free if needed)
- 60g dairy-free cream cheese
- 1 tablespoon unsweetened cocoa powder
- 200g dairy-free dark chocolate
- Vegan cornflakes (gluten-free optional), as needed for decoration
- Icing sugar, for dusting
Instructions
- Line a baking tray with greaseproof paper and set aside.
- Process chocolate biscuits in a food processor or blender until fine crumbs form, or crush manually with a rolling pin.
- Transfer biscuit crumbs to a large mixing bowl. Add dairy-free cream cheese and cocoa powder. Mix until evenly incorporated and the mixture holds together when pressed.
- Using clean hands, roll tablespoon-sized portions (approximately 20g each) into balls. Pinch the tops to create an oval, pinecone-like shape and place them on the prepared tray.
- Starting from the base, press cornflakes into each truffle, layering upwards to resemble pinecone scales, using smaller flakes as you ascend.
- Place tray in the freezer for 25 minutes until firm enough for coating.
- Five minutes before removing truffles from the freezer, melt dark chocolate in a heatproof bowl set over a pan of simmering water (bain-marie), or in a microwave in 20-second intervals until smooth.
- Using a fork, dip each chilled truffle into the melted chocolate, spooning over to cover. Allow any excess chocolate to drip off.
- Return coated truffles to the tray and place in the freezer for 5–10 minutes, until the chocolate sets.
- Lightly dust cooled truffles with icing sugar and serve immediately.
Notes
- Store any leftovers in an airtight container in the refrigerator.
- For a nut-free version, ensure the cream cheese used is nut-free.
- Make sure to use gluten-free biscuits if necessary.
- Prep Time: 30 minutes
- Cook Time: 0 minutes
- Category: Dessert
- Method: No-Bake
- Cuisine: American
Nutrition
- Serving Size: 1 truffle
- Calories: 150
- Sugar: 5g
- Sodium: 50mg
- Fat: 9g
- Saturated Fat: 5g
- Unsaturated Fat: 3g
- Trans Fat: 0g
- Carbohydrates: 15g
- Fiber: 2g
- Protein: 2g
- Cholesterol: 0mg