No-Bake Strawberry Cheesecake Bars: A Delightful Treat!

Introduction to No-Bake Strawberry Cheesecake Bars
Hey there, fellow food lovers! If you’re searching for a delightful dessert that requires minimal effort, look no further than these No-Bake Strawberry Cheesecake Bars. Imagine a creamy, luscious cheesecake on a buttery crust topped with sweet, vibrant strawberries. It’s like a slice of summer on your plate! Perfect for busy moms like us, this recipe allows you to whip up a stunning treat to impress family and friends without spending hours in the kitchen. Just set it to chill and go about your day, knowing a delicious dessert awaits you later!
Why You’ll Love This No-Bake Strawberry Cheesecake Bars
If you’re pressed for time but still want to treat your loved ones, these No-Bake Strawberry Cheesecake Bars are your answer. They come together in just 20 minutes, with no baking required! The rich cheesecake filling, paired with fresh strawberries, creates a flavor explosion that feels indulgent yet refreshing. Plus, you can make them a day ahead, taking the stress out of entertaining!
Ingredients for No-Bake Strawberry Cheesecake Bars
To create these mouth-watering No-Bake Strawberry Cheesecake Bars, you’ll need a handful of simple ingredients that blend beautifully together. Here’s a quick rundown:
- Graham cracker crumbs: These are the backbone of the crust, giving it that signature crunch and buttery flavor. You can even use gluten-free graham crackers if needed.
- Granulated sugar: A little sweetness in the crust and filling helps balance the flavors perfectly. Feel free to swap with coconut sugar for a healthier option.
- Unsalted butter: This adds richness to the crust. I always opt for unsalted so I can control the overall saltiness of the bars.
- Cream cheese: The star of the show! It creates that luscious, creamy filling. Make sure it’s softened to make mixing easier.
- Powdered sugar: This gives the filling a smooth sweetness that granulated sugar just can’t achieve.
- Vanilla extract: A splash of this adds depth to the flavor, enhancing the overall sweetness of the cheesecake.
- Heavy cream: Whipping this helps to create that dreamy, light texture in the filling. Don’t over-whip, or it can turn gritty!
- Fresh strawberries: The vibrant topping is what brings this dessert to life. Use ripe, sweet strawberries for the best flavor.
- Lemon juice: Just a touch helps enhance the fruity flavor of the strawberries and balances the sweetness.
For those interested in alternative toppings or flavors, feel free to swap strawberries with other fruits like blueberries, raspberries, or peaches. And if you’re curious about exact measurements, they’ll be available for printing at the bottom of the article!
How to Make No-Bake Strawberry Cheesecake Bars
Now, let’s dive into creating those irresistible No-Bake Strawberry Cheesecake Bars. I promise, it’s simpler than it sounds, and the end result is downright heavenly. Follow along step-by-step, and soon you’ll have a show-stopping dessert ready to chill.
Make the Crust
First things first, let’s tackle that graham cracker crust.
- In a medium bowl, mix together the graham cracker crumbs and granulated sugar.
- Next, pour in the melted butter and stir until everything is combined. The mixture should resemble wet sand.
- Grab a 9×9-inch square baking dish or a 9-inch round pan. Press the crust mixture firmly into the bottom.
- Pack it tightly using the back of a spoon or your fingers. This ensures a solid base.
- Finally, refrigerate the crust for at least 10 minutes while you whip up the filling. It needs to firm up a bit!
Prepare the Cheesecake Filling
Now that your crust is chilling, it’s time for the creamy cheesecake filling.
- In a large mixing bowl, beat the softened cream cheese using an electric mixer. Make it smooth and creamy.
- Gradually add the powdered sugar and a splash of vanilla extract while mixing. Take your time; we want a silky texture here.
- In another bowl, whip the heavy cream until stiff peaks form. Remember, don’t overdo it; we want it fluffy, not grainy!
- Gently fold the whipped cream into the cream cheese mixture using a spatula. Be patient, and make sure it’s fully incorporated.
- Once mixed, spread the cheesecake filling evenly over the chilled crust. Smooth it out with a spatula to create a lovely finish.
Make the Strawberry Topping
Let’s add the star of the show – the vibrant strawberry topping!
- In a small saucepan, combine the chopped strawberries, granulated sugar, and lemon juice. This sweet duet will bring out the strawberries’ natural juices.
- Heat the mixture over medium heat, stirring occasionally. You’ll know it’s ready when it becomes syrupy, which takes about 5-7 minutes.
- Remove from heat and let it cool to room temperature. If you prefer a smooth topping, mash the strawberries with a fork or blend them for a pureed texture.
Assemble the Bars
Now it’s time to bring all the elements together.
- Once your strawberry topping has cooled, spoon it evenly over the cheesecake layer.
- Make sure the strawberries spread out, creating a luscious layer on top.
- Refrigerate the whole masterpiece for at least four hours. For the best results, overnight is even better!
Serve
Finally, it’s time to share your creation!
- When ready to serve, remove the bars from the refrigerator. A warm knife dipped in hot water helps to cut cleanly.
- Cut into squares or bars, whichever you prefer. Trust me, everyone will be coming back for seconds!
- Enjoy those delicious No-Bake Strawberry Cheesecake Bars and relish the smiles on your loved ones’ faces!
Tips for Success
- Use room temperature cream cheese for easier blending. It helps to achieve that smooth filling!
- Don’t over-whip the heavy cream; it should be fluffy and light, not grainy.
- Let the bars chill overnight for the best flavor and texture. Patience pays off!
- For a pop of flavor, try adding a splash of almond extract in the filling.
- Keep leftovers covered in the fridge for up to three days. They won’t last long!
Equipment Needed
- Mixing bowls: Have at least two on hand, one for the crust and one for the filling.
- Electric mixer: A hand mixer works great, but a stand mixer will save your arm from fatigue!
- 9×9-inch baking dish: A round pan is also fine. Just ensure it’s suitable for chilling.
- Spatula: A rubber spatula helps in spreading the filling evenly.
- Small saucepan: Use this for the strawberry topping. A frying pan works too!
Variations
- Berry Bliss: Try substituting strawberries with a mix of blueberries and raspberries for a vibrant twist on the topping.
- Chocolate Indulgence: Add melted chocolate to the cheesecake filling for a rich chocolate flavor that pairs beautifully with the strawberries.
- Nutty Crunch: Toss some chopped nuts, like almonds or pecans, into the crust for added texture and a delightful crunch.
- Healthier Option: Use Greek yogurt instead of cream cheese for a lighter version that still maintains creaminess.
- Citrusy Delight: Add a bit of orange or lime zest to the cheesecake filling for a refreshing citrus kick.
Serving Suggestions
- Pair your No-Bake Strawberry Cheesecake Bars with a dollop of whipped cream for extra creaminess.
- A scoop of vanilla ice cream on the side is a classic choice that complements the strawberry topping beautifully.
- Serve with a refreshing mint tea or sparkling water to cleanse the palate.
- Garnish with fresh mint leaves or additional strawberries for a picturesque presentation.
FAQs about No-Bake Strawberry Cheesecake Bars
When it comes to making No-Bake Strawberry Cheesecake Bars, you might have some questions. Here are a few common ones that I often hear!
Can I use frozen strawberries instead of fresh?
Absolutely! Frozen strawberries work well too. Just make sure to thaw them and drain any excess liquid before using them for the topping.
How long can I store these cheesecake bars?
These bars can last up to three days in the refrigerator when stored in an airtight container. However, they’re best enjoyed within the first two days!
Can I make the crust without graham crackers?
Definitely! You can use digestive biscuits, crushed vanilla wafers, or even oatmeal cookies for a different flavor. The key is to have a crunchy base.
How can I make these bars more festive?
Top your No-Bake Strawberry Cheesecake Bars with colorful sprinkles or edible flowers to brighten them up for a party. They’ll look as fabulous as they taste!
What should I do if the filling is too runny?
If your filling turns out runny, try refrigerating it longer to firm up. You can also consider adding a bit more cream cheese to thicken it. Just remember to blend well!
Final Thoughts
Creating these No-Bake Strawberry Cheesecake Bars is not just about making a dessert; it’s an experience that brings joy to both the creator and the enjoyer. There’s something truly magical about layering creamy cheesecake with fresh, tangy strawberries atop a buttery crust. The compliments from family and friends as they savor each bite are like a cherry on top! Whether it’s a family gathering or a quiet night in, this recipe delivers smiles every time. With minimal effort and maximum flavor, you’re sure to make lasting memories with this delightful treat!
Print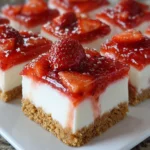
No-Bake Strawberry Cheesecake Bars
- Total Time: 4 hours 20 minutes
- Yield: 16 bars 1x
- Diet: Vegetarian
Description
A refreshing and creamy dessert perfect for any occasion, these no-bake strawberry cheesecake bars combine a buttery graham cracker crust with a rich cheesecake filling and a sweet strawberry topping.
Ingredients
- 1 ½ cups graham cracker crumbs (about 12 graham crackers)
- ⅓ cup granulated sugar
- ½ cup unsalted butter, melted
- 2 cups cream cheese, softened
- 1 cup powdered sugar
- 1 teaspoon vanilla extract
- 2 cups heavy cream
- 2 cups fresh strawberries, hulled and chopped
- ¼ cup granulated sugar
- 1 tablespoon lemon juice
Instructions
- Make the Crust: In a medium bowl, combine the graham cracker crumbs and granulated sugar. Stir in the melted butter until everything is well combined and the mixture resembles wet sand. Press the crust mixture firmly into the bottom of a 9×9-inch square baking dish or a 9-inch round pan. Use the back of a spoon or your fingers to pack it tightly. Refrigerate the crust while you prepare the filling.
- Prepare the Cheesecake Filling: In a large mixing bowl, beat the softened cream cheese with an electric mixer until smooth and creamy. Gradually add powdered sugar and vanilla extract, continuing to beat until well combined. In a separate bowl, whip the heavy cream until stiff peaks form. Be careful not to over-whip. Gently fold the whipped cream into the cream cheese mixture until fully incorporated and smooth. Spread the cheesecake filling evenly over the chilled crust. Use a spatula to smooth the top.
- Make the Strawberry Topping: In a small saucepan, combine the chopped strawberries, granulated sugar, and lemon juice. Heat over medium heat, stirring occasionally, until the strawberries release their juices and the mixture becomes syrupy, about 5-7 minutes. Remove from heat and let the strawberry topping cool to room temperature. If you’d prefer a smoother topping, you can mash the strawberries lightly with a fork or blend them for a smoother consistency.
- Assemble the Bars: Once the strawberry topping has cooled, spoon it evenly over the cheesecake layer. Refrigerate the bars for at least 4 hours, or preferably overnight, to allow the layers to set.
- Serve: When ready to serve, cut into squares or bars. Enjoy the creamy, refreshing flavor of these no-bake cheesecake bars!
Notes
- For a gluten-free option, use gluten-free graham crackers.
- These bars can be made a day in advance and stored in the refrigerator.
- Feel free to substitute other fruits for the topping.
- For best results, let the bars chill overnight for a firmer texture.
- Prep Time: 20 minutes
- Cook Time: 0 minutes
- Category: Dessert
- Method: No-Bake
- Cuisine: American
Nutrition
- Serving Size: 1 bar
- Calories: 280
- Sugar: 16g
- Sodium: 210mg
- Fat: 20g
- Saturated Fat: 10g
- Unsaturated Fat: 7g
- Trans Fat: 0g
- Carbohydrates: 26g
- Fiber: 1g
- Protein: 3g
- Cholesterol: 50mg