Olive Garden Breadsticks: Discover the Perfect Recipe!

Introduction to Olive Garden Breadsticks
There’s something magical about Olive Garden breadsticks that brings warmth and comfort to any meal. As a busy mom juggling a million tasks, I know how important it is to have a go-to recipe that’s not just easy, but also a crowd-pleaser. When my family sits down with these warm, fluffy delights, you can feel the connection over the dinner table. Picture this: buttery breadsticks, fresh from the oven, ready to scoop up that delicious marinara sauce. Trust me, this recipe will quickly become your favorite—and that’s saying something in the world of home cooking!
Why You’ll Love This Olive Garden Breadsticks
These Olive Garden breadsticks are your new kitchen superhero! They’re incredibly easy to make, so even the busiest moms can whip them up without breaking a sweat. Plus, there’s something truly comforting about homemade bread. They bake up soft and fluffy, making them the perfect side for just about any meal. Whether you’re serving them with pasta or a family-friendly soup, they’ll be a hit every time!
Ingredients for Olive Garden Breadsticks
Let’s gather the essentials for these heavenly Olive Garden breadsticks! Each ingredient plays a vital role in giving them that signature soft and fluffy texture. Here’s what you’ll need:
- Warm water: This is the starting point for activating the yeast. Aim for around 110°F—just warm enough to feel cozy to the touch.
- Active dry yeast: This little powerhouse is what gives our breadsticks their rise and softness. Fresh yeast works wonders, but be sure it’s still active.
- Sugar: A tiny bit of sweetness nourishes the yeast and balances flavors. You can use granulated or even a bit of honey if you’re feeling adventurous.
- Salt: This ingredient isn’t just for flavor—it’s essential for controlling the yeast’s activity. Use regular table salt or sea salt here.
- Vegetable oil: Oil adds moisture to the dough, ensuring your breadsticks are tender and soft. You can substitute it with olive oil for an extra layer of flavor!
- All-purpose flour: This is what holds everything together. If you’re looking for a healthier option, whole wheat flour can add a nutty twist, but it may change the texture slightly.
- Melted butter: Brushing these breadsticks with melted butter after they bake gives that signature shine and extra flavor that you’ll absolutely love.
- Garlic salt with parsley flakes: This is optional but highly recommended for that authentic Olive Garden taste. You can adjust the amount based on your garlic cravings!
For exact quantities and printing convenience, be sure to check out the detailed measurements at the bottom of the article. Trust me, these breadsticks will be worth every measurement!
How to Make Olive Garden Breadsticks
Now that we have our ingredients ready, it’s time to dive into the process of creating these scrumptious Olive Garden breadsticks. Follow these simple, step-by-step instructions, and soon enough, you’ll be enjoying the aroma wafting through your kitchen. Let’s roll up our sleeves and get started!
Step 1: Combine Ingredients
To kick things off, grab a large bowl and mix together the warm water, active dry yeast, and sugar. Stir gently, making sure everything is well combined. Then, let this magical mixture sit for about 5 to 10 minutes. Keep an eye on it as it transforms into a bubbly foam! Trust me; this is the key to fluffy breadsticks.
Step 2: Mix in Dry Ingredients
Once your yeast mixture is all frothy, it’s time to add in the dry ingredients. Pour in the salt, followed by the vegetable oil. Then, add 2 cups of all-purpose flour and stir until everything is mixed together. You want it to come together into a sticky dough. Don’t worry; we’ll add the remaining flour next!
Step 3: Knead the Dough
Now comes the fun part: kneading! Turn your dough out onto a lightly floured surface and sprinkle some flour on your hands. Knead the dough for about 5 to 7 minutes until it’s soft and slightly sticky. If it sticks to your fingers, sprinkle a bit more flour as needed. Imagine you’re giving the dough a little workout!
Step 4: Let the Dough Rise
Once your dough is kneaded to perfection, place it in a lightly greased bowl. Cover it with a clean kitchen towel and let it sit in a warm spot. Be patient as it rises; this is where the magic happens! In about 30 minutes, you’ll witness it double in size. It’s like a beautiful transformation, perfect for impressing family and friends.
Step 5: Shape the Breadsticks
After the dough has risen, gently punch it down to release the air. Divide the dough into 12 equal portions. Roll each piece into a 9-inch rope. They don’t need to be perfect cylinders, so don’t stress about that! Place them on a parchment-lined baking sheet, ready to rise for the second time.
Step 6: Final Rise
Now, cover the shaped breadsticks with a towel and let them rise again for 20 to 30 minutes. This second rise will make your Olive Garden breadsticks oh-so-fluffy! While waiting, resist the urge to sneak a taste—trust me, the wait will be worth it when you finally bake them.
Tips for Success
- Make sure your warm water is around 110°F to activate the yeast effectively.
- Don’t rush the rising process; patience is key for the best texture.
- If your kitchen is cool, try placing the dough near a warm oven to help it rise.
- Brush your breadsticks with melted butter just before serving for extra flavor.
- Experiment with different toppings like grated cheese or Italian herbs for variety!
Equipment Needed
- Mixing bowl: A large bowl works best, but a pot will do in a pinch!
- Measuring cups and spoons: Essential for accuracy; a kitchen scale is a great alternative.
- Parchment paper: For lining your baking sheet; aluminum foil can be used instead.
- Rolling pin: Handy for shaping dough, though your hands will work just fine!
- Clean kitchen towel: Useful for covering dough; any soft cloth will also work.
Variations on Olive Garden Breadsticks
- Herb-Infused Breadsticks: Add your favorite dried herbs—like rosemary or thyme—into the dough for an aromatic twist!
- Cheesy Breadsticks: Sprinkle shredded mozzarella or parmesan cheese on top of the dough just before baking for a cheesy delight.
- Garlic Lovers: Increase the garlic salt or add minced garlic to the dough for a richer flavor experience that’s garlicky goodness.
- Whole Wheat Option: Substitute half or all of the all-purpose flour with whole wheat flour for a nuttier flavor and extra fiber.
- Sweet Breadsticks: For a different treat, add a touch of cinnamon and sugar into the dough or drizzle with icing after baking for a sweet finish!
Serving Suggestions
- Pair your Olive Garden breadsticks with a rich marinara sauce for dipping—it’s a classic!
- Serve alongside a fresh garden salad, drizzled withItalian dressing, for a balanced meal.
- Enjoy with a hearty soup or stew, perfect for cozy nights at home.
- Consider a crisp white wine, like Pinot Grigio, to elevate your dining experience.
- For a touch of elegance, arrange the breadsticks in a tall glass for a stunning presentation.
FAQs about Olive Garden Breadsticks
When embarking on my culinary adventure with Olive Garden breadsticks, I often found myself with a few questions. Here are some common queries, answered just for you!
Can I freeze Olive Garden breadsticks?
Absolutely! After baking, let them cool completely. Then, wrap them tightly in plastic wrap and place them in a freezer bag. They’ll be perfect whenever you crave that soft, fluffy goodness!
How do I store leftover breadsticks?
Store any leftovers in an airtight container at room temperature. For best results, enjoy them within a couple of days. You canReheat them in the oven for a few minutes to regain their softness.
Can I make the dough ahead of time?
Yes, you can! Prepare the dough and place it in the fridge instead of letting it rise. When you’re ready to bake, let it come to room temperature and proceed with the rising steps before shaping your breadsticks.
What can I substitute for active dry yeast?
If you’re out of active dry yeast, instant yeast is a great alternative. You can use it in the same quantities: just mix it directly with the dry ingredients without activating it first.
Are these breadsticks vegan-friendly?
This Olive Garden breadsticks recipe is almost vegan! Simply swap the butter for a plant-based alternative, and leave out the garlic salt with parsley flakes if it contains any dairy. They will be just as delicious!
Final Thoughts on Olive Garden Breadsticks
Creating Olive Garden breadsticks in your own kitchen is more than just baking; it’s an experience filled with joy and connection. Imagine the happiness on your family’s faces as they enjoy warm, fluffy breadsticks fresh from the oven. It’s those shared moments, the smiles over dinner, that make this recipe truly special. Plus, the aroma wafting through your home? Pure bliss! With just a few simple ingredients, you’re not only nourishing your loved ones but also crafting memories that will linger long after the last bite. So, roll up your sleeves and share the joy of homemade breadsticks!
Print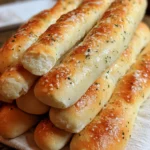
Olive Garden Breadsticks
- Total Time: 1 hour
- Yield: 12 breadsticks 1x
- Diet: Vegetarian
Description
Learn how to make delicious Olive Garden-style breadsticks that are soft, fluffy, and perfect for any meal.
Ingredients
- 1 cup warm water
- 1 tablespoon active dry yeast
- 2 tablespoons sugar
- 1 teaspoon salt
- 3 tablespoons vegetable oil
- 2 ½ cups all-purpose flour
- 2 tablespoons melted butter
- ½ teaspoon garlic salt with parsley flakes
Instructions
- In a large bowl, combine warm water, yeast, and sugar. Let it sit for 5-10 minutes, or until the mixture becomes foamy.
- Add salt, vegetable oil, and 2 cups of flour to the yeast mixture. Stir until combined.
- Gradually add the remaining flour, ¼ cup at a time, until the dough pulls away from the sides of the bowl and is soft yet slightly sticky.
- Turn the dough onto a lightly floured surface and knead for about 5-7 minutes, adding flour as needed to prevent sticking.
- Place the kneaded dough into a lightly greased bowl. Cover with a clean kitchen towel and let it rise for at least 30 minutes, or until doubled in size.
- Once risen, punch down the dough gently. Divide it into 12 equal portions.
- Roll each portion into a 9-inch rope and place it on a parchment-lined baking sheet.
- Cover the shaped breadsticks with a towel and let them rise again for 20-30 minutes.
Notes
- For best results, use warm water (about 110°F) to activate the yeast.
- Feel free to adjust the amount of garlic salt based on personal preference.
- These breadsticks are best served warm and can be brushed with additional melted butter after baking.
- Prep Time: 15 minutes
- Cook Time: 15 minutes
- Category: Bread
- Method: Baking
- Cuisine: Italian
Nutrition
- Serving Size: 1 breadstick
- Calories: 100
- Sugar: 1g
- Sodium: 150mg
- Fat: 3g
- Saturated Fat: 0.5g
- Unsaturated Fat: 2g
- Trans Fat: 0g
- Carbohydrates: 18g
- Fiber: 1g
- Protein: 3g
- Cholesterol: 0mg