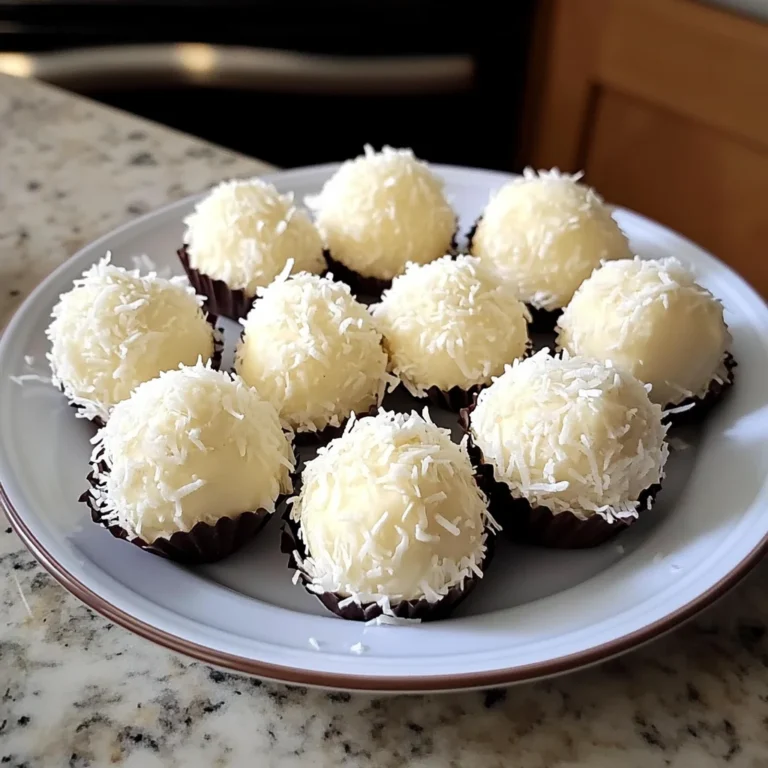
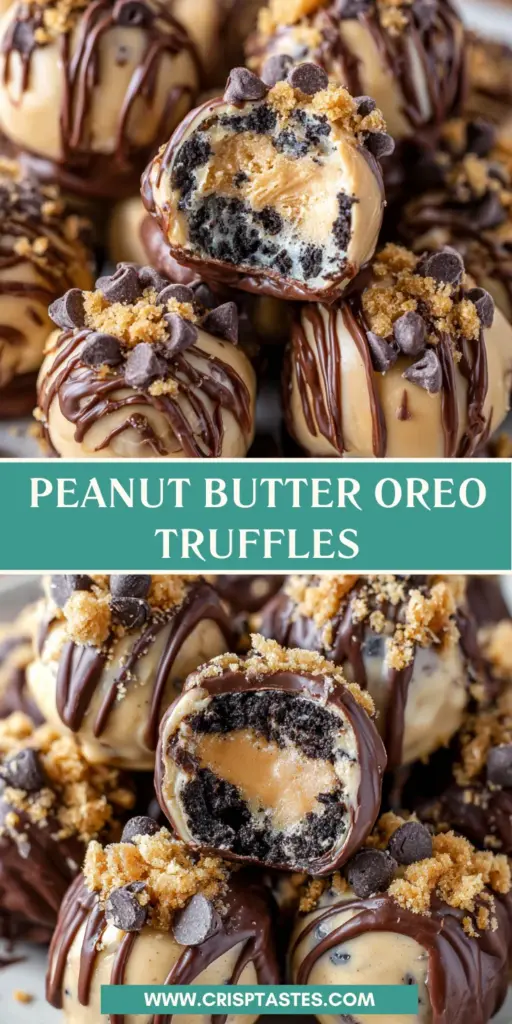
Peanut Butter Oreo Truffles: Sweet Treat That Delights!

Introduction to Peanut Butter Oreo Truffles
Welcome to the delightful world of Peanut Butter Oreo Truffles! If you’re like me, a busy mom or professional trying to juggle it all, you understand the magic of a quick and satisfying treat. These truffles are the perfect solution for those hectic days when you need a sweet indulgence. Imagine biting into a creamy, chocolate-dipped morsel that combines the rich flavors of Oreos and peanut butter. Can you think of a better way to impress your loved ones without spending hours in the kitchen? Let’s dive into this easy, no-bake recipe!
Why You’ll Love This Peanut Butter Oreo Truffles
These Peanut Butter Oreo Truffles are truly a game changer! They’re incredibly easy to make, requiring minimal ingredients and no baking. In just 50 minutes, you’ll have a delightful treat that’s perfect for any occasion. The combination of creamy peanut butter and rich chocolate will tantalize your taste buds. Plus, they’re ideal for satisfying late-night cravings or impressing guests at your next gathering. Dive into these little bites of happiness!
Ingredients for Peanut Butter Oreo Truffles
Gathering your ingredients is the first step to creating these mouthwatering Peanut Butter Oreo Truffles. Here’s what you’ll need:
- Double Stuf Oreos: The base of our truffles, these give that chocolatey, crunchy goodness. Feel free to use regular Oreos if you prefer less cream.
- Cream Cheese: This creamy ingredient helps bind the truffles together while adding a rich texture. Make sure it’s softened for easier mixing.
- Creamy Peanut Butter: The star of the show! Its nutty flavor provides a heavenly taste. You can swap it with chunky peanut butter for added texture.
- Unsalted Butter: Helps smooth out the peanut butter mixture. Always choose unsalted to control the saltiness of your sweet treats.
- Powdered Sugar: Sweetens the peanut butter mixture beautifully. It’s the secret ingredient that adds a melt-in-your-mouth quality.
- Semi-sweet Milk Chocolate Chips: These are perfect for coating your truffles. Want a different flavor? Try dark chocolate or even white chocolate as a delicious alternative!
All the exact measurements for each ingredient are listed at the bottom of this article. Feel free to print it out for easy reference when you whip up these delightful truffles!
How to Make Peanut Butter Oreo Truffles
Now that you’ve got your ingredients ready, let’s get to the fun part: making these scrumptious Peanut Butter Oreo Truffles! Follow these simple steps, and you’ll have an impressive treat that’s sure to please.
Prepare Your Baking Tray
First things first, you need a clean workspace. Line a baking tray with wax or parchment paper. This not only helps in easy clean-up but also ensures that your truffles don’t stick. Trust me, your future self will thank you!
Crush the Oreos
Next, grab those Oreos! You can finely crush them using a rolling pin by placing them in a large plastic bag. Don’t worry—this is a stress reliever itself! Alternatively, if you have a food processor, pulse them until they achieve a fine crumb texture. This will be the base of our magical truffles.
Combine the Cream Cheese and Oreo Mixture
In a mixing bowl, blend your softened cream cheese until it reaches a smooth consistency. Add your crushed Oreos and carefully mix until everything is combined and uniform. This step is vital, as it makes the delicious filling of your truffles.
Form the Oreo Balls
Now comes the exciting part: rolling! With your hands lightly greased, take small portions of the mixture and roll them into even balls—about one inch in size. It’s okay if they’re not perfectly round; after all, they’re homemade! Place these onto your prepared tray and refrigerate for about 20 minutes. This helps them firm up for the next step.
Create the Peanut Butter Mixture
While the Oreo balls chill, let’s whip up the peanut butter mixture. In a separate bowl, combine your creamy peanut butter and softened butter. Stir in the powdered sugar until it’s smooth and cohesive. This mixture is going to wrap around our little Oreo balls like a warm, cozy blanket!
Set the Truffles Again
After chilling, take your Oreo balls out of the fridge. Now, scoop a small portion of the peanut butter mixture and gently wrap it around each chilled ball. Roll them again to ensure an even coating. Once done, return these to the tray, and pop them back into the refrigerator for another 20 to 30 minutes. This is crucial for that firm texture we all love!
Melt the Chocolate
Once your truffles are set, it’s time to take out the semi-sweet milk chocolate chips. Melt them in a microwave-safe bowl in 30-second increments. Stir frequently to prevent burning. It usually takes about 90 seconds total to reach that silky smooth consistency.
Dip and Decorate the Truffles
Finally, it’s showtime! Insert a toothpick into each truffle, dip it into the melted chocolate, and let any excess chocolate drip off. This ensures a perfect, even coat. Place them back onto the tray, and voilà! Let them chill for another 20 to 30 minutes until the chocolate is fully set.
Tips for Success
- Ensure your cream cheese is at room temperature for easier blending.
- Use a food processor for fast and uniform Oreo crushing.
- Keep your hands lightly greased while forming balls to avoid sticking.
- For a smooth chocolate dip, avoid overheating in the microwave.
- Experiment with different nut butters for unique flavors!
Equipment Needed
- Baking tray: A regular baking sheet works, but a smaller tray makes for easier handling.
- Plastic bag or food processor: Use whichever you have on hand to crush the Oreos.
- Mixing bowls: Any size will do—just make sure they’re sturdy.
- Toothpicks: Alternatively, use forks if that’s what you have handy!
Variations on Peanut Butter Oreo Truffles
- Dark Chocolate Coating: Swap the semi-sweet chocolate chips for dark chocolate for a richer flavor experience.
- Nut Butter Options: Use almond or cashew butter instead of peanut butter for a unique twist on taste.
- Minty Fresh: Add a few drops of peppermint extract to the peanut butter mixture for a refreshing mint flavor.
- Gluten-Free: Use gluten-free Oreos to make this treat suitable for those with gluten sensitivities.
- Add Sprinkles: Roll your truffles in colorful sprinkles instead of chocolate to brighten up the presentation.
- Cocoa Powder Dusting: For a less sweet variation, dust your truffles with cocoa powder instead of chocolate coating.
- Fruit Flavored: Incorporate a teaspoon of raspberry or strawberry puree into the peanut butter mixture for a fruity punch.
Serving Suggestions for Peanut Butter Oreo Truffles
- Pair these treats with a glass of cold milk for a classic combination that never fails.
- Serve with fresh strawberries or raspberries for a fruity contrast to the rich flavors.
- Presentation matters! Arrange truffles on a decorative platter with a sprinkle of cocoa powder for a stunning look.
- Create a DIY dessert station for parties, allowing guests to customize their truffles with toppings!
FAQs about Peanut Butter Oreo Truffles
Let’s address some common questions you might have while making these delightful Peanut Butter Oreo Truffles. I want to make sure your truffle-making experience is as smooth as melted chocolate!
Can I use reduced-fat cream cheese for this recipe?
Yes, you can! Reduced-fat cream cheese works perfectly in these truffles. Just remember, it might alter the texture slightly but won’t affect the delicious flavor.
How long do these Peanut Butter Oreo Truffles last?
If stored in an airtight container in the refrigerator, these truffles can last up to two weeks—if they survive that long!
Can I freeze the truffles instead of refrigerating them?
Absolutely! These truffles freeze well. Just make sure they’re fully set and stored in a freezer-safe container. They’ll keep for up to three months.
What can I do if I don’t have powdered sugar on hand?
You can make your own by blending granulated sugar in a blender or food processor until it becomes a fine powder. It’s a handy trick when you’re in a pinch!
Are there any nut-free alternatives for the peanut butter?
If you’re looking for nut-free options, try using sunflower seed butter or soy nut butter. They’ll add a tasty twist without any nut allergens!
Final Thoughts
Creating these Peanut Butter Oreo Truffles is more than just baking; it’s about sharing joy in bite-sized form. Each creamy, chocolate-coated morsel wraps you in a cozy hug, perfect for any celebration—or a simple night in with a good movie. I love watching my family’s faces light up with surprise when I serve these treats. They’re like little pieces of happiness. So, gather your ingredients, embrace the process, and create your own sweet moments in the kitchen. Trust me, once you start making them, you’ll be hooked on this easy, delightful recipe!
Print
Peanut Butter Oreo Truffles
- Total Time: 50 minutes
- Yield: 24 truffles 1x
- Diet: Vegetarian
Description
Peanut Butter Oreo Truffles are delicious bite-sized treats combining the rich flavors of Oreos, creamy peanut butter, and chocolate.
Ingredients
- 20 Double Stuf Oreos, finely crushed
- 120 grams cream cheese, softened
- 240 grams creamy peanut butter
- 60 grams unsalted butter, softened
- 250 grams powdered sugar
- 270 grams semi-sweet milk chocolate chips
Instructions
- Line a baking tray with wax or parchment paper to prevent sticking.
- Finely crush the Oreos in a large plastic bag using a rolling pin or pulse in a food processor until finely ground.
- In a mixing bowl, blend cream cheese until smooth. Add Oreo crumbs and mix until homogenous.
- With lightly greased hands, roll the mixture into approximately 24 even balls and arrange them on the prepared tray. Refrigerate for 20 minutes until firm.
- In a separate bowl, combine peanut butter, softened butter, and powdered sugar. Stir until smooth and fully incorporated.
- Wrap a portion of the peanut butter mixture around each Oreo ball and roll to ensure a smooth, even layer. Return balls to the tray.
- Refrigerate for 20-30 minutes to allow the coating to set.
- In a microwave-safe bowl, melt chocolate chips in 30-second increments, stirring frequently, until smooth. Total time should not exceed 90 seconds.
- Insert a toothpick into each truffle and dip into the melted chocolate, ensuring a full, even coat. Let any excess chocolate drip off, then place back on the tray.
- Refrigerate truffles for 20-30 minutes or until chocolate is fully set. Store chilled.
Notes
- Ensure the cream cheese is at room temperature for easier mixing.
- Experiment with different types of chocolate for coating, such as dark or white chocolate.
- Store truffles in the refrigerator to maintain firmness.
- Prep Time: 20 minutes
- Cook Time: 10 minutes
- Category: Dessert
- Method: Refrigerate, Melt
- Cuisine: American
Nutrition
- Serving Size: 1 truffle
- Calories: 150
- Sugar: 10g
- Sodium: 70mg
- Fat: 8g
- Saturated Fat: 4g
- Unsaturated Fat: 3g
- Trans Fat: 0g
- Carbohydrates: 18g
- Fiber: 1g
- Protein: 3g
- Cholesterol: 10mg