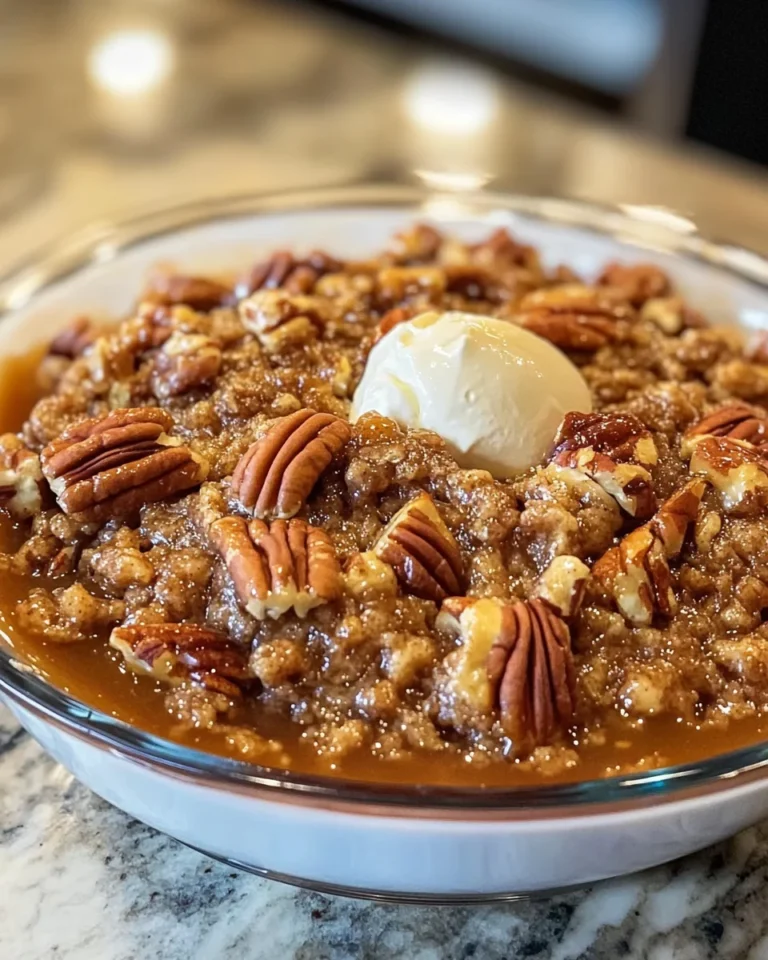
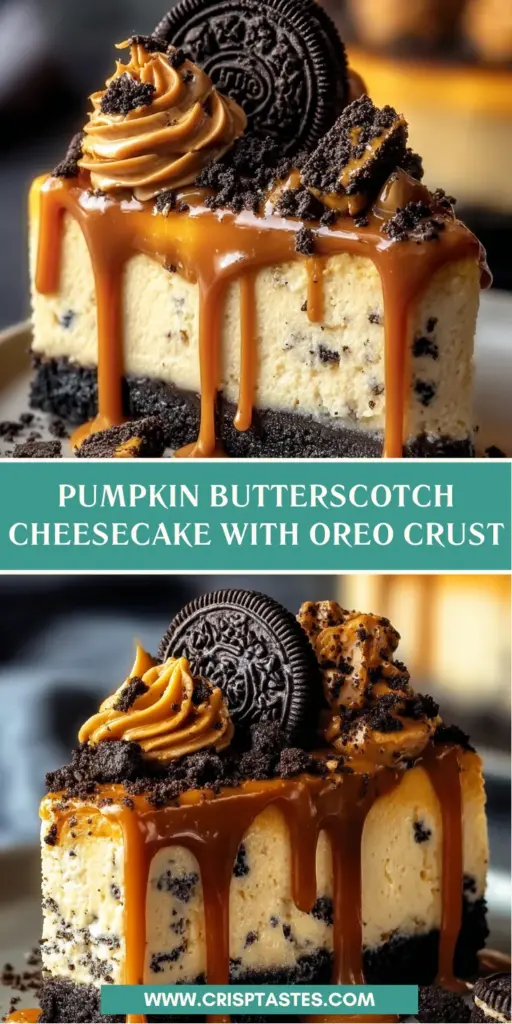
Pumpkin Butterscotch Cheesecake with Oreo Crust

Introduction to Pumpkin Butterscotch Cheesecake with Oreo Crust
As the leaves start to turn and the air gets a little crisp, I can’t help but think of cozy gatherings with family and friends. One dessert that always shines is my Pumpkin Butterscotch Cheesecake with Oreo Crust. It’s creamy, indulgent, and oh-so-easy to whip up, making it perfect for busy moms like us. Trust me, it’s one of those recipes that impresses loved ones while being a cinch to make. Plus, who wouldn’t want a slice of deliciousness that embodies the flavors of fall?
Why You’ll Love This Pumpkin Butterscotch Cheesecake with Oreo Crust
This Pumpkin Butterscotch Cheesecake with Oreo Crust is a true crowd-pleaser. Not only does it taste divine, but it’s also incredibly easy to make, which is music to the ears of busy moms! The combination of creamy cheesecake, rich butterscotch, and crunchy Oreo gives you the perfect balance of flavors and textures. Plus, it can be prepared ahead of time, so you can genuinely enjoy your gathering without the stress!
Ingredients for Pumpkin Butterscotch Cheesecake with Oreo Crust
When it comes to crafting my Pumpkin Butterscotch Cheesecake with Oreo Crust, the ingredients are surprisingly straightforward yet delightful. Here’s what you’ll need to bring your cheesecake to life:
- Chocolate sandwich cookies (like Oreos) – These create a crunchy base that contrasts beautifully with the creamy filling. You can even use gluten-free options if dietary needs arise.
- Melted unsalted butter – This binds the cookie crust together and adds richness. Feel free to swap it with coconut oil for a lighter option.
- Cream cheese – The star ingredient for the cheesecake filling. Make sure it’s softened for a smooth blend; you don’t want any lumps! Low-fat varieties work too.
- Granulated sugar – Sweetens the cheesecake and balances the pumpkin flavor. Brown sugar can add a deeper, caramel-like taste.
- Pumpkin purée – This is what gives your cheesecake that warm autumn flavor. Use real pumpkin or canned; either works wonderfully!
- Eggs – They help set the cheesecake, providing a luscious texture. For a dairy-free version, replace them with a flaxseed mix!
- Vanilla extract – A splash of vanilla elevates the flavor profile, making everything taste even better.
- Spices (ground cinnamon, nutmeg, ginger) – These aromatic spices complement the pumpkin perfectly and whisk you away to cozy fall moments.
- Sour cream – Adds a creamy tang and helps create that velvety texture. You can swap it out for Greek yogurt if you prefer.
- Butterscotch chips – These melt into the filling and provide a delightful sweetness. If you want to mix it up, caramel chips are a yummy alternative!
- Crushed chocolate sandwich cookies (for batter) – More Oreo goodness folded into the filling adds texture and flavor.
- Whipped cream or butterscotch whipped topping – A fluffy topping gives a final touch of decadence that’s just heavenly!
- Butterscotch sauce – Drizzling this on top not only adds sweetness but also creates an eye-catching presentation.
- Whole chocolate sandwich cookies (for garnish) – They make for a fun and whimsical decoration!
If you need exact measurements, don’t worry! You’ll find them at the bottom of the article, easily available for printing.
How to Make Pumpkin Butterscotch Cheesecake with Oreo Crust
Now for the best part! Let’s dive into making this delectable Pumpkin Butterscotch Cheesecake with Oreo Crust step by step. Don’t worry; I’ve got you covered with tips that make it simple and enjoyable. Here we go!
Step 1: Prepare the Crust
Preheat and Mix
First things first, you want to preheat your oven to 325°F (160°C). This is crucial because a properly heated oven ensures even baking. While that warms up, grab your crushed chocolate sandwich cookies and melted butter. Combine them until everything is well blended. The buttery goodness works as the glue for your crust.
Next, firmly press this mixture into the bottom of a 9-inch springform pan. Don’t skip that step; a good press helps your crust hold together. Bake for 10 minutes to set it. After baking, let it cool completely on a wire rack before adding the cheesecake filling.
Step 2: Make the Cheesecake Filling
Beat the Cream Cheese
Now, let’s work on that creamy filling! Start by beating your softened cream cheese in a mixing bowl until it’s smooth and fluffy. You might feel like a kitchen wizard at this stage! Then, gradually add granulated sugar and continue to mix until everything is airy and light.
Next, it’s time to add the pumpkin purée, eggs (one at a time), vanilla extract, and those lovely spices like cinnamon, nutmeg, and ginger. Incorporate these ingredients gently to keep the mixture fluffy and combine well. Finally, fold in the melted butterscotch and crushed cookies to give your cheesecake an extra delightful texture and flavor.
Step 3: Assemble and Bake
Pour and Bake
Carefully pour your cheesecake filling over the cooled crust in the springform pan. Give the pan a gentle tap on the counter. This helps to eliminate air bubbles, ensuring a smooth, creamy cheesecake.
Now, it’s time for the magic of baking! Place it in your preheated oven and bake for 55 to 65 minutes. The edges should look set while the center should still be a tiny bit jiggly. This way, it will finish firming up as it cools.
Step 4: Cool and Chill
Oven Cooling Techniques
Once your cheesecake is done baking, turn off the oven and crack the door open. Let it cool inside for about an hour. This technique helps prevent cracks on the surface by allowing it to cool gradually. After an hour, it’s time to transfer it to the refrigerator.
Chill your Pumpkin Butterscotch Cheesecake for at least four hours; overnight is even better if you can wait! This period enhances the flavors, offering a creamy, rich slice when you finally serve it. Your patience will pay off, trust me!
Tips for Success
- Always use softened cream cheese for a smooth filling.
- For an even crust, press the cookie mixture firmly and evenly.
- Keep an eye on the baking time; ovens can vary.
- Let the cheesecake cool completely before chilling to prevent condensation.
- Top with whipped cream just before serving for a fresh look.
Equipment Needed
- 9-inch springform pan – Essential for easy removal. A cake pan works too, but you’ll need to carefully slice the cheesecake.
- Mixing bowls – Use medium and large ones for mixing ingredients. Any sturdy bowl will do.
- Electric mixer – A hand or stand mixer speeds things up, but whisking by hand works in a pinch.
- Rubber spatula – Perfect for folding in ingredients smoothly. A wooden spoon is a good substitute!
- Oven thermometer – Helps ensure accurate oven temperatures, especially if yours isn’t very reliable.
Variations for Pumpkin Butterscotch Cheesecake with Oreo Crust
- Chocolate Pumpkin Swirl – Incorporate melted dark chocolate into the batter for a rich twist. Swirl it in just before baking for a stunning marble effect!
- Maple Butterscotch – Replace butterscotch chips with pure maple syrup and maple-flavored chips for a delightful autumn flavor.
- Nutty Crunch – Add chopped pecans or walnuts to the crust for a crunchy texture that pairs beautifully with the creamy filling.
- Vegan-Friendly – Swap cream cheese with a plant-based cream cheese, use flax eggs, and coconut oil instead of butter for an amazing vegan version!
- Gluten-Free Option – Use gluten-free chocolate sandwich cookies to make this delicious dessert suitable for gluten-sensitive friends.
Serving Suggestions for Pumpkin Butterscotch Cheesecake with Oreo Crust
- Pair with a steaming cup of spiced chai or a rich coffee for a cozy vibe.
- Serve alongside a scoop of vanilla ice cream to balance the creaminess.
- Add a sprinkle of crushed nuts on top for a delightful crunch.
- Use festive dessert plates for a lovely presentation at gatherings.
- Consider drizzling extra butterscotch sauce before serving for that wow factor!
FAQs about Pumpkin Butterscotch Cheesecake with Oreo Crust
As a fellow home cook, I understand that making a delicious Pumpkin Butterscotch Cheesecake with Oreo Crust can leave you with a few questions. Let’s address some common queries to ease your baking journey!
Can I make this cheesecake in advance?
Absolutely! This Pumpkin Butterscotch Cheesecake can be made a day ahead. Plus, it actually tastes better the next day as the flavors meld together beautifully!
How do I store leftovers?
To keep your cheesecake fresh, cover it tightly with plastic wrap or foil. It will last in the refrigerator for about four to five days. Just remember to keep any toppings like whipped cream separate until serving!
Can I use fresh pumpkin instead of canned?
Yes, you can use fresh pumpkin! Just make sure to cook and purée it before adding it to your filling. The taste of fresh pumpkin adds a wonderful depth to your cheesecake.
What’s the best way to prevent cracks in my cheesecake?
Cooling your cheesecake slowly in the oven and refrigerating it properly helps reduce the chance of cracks. Overbaking can also cause cracks, so watch those baking times closely!
Can I substitute the butterscotch chips with another flavor?
Definitely! Feel free to swap in caramel chips or even chocolate chips for a delicious twist. Each variation will bring a unique delight to your cheesecake!
Final Thoughts
Creating a Pumpkin Butterscotch Cheesecake with Oreo Crust isn’t just about baking; it’s about crafting joy and memories in the kitchen. Every slice serves as a reminder of cozy moments shared around the table. Just picture the smiles and delightful gasps when your loved ones take their first bite! Completing this decadent dessert brings a sense of accomplishment and warmth that makes all the effort worth it. So, gather your family, pour that cup of coffee, and dive into this delightful cheesecake. You’ll be thankful you did! Trust me, every bite is a hug from fall itself!
Print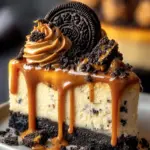
Pumpkin Butterscotch Cheesecake with Oreo Crust Delights!
- Total Time: 5 hours 35 minutes (including chilling time)
- Yield: 12 servings 1x
- Diet: Vegetarian
Description
A delightful and creamy Pumpkin Butterscotch Cheesecake on a crunchy Oreo crust, perfect for fall gatherings and special occasions.
Ingredients
- 24 chocolate sandwich cookies (like Oreos), finely crushed
- 5 tbsp melted unsalted butter
- 3 (8 oz) packages cream cheese, softened
- 1 cup granulated sugar
- 1 cup pumpkin purée
- 3 large eggs
- 1 tsp vanilla extract
- 1/2 tsp ground cinnamon
- 1/4 tsp ground nutmeg
- 1/4 tsp ground ginger
- 1/4 cup sour cream
- 1/2 cup butterscotch chips, melted and slightly cooled
- 8 crushed chocolate sandwich cookies (for batter)
- 1/2 cup whipped cream or butterscotch whipped topping
- 2 tbsp butterscotch sauce (for drizzling)
- Whole chocolate sandwich cookies (for garnish)
Instructions
- Preheat oven to 325°F (160°C). Mix crushed cookies with melted butter until combined. Press into the bottom of a 9-inch springform pan. Bake for 10 minutes, then cool completely.
- Beat cream cheese until smooth, then add sugar and mix until fluffy. Add pumpkin purée, eggs (one at a time), vanilla, spices, and sour cream. Fold in melted butterscotch and crushed cookies.
- Pour batter over the crust and tap the pan to remove air bubbles. Bake 55–65 minutes, or until the center is set but slightly jiggly.
- Turn off oven, crack the door, and cool inside for 1 hour. Refrigerate for at least 4 hours or overnight.
- Top with whipped cream, drizzle with butterscotch sauce, and garnish with cookies before serving.
Notes
- For best results, cool the cheesecake completely before refrigerating.
- You can substitute the butterscotch chips with caramel sauce for a different flavor.
- This cheesecake can be made a day in advance for convenience.
- Prep Time: 30 minutes
- Cook Time: 65 minutes
- Category: Dessert
- Method: Baking
- Cuisine: American
Nutrition
- Serving Size: 1 slice
- Calories: 420
- Sugar: 32g
- Sodium: 300mg
- Fat: 28g
- Saturated Fat: 16g
- Unsaturated Fat: 10g
- Trans Fat: 0g
- Carbohydrates: 38g
- Fiber: 2g
- Protein: 6g
- Cholesterol: 90mg