Pumpkin Unicorn

Introduction to Pumpkin Unicorn
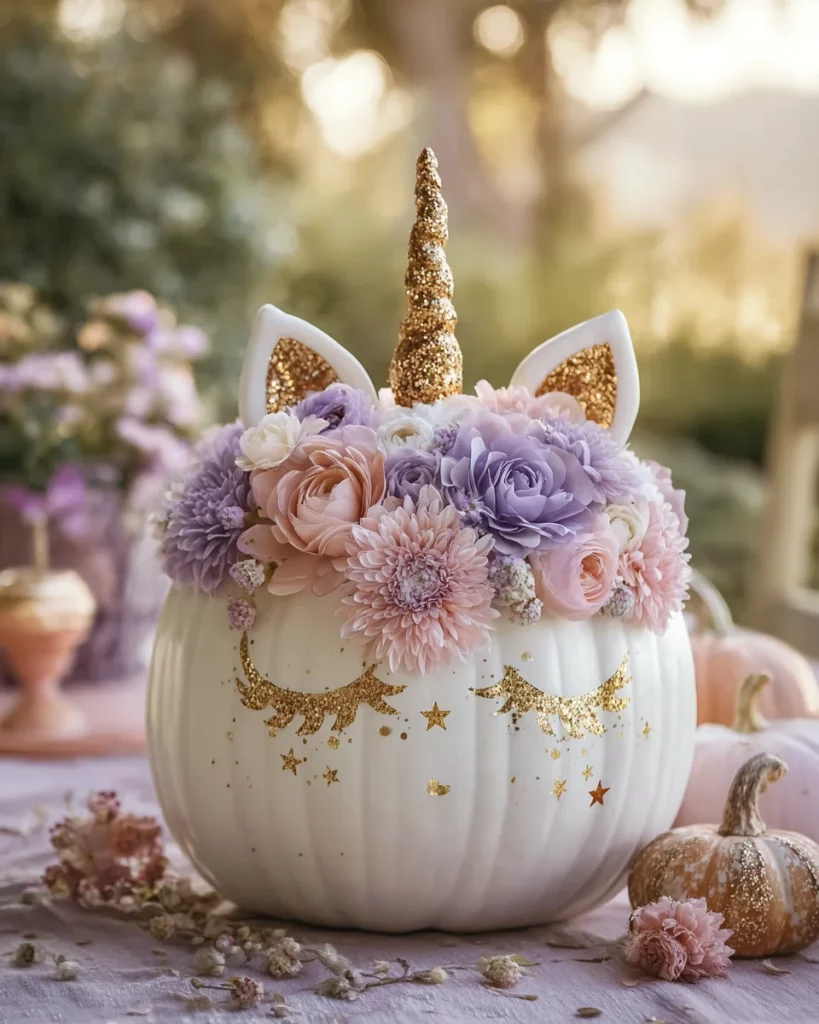
Hey there, fellow busy moms and professionals! If you’re like me, finding time to be creative can feel impossible amidst the whirlwind of daily life. That’s why I’m excited to introduce you to the enchanting world of the Pumpkin Unicorn! This delightful DIY project is a quick solution for adding a magical touch to your fall decor. In just ten minutes, you can transform a simple pumpkin into a whimsical masterpiece that’ll bring smiles to your family and guests alike. Let’s dive into this fun and easy craft that’s perfect for all ages!
Why You’ll Love This Pumpkin Unicorn
The Pumpkin Unicorn is not just a craft; it’s a celebration of creativity and joy. You’ll love how quick and easy it is, taking only 10 minutes! This project invites you to enjoy meaningful moments with your kids or even alone when you need a break from the hectic routine. Plus, it’s a cost-effective way to create whimsical decor that effortlessly enhances your home’s autumn vibe and brings out your inner artist!
Ingredients for Pumpkin Unicorn
To create your magical Pumpkin Unicorn, gather these supplies:
- A medium to large pumpkin: Choose either a classic orange or a white pumpkin for a magical base. White varieties look especially enchanting and can save you time on painting!
- Gold glitter paper or foam: This will be used for the horn and ears. The sparkle adds that whimsical touch that’s essential for any unicorn!
- Artificial flowers: Go for pastel shades like pinks and purples. They’ll create a beautiful floral crown, giving your unicorn a vibrant, lively look.
- Hot glue gun and glue sticks: These are essential for sticking everything together. Trust me, a hot glue gun makes the crafting process a breeze!
- Black craft paint or a permanent marker: You’ll need this for drawing the eyes. A cute pair of closed eyes with long lashes will bring your unicorn to life!
- Scissors: These will help you cut the shapes for the horn and ears. A trusty pair of scissors is a must-have in any crafting kit.
- Optional: Little star stickers or extra glitter for an added sprinkle of magic! These can transform your creation into a truly dreamy masterpiece.
You’ll find specific quantities and concepts at the bottom of the article for easy printing. Happy crafting!
How to Make Pumpkin Unicorn
Creating your own Pumpkin Unicorn is easier than you might think! Follow these simple steps to bring a touch of magic into your home. You’ll feel like a crafting pro in no time!
Step 1: Prepare Your Pumpkin
Start with a clean, dry pumpkin. If you choose to paint it, grab some white paint and apply an even coat. Let it dry completely. This step is the foundation of your unicorn, creating a magical base that shines!
Step 2: Create the Unicorn Horn
Next, take your gold glitter paper or foam. Cut a horn shape, wide at the bottom and narrow at the top. Roll it into a cone and seal it with hot glue. Attach this horn to the top center of the pumpkin using your glue gun. This sparkly horn is the quintessential element of your Pumpkin Unicorn!
Step 3: Make the Unicorn Ears
For ears, cut out shapes from white cardstock or foam. Then, cut smaller inner pieces from the gold paper. Glue the inner pieces onto the larger ear shapes. Finally, attach the ears on each side of the horn using hot glue. Your unicorn is now starting to take shape!
Step 4: Add Floral Decorations
Now for the fun part—floral decorations! Arrange your artificial flowers around the horn and ears, creating a lovely floral crown. Don’t hold back; mix pastel colors to give it a vibrant personality. Use your hot glue to secure them in place, ensuring they don’t fall off!
Step 5: Paint the Eyes
Using black craft paint or a permanent marker, gently draw closed eyes on the front side of the pumpkin. Add long lashes for that classic magical look! Feel free to make each eye a bit different—that’s the charm of a unique Pumpkin Unicorn.
Step 6: Finish with Sparkle
Finally, it’s time for that extra sparkle! Sprinkle little star stickers or additional glitter over your creation. This adds a whimsical finish, making your Unicorn shine even brighter! Your magical Pumpkin Unicorn is now complete, ready to enchant all who see it!
Tips for Success
- Before you start, gather all your supplies to streamline the crafting process.
- If you’re using a painted pumpkin, be sure it’s fully dry to avoid smudges!
- Experiment with different flower arrangements to find your unicorn’s best look.
- Don’t worry about perfection—each Pumpkin Unicorn is unique and charming!
- If you have kids, let them get creative with the decorations and designs.
Equipment Needed
- Hot glue gun: A reliable tool for quick adhesion. If you don’t have one, craft glue can work too, but it might take longer to set.
- Scissors: Essential for cutting shapes. A craft knife can also be handy for precision cutting.
- Paintbrush: Useful for applying paint to your pumpkin if you choose to paint it.
Variations
- Use a foam pumpkin: For a reusable option, consider using a foam pumpkin instead of a real one. It’s perfect for crafting year after year!
- Try different colors: Experiment with different paint colors beyond white! Pastel blues, pinks, or even vivid rainbow hues can work beautifully for a unique twist.
- Switch up the flowers: Instead of artificial flowers, use real ones that are in season. Just be mindful of the pumpkin’s lifespan!
- Add LED lights: For an extra magical effect, place small battery-operated LED lights inside the pumpkin before decorating it. It will glow beautifully at night!
- Incorporate themed accessories: Based on the upcoming holidays, consider adding themed decorations like mini pumpkins or festive ribbons to tailor your unicorn for various occasions.
Serving Suggestions for Pumpkin Unicorn
- Display your Pumpkin Unicorn as the centerpiece on your dining table for an eye-catching autumn look.
- Place it next to festive snacks like pumpkin pie or apple cider for themed party vibes.
- Pair it with cozy fall drinks like spiced chai or a warm caramel apple cocktail.
FAQs about Pumpkin Unicorn
Creating a Pumpkin Unicorn is such a delightful experience, and I know you might have a few questions! Here are some frequently asked questions to help you along your crafting journey.
Can I use a real pumpkin for this craft?
Absolutely! Using a real pumpkin adds a lovely seasonal touch. Just remember, real pumpkins will eventually decay, so keep that in mind for long-term display.
What can I do if I don’t have gold glitter paper?
No worries! You can use yellow or silver foil, spray paint, or even fabric that sparkles. The key is to capture that magical look in a way that works for you!
How do I make my Pumpkin Unicorn last longer?
If you want your creation to last, consider using a foam pumpkin instead of a real one. This way, you can enjoy your craft year after year!
Can my kids help with this project?
Definitely! This is a fantastic family activity. Let your kids help with gluing the flowers or drawing the eyes. It’s a wonderful way to create lasting memories together!
What if I have leftover supplies?
Get creative! Use leftover flowers or glitter for other fall crafts. You can even make mini Unicorns or decorative place cards for your Thanksgiving table!
Final Thoughts
Creating your Pumpkin Unicorn is more than just a craft project; it’s a journey of joy and creativity.
Each step—whether choosing the perfect pumpkin or arranging the flowers—allows you to embrace your inner artist while sparking smiles from your loved ones.
Let’s face it, life gets busy, but taking just ten minutes to craft something magical can make all the difference. Your Pumpkin Unicorn will be a whimsical addition to your home, reminding everyone that a sprinkle of creativity can turn the ordinary into extraordinary. I hope this inspires you to unleash your imagination and enjoy the festive season!
Print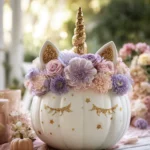
Pumpkin Unicorn
- Total Time: 10 minutes
- Yield: 1 Pumpkin Unicorn
- Diet: Vegetarian
Description
Create a magical Pumpkin Unicorn decoration in just a few minutes with simple supplies.
Ingredients
- A medium to large pumpkin (painted white or left natural)
- Gold glitter paper or foam (for the horn and ears)
- Artificial flowers (pinks, purples, pastels work beautifully)
- Hot glue gun and glue sticks
- Black craft paint or a permanent marker (for the eyes)
- Scissors
- Optional: little star stickers or glitter for extra sparkle
Instructions
- Start with a clean, dry pumpkin. If you’d like a magical base, paint it white and let it dry completely.
- Cut a unicorn horn shape from gold glitter paper or foam, then roll it into a cone and glue securely. Attach it to the top center of the pumpkin with hot glue.
- Cut out ear shapes from white cardstock or foam, then smaller inner ear pieces from gold paper. Glue them together and attach on each side of the horn.
- Arrange and glue artificial flowers around the horn and ears to create a floral crown.
- Using black paint or a marker, draw closed eyes with long lashes on the pumpkin’s front.
- Add stars, glitter, or extra decorations for a dreamy finishing touch.
Notes
- If you don’t want to paint the pumpkin, look for a white variety — it saves time and looks extra enchanting!
- Prep Time: 10 minutes
- Cook Time: 0 minutes
- Category: Craft
- Method: DIY
- Cuisine: N/A