Red Velvet Oreo Roll: Indulge in a Dessert Delight!

Introduction to Red Velvet Oreo Roll
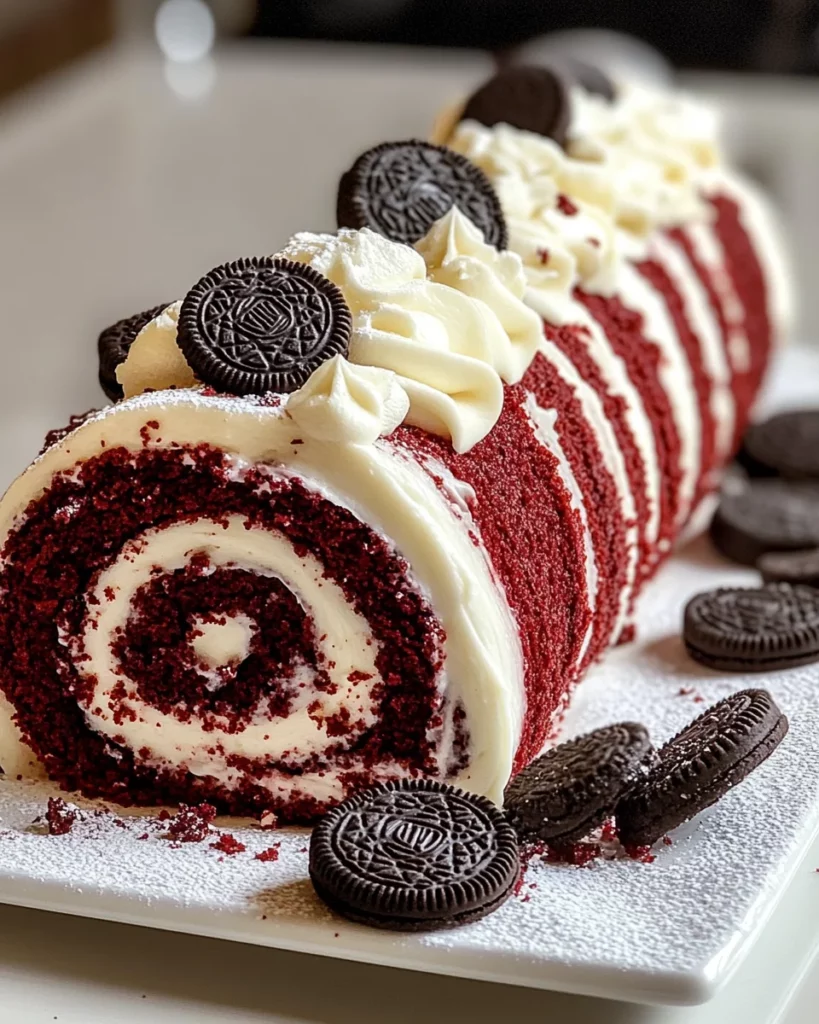
Hey there! If you’re looking for a dessert that wows without overwhelming your schedule, let me introduce you to the Red Velvet Oreo Roll. This dessert is like a warm hug on a plate; it combines the classic appeal of red velvet cake with the playful crunch of Oreo cookies. Perfect for busy moms or professionals needing a quick solution for last-minute gatherings, this delicious delight will have everyone asking for seconds. Trust me, it’s an impressive treat that feels special while being surprisingly easy to whip up. You’re just a few steps away from pure indulgence!
Why You’ll Love This Red Velvet Oreo Roll
This Red Velvet Oreo Roll is a total game-changer in the dessert department! It’s quick to prepare and requires minimal ingredients, making it a breeze for even the busiest of days. The tantalizing combination of rich red velvet and creamy Oreo filling is an absolute treat for the palate. Plus, who can resist that gorgeous appearance? This dessert is sure to impress family and friends without any fuss. You’ll be their new favorite chef!

Ingredients for Red Velvet Oreo Roll
To create this eye-catching Red Velvet Oreo Roll, you’ll need a handful of simple ingredients that deliver big on flavor. Here’s what you’ll require:
- All-purpose flour: The backbone of your cake, giving it structure. Feel free to substitute with a gluten-free blend if needed.
- Unsweetened cocoa powder: Adds a rich chocolate flavor to the red velvet base. Don’t skimp; it’s essential for depth!
- Baking powder: This little leavening agent ensures your cake rises nicely, giving it that light, airy texture.
- Salt: A pinch complements the sweetness and enhances all the flavors. Trust me, it makes a difference!
- Large eggs: They add moisture and richness, helping bind the ingredients together beautifully.
- Granulated sugar: Sweetens the deal! You can swap some of it out for a sugar substitute if you’re counting your carbs.
- Vegetable oil: Adds moisture and keeps the cake tender. You can use melted coconut oil for a different flavor profile.
- Vanilla extract: A must for that warm, comforting flavor in the cake. Almond extract works well too if you want a twist!
- Red food coloring: It’s the signature of red velvet! Use gel food coloring for more vivid results.
- Powdered sugar: For dusting and sweetening the cream cheese filling.
- Cream cheese: This creamy dream is the base for your Oreo filling. Make sure it’s softened for easy mixing!
- Whipped cream: Fluffy and light, it creates the perfect texture in the filling. You can whip it fresh or use store-bought.
- Crushed Oreo cookies: Adds that iconic crunch and flavor. Don’t forget to save a bit for the topping!
- Semi-sweet chocolate chips: When melted, they become your luscious ganache for a beautiful finish.
- Heavy cream: This rich cream combines with the chocolate chips to form the ganache. Feel free to use low-fat cream for a lighter option.
- Whipped cream (optional): Spruce up your serving with a dollop of whipped cream, if desired!
You can find exact measurements at the bottom of this article, ready for printing. Happy cooking!
How to Make Red Velvet Oreo Roll
Prepare the Cake Batter
Let’s get started! First, preheat your oven to 350°F (175°C). While it’s warming, gather all your ingredients. Sifting the flour, cocoa powder, baking powder, and salt together in one bowl is key. This step prevents any lumps. In another bowl, whip those eggs and sugar until they’re thick and frothy. Now, add in the vegetable oil, vanilla extract, and red food coloring. Finally, mix your dry ingredients into the wet, but be gentle! It’s all about keeping that lovely texture intact.
Bake the Cake
Now it’s time to bake! Transfer the silky batter into your lined jelly roll pan and spread it evenly. Bake it for 12-15 minutes. Keep an eye on it; you want a soft, springy texture. Once done, carefully turn the cake out onto a kitchen towel sprinkled with powdered sugar. This will keep it from sticking. Now here’s the tricky part—roll it up while it’s still warm! Let it cool completely in that cozy roll. Patience is essential; trust me, the cooling part makes all the difference.
Make the Oreo Filling
Oh, we’re getting to the fun part! In a mixing bowl, beat that softened cream cheese until it’s smooth and creamy. Gradually add powdered sugar and vanilla extract, blending well. The real magic happens when you fold in the fluffy whipped cream. Make sure it’s nice and airy—that’s what gives your filling that delectable texture! Lastly, toss in those crushed Oreo cookies, mixing them slowly. You’ll know it’s time to move on when every bite is cookie-studded deliciousness!
Assemble the Cake Roll
Time to bring it all together! Gently unroll the cooled cake and spread your Oreo filling over the surface. Just imagine the creamy goodness awaiting inside! Carefully roll the cake back up, making sure not to squish it. Wrap it tightly in plastic wrap and pop it in the fridge to chill for at least an hour. This helps everything set nicely. Plus, the longer it sits, the more flavors meld—yum!
Create the Chocolate Ganache
While your cake rolls in the fridge, let’s whip up that luscious chocolate ganache. In a small saucepan, heat heavy cream over low heat until it simmers gently—don’t boil! Pour that warm cream over the semi-sweet chocolate chips in a bowl. Let it sit for a minute, then stir until everything is melted and silky smooth. This glossy ganache not only adds flavor but also makes your Red Velvet Oreo Roll look absolutely irresistible!
Finishing Touches
Your cake roll is almost ready to dazzle! Take it out of the fridge and unwrap it carefully. Spread the velvety ganache over the top with a spatula, letting it drip down the sides for that show-stopping effect. Don’t forget to sprinkle crushed Oreos over the ganache for that extra crunch! If you’re feeling fancy, a dollop of whipped cream on the side is the cherry on top. Slice it gently, and watch your family’s faces light up with joy when you serve this beauty!
Tips for Success
- Always sift your dry ingredients to avoid lumps and ensure a smooth batter.
- Cool the cake completely before adding the filling to maintain its structure.
- Use a clean towel dusted with powdered sugar when rolling the cake to prevent sticking.
- For a lighter version, substitute heavy cream with a low-fat alternative.
- Chill the assembled roll for at least an hour for optimal flavor melding.
Equipment Needed
- Jelly roll pan: Essential for baking the cake. A rimmed baking sheet can work too in a pinch.
- Parchment paper: Prevents sticking. You can also grease the pan instead.
- Mixing bowls: Use a set of different sizes for mixing batter and filling.
- Hand mixer: Perfect for whipping cream cheese and whipped cream; a whisk will do if you’re feeling strong!
- Spatula: Great for spreading the ganache and filling evenly.
Variations for Red Velvet Oreo Roll
- Gluten-free option: Substitute the all-purpose flour with a gluten-free flour blend to make this treat suitable for those with gluten sensitivities.
- Red velvet cupcakes: Transform the batter into cupcakes! Pour into cupcake liners and bake for a shorter time. Fill with the Oreo mixture for mini desserts.
- Cheesecake filling: Swap the Oreo filling for a cheesecake-like mixture by using an additional 8 oz of cream cheese and omitting whipped cream.
- Chocolate ganache alternative: Use white chocolate chips instead of semi-sweet for a sweeter contrast with the red velvet cake.
- Mint Oreo twist: Use mint-flavored Oreo cookies instead of regular to give a refreshing spin to this classic dessert.
Serving Suggestions
- Pair with a scoop of vanilla ice cream for a creamy contrast to the cake.
- Serve alongside fresh berries for a pop of color and zest.
- Drizzle with extra chocolate sauce for indulgence.
- For drinks, a nice cup of coffee or a chilled glass of milk works wonders.
- Present on a decorative platter, garnished with fresh mint leaves for elegance!
FAQs about Red Velvet Oreo Roll
Curious minds want to know! Here are some frequently asked questions I often encounter about the Red Velvet Oreo Roll.
Can I make the Red Velvet Oreo Roll ahead of time?
Absolutely! This cake roll tastes even better the next day as the flavors meld. Just assemble it and keep it wrapped in the fridge. Serve chilled for the best texture!
What can I use if I can’t find red food coloring?
If you’re struggling to find red food coloring, don’t fret. You can use beet juice for a natural alternative. Just note that the color might be a little lighter yet very pretty!
How do I store leftover Red Velvet Oreo Roll?
Wrap the leftover slices in plastic wrap and store them in the fridge. They’ll stay fresh for up to 3 days. Just make sure they don’t dry out!
Can I freeze the Red Velvet Oreo Roll?
Yes, you can! Wrap it tightly in plastic and foil before freezing. It can last up to a month. Thaw it in the fridge overnight before serving.
What variations can I try for the filling?
The possibilities are endless! Instead of Oreo filling, try adding peanut butter, Nutella, or even fruit preserves. Your creative twist will surely delight everyone!
Final Thoughts
The Red Velvet Oreo Roll truly embodies joy and indulgence, making it a delightful addition to any gathering. Each slice offers a luscious blend of flavors, from the rich, velvety cake to the creamy Oreo filling, topped with a glossy ganache. It’s a dessert that brings smiles to faces and warmth to hearts, perfect for sharing with loved ones after a hectic day. Even better, the easy preparation means that you can whip it up without sacrificing precious time. So go ahead, create sweet memories with this show-stopping dessert, and savor the happiness it brings!
Print
Red Velvet Oreo Roll
- Total Time: 35 minutes
- Yield: 8 servings 1x
- Diet: Vegetarian
Description
A delightful dessert featuring a red velvet cake rolled with a creamy Oreo filling and topped with chocolate ganache.
Ingredients
- ¾ cup all-purpose flour
- ¼ cup unsweetened cocoa powder
- 1 tsp baking powder
- ½ tsp salt
- 4 large eggs, room temperature
- ¾ cup granulated sugar
- 2 tbsp vegetable oil
- 1 tsp vanilla extract
- 1 tbsp red food coloring
- Powdered sugar for dusting
- 1 (8 oz) package cream cheese, softened
- 1 cup powdered sugar
- 1½ cups whipped cream
- 1 tsp vanilla extract
- 12–15 crushed Oreo cookies
- 1 cup semi-sweet chocolate chips
- ½ cup heavy cream
- Crushed Oreo cookies for topping
- Whipped cream (optional)
Instructions
- Preheat oven to 350°F (175°C) and line a jelly roll pan with parchment paper.
- Sift together flour, cocoa powder, baking powder and salt. In a separate bowl, whip eggs and sugar till thick. Stir in oil, vanilla and red food coloring. Then stir in dry ingredients.
- Transfer to the pan and bake for 12-15 minutes. Turn out onto a powdered sugar-sprinkled towel and roll up. Cool completely.
- Beat cream cheese, then add powdered sugar and vanilla. Fold in whipped cream and crushed Oreo cookies.
- Unroll cooled cake, spread with filling, and re-roll. Refrigerate.
- Simmer heavy cream, pour over chocolate chips and mix until melted.
- Spread ganache over the cake roll and sprinkle with crushed Oreos. Serve with optional whipped cream.
Notes
- Ensure the cake is fully cooled before adding the filling to prevent melting.
- Use a clean towel for rolling the cake to avoid any sticking.
- Can substitute heavy cream with low-fat cream for a lighter version.
- Prep Time: 20 minutes
- Cook Time: 15 minutes
- Category: Dessert
- Method: Baking
- Cuisine: American
Nutrition
- Serving Size: 1 slice
- Calories: 320
- Sugar: 25g
- Sodium: 150mg
- Fat: 15g
- Saturated Fat: 8g
- Unsaturated Fat: 5g
- Trans Fat: 0g
- Carbohydrates: 40g
- Fiber: 2g
- Protein: 5g
- Cholesterol: 80mg