Santa’s Trash Cookie Bars

Introduction to Santa’s Trash Cookie Bars
As we dive into the holiday season, the kitchen transforms into a cozy haven filled with the scent of sweet treats. One recipe that has become a staple in my home is Santa’s Trash Cookie Bars. These bars are a delightful blend of sweet and salty flavors that everyone loves. Whether you’re hosting a gathering or just craving a festive treat, these cookie bars are perfect. They’re quick to whip up, and each bite feels like a warm hug. So grab your apron, and let’s create something magical together!
Why You’ll Love This Santa’s Trash Cookie Bars
Santa’s Trash Cookie Bars are not just a festive treat; they offer a delightful blend of ease and speed. With just a few steps, you’re on your way to a delicious dessert that satisfies even the pickiest of eaters. The combination of sweet chocolate, salty pretzels, and crunchy potato chips makes each bite an explosion of flavor. Plus, these cookie bars are perfect for sharing, bringing joy to family and friends during the busy holiday season!
Ingredients for Santa’s Trash Cookie Bars
Gathering the right ingredients for Santa’s Trash Cookie Bars is like assembling a jolly team of flavors. Here’s what you need:
- Cornstarch: Provides a soft texture for the bars.
- Baking soda: A leavening agent that gives the bars a nice lift.
- Salt: Balances the sweetness and enhances flavors.
- Unsalted butter: The foundation for a rich and buttery flavor; it’s best at room temperature for easy mixing.
- Granulated sugar: Adds sweetness and contributes to that lovely chewy texture.
- Light brown sugar: Brings in moistness and a hint of caramel flavor.
- Vanilla extract: Infuses that warm, comforting aroma loved in baked goods.
- Large eggs: They bind the ingredients together and help with rise.
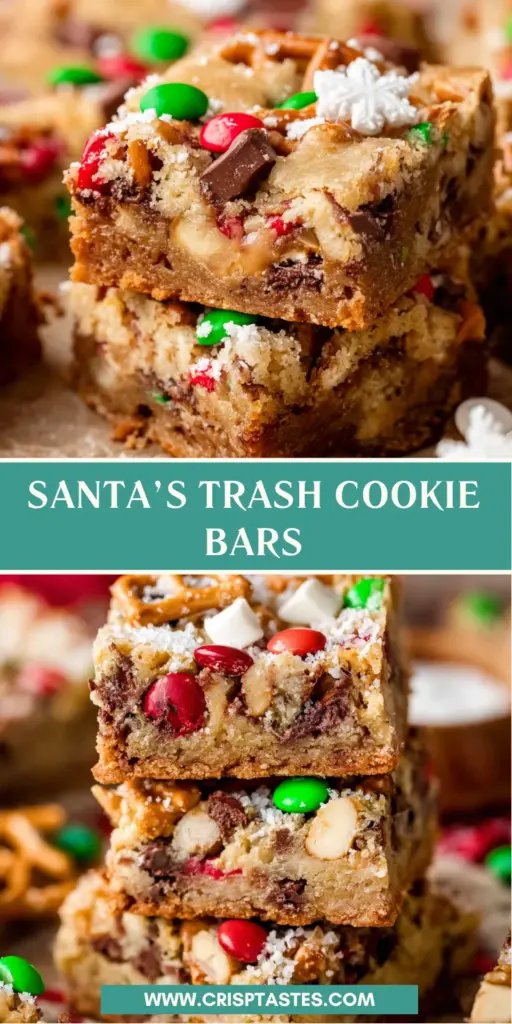
- Crushed potato chips: A fun twist that adds saltiness and crunch!
- Crushed pretzels: For an extra salty crunch; they’re a must for the ‘trash’ aspect!
- Chocolate chips: These sweet morsels make everything better—they melt into gooey goodness.
- Christmas M&Ms: Bright and colorful, they give a festive touch and a candy-coated surprise.
- Christmas sprinkles: A sprinkle of cheer to finish it all off, perfect for the holiday vibe.
Feel free to get creative! You can swap in different kinds of chips or even add nuts if you like a bit more texture. If you need a gluten-free version, just use a gluten-free flour blend in place of the all-purpose flour. For specific quantities, be sure to check the bottom of the article where they’re available for printing!
How to Make Santa’s Trash Cookie Bars
Making Santa’s Trash Cookie Bars is like preparing a delightful surprise for your taste buds. With a few easy steps, you’ll create a festive dish that everyone will adore. Let’s dive into the joy of baking!
Step 1: Preheat and Prepare
First things first, preheat your oven to 350 degrees F. This ensures that your cookie bars will bake evenly. While that’s warming up, line a 9-inch × 13-inch cake pan with aluminum foil or parchment paper. This makes cleanup a breeze and helps you easily remove the bars once they’re baked.
Step 2: Mix Dry Ingredients
Next, grab a medium-sized bowl and whisk together the flour, cornstarch, baking soda, and salt. This step is crucial as it helps distribute the leavening agents evenly. Set your mixture aside for a bit while we work on the wet ingredients. Trust me; it’s an important step to make sure your cookie bars come out fluffy!
Step 3: Cream the Butter and Sugars
Now, let’s bring some magic into our mixing bowl. In a large bowl, use a hand mixer or stand mixer to cream together the softened butter, granulated sugar, light brown sugar, and vanilla extract. Mix this until it’s light and fluffy, which usually takes about 2-3 minutes. Watching the butter turn creamy is like watching clouds fluff up in the sky!
Step 4: Add Eggs and Mix
Here comes the fun part! Crack the eggs into the butter mixture, adding them one at a time. After each addition, mix for about 10 seconds just to incorporate. This step ensures that everything blends together smoothly, giving you a rich batter. Mix with love—every bite deserves it!
Step 5: Combine Mixtures
Now it’s time to bring it all together. Slowly add the dry ingredient mixture to the wet ingredients. Mix until just combined; we don’t want to overdo it! Then, gently fold in the crushed potato chips, pretzels, chocolate chips, M&Ms, and most of the sprinkles. This is where the fun of ‘trash’ starts—it’s a delicious mess of textures!
Step 6: Spread and Sprinkle
Once combined, spread your cookie dough evenly in the prepared pan. Use a spatula to help smooth it out, making sure it fills all the corners. Now, channel your inner artist and top with extra M&Ms, chocolate chips, potato chips, pretzels, and the remaining sprinkles. Your festive baking masterpiece is nearly complete!
Step 7: Bake and Cool
Place the pan in your preheated oven and let the magic happen! Bake for 22 to 25 minutes, until the edges start to turn golden brown. When you take them out, let the bars cool in the pan on a wire rack for at least 1 hour. This step is so hard to resist, but patience here will pay off when you cut those squares of joy!
Tips for Success
- Make sure your butter is softened to room temperature for easy mixing.
- Don’t overmix the batter after adding the dry ingredients; this keeps the bars tender.
- Feel free to tweak the mix-ins based on what you have; it’s all about creativity!
- Let the bars cool completely before slicing for cleaner squares.
- For an extra festive touch, serve with hot cocoa or coffee.
Equipment Needed
- Mixing bowls: A medium and a large one; you can also use a single large bowl.
- Whisk: For mixing dry ingredients; a fork works in a pinch!
- Hand mixer or stand mixer: To cream the butter and sugars; elbow grease is an option too.
- Spatula: For spreading the dough; a butter knife can do the job as well.
- Parchment paper or aluminum foil: For lining the pan; grease can work if you’re in a hurry.
Variations for Santa’s Trash Cookie Bars
- Add nuts: Incorporate chopped nuts like pecans or walnuts for extra crunch.
- Change up the chips: Use white chocolate or peanut butter chips instead of regular chocolate for a fun twist.
- Mix in dried fruits: Adding dried cranberries or cherries can infuse a fruity flavor and a chewy texture.
- Go dairy-free: Substitute the butter with coconut oil or dairy-free butter for a plant-based option.
- Lower sugar content: Use a sugar substitute or reduce the amount of sugars in the recipe for a healthier version.
Serving Suggestions
- Pair with a scoop of vanilla ice cream for a decadent treat.
- Serve alongside a warm cup of hot chocolate or coffee for a cozy experience.
- Dress your platter with fresh berries to add a pop of color.
- For a festive touch, sprinkle additional Christmas sprinkles on top before serving.
- Wrap individual bars in festive paper for delightful gifts or party favors.
FAQs about Santa’s Trash Cookie Bars
Can I make Santa’s Trash Cookie Bars in advance?
Absolutely! You can prepare these delicious cookie bars a day or two ahead of your holiday gatherings. Just store them in an airtight container at room temperature to maintain their freshness.
What can I substitute for potato chips?
If you’re not a fan of potato chips, feel free to use crushed corn chips or even pretzel sticks for that salty crunch. The idea is to keep that delightful salty-sweet balance in Santa’s Trash Cookie Bars!
Can I freeze the cookie bars for later?
Yes, these bars freeze wonderfully! Just wrap them tightly in plastic wrap and aluminum foil, and they’ll stay fresh for up to three months. Thaw in the fridge before enjoying!
What if I don’t have eggs on hand?
No worries! You can replace each egg with ¼ cup of unsweetened applesauce or mashed banana as a great egg alternative. This still helps with binding while adding a hint of sweetness.
Are there any gluten-free options for Santa’s Trash Cookie Bars?
Certainly! To make these cookie bars gluten-free, simply use a gluten-free flour blend instead of all-purpose flour. This way, everyone can enjoy the festive flavors of Santa’s Trash Cookie Bars!
Final Thoughts
Baking Santa’s Trash Cookie Bars is more than just making a dessert; it’s about creating unforgettable memories with family and friends. Each batch fills your home with a fantastic aroma, instantly lifting spirits and bringing smiles. Whether you indulge alone or share with loved ones, these bars embody the holiday spirit through their delightful combination of flavors. Their unique texture and vibrant colors make them a joy to eat and share. So grab your ingredients and let the festive cheer flow as you bake these delightful bars—because nothing says holiday joy quite like a sweet, salty treat from the heart!
Print
Santa’s Trash Cookie Bars
- Total Time: 40 minutes
- Yield: 24 bars 1x
- Diet: Vegetarian
Description
Santa’s Trash Cookie Bars are a delightful and festive dessert that combines sweet and salty flavors, perfect for holiday gatherings.
Ingredients
- 1 tablespoon cornstarch
- 1 teaspoon baking soda
- 1 teaspoon salt
- 1 cup unsalted butter, softened
- ¾ cup granulated sugar
- ¾ cup light brown sugar, packed
- 1 teaspoon vanilla extract
- 2 large eggs
- ¾ cup potato chips, crushed
- ¾ cup pretzels, crushed
- ¾ cup chocolate chips
- ¾ cup Christmas M&Ms
- 2 tablespoons Christmas sprinkles
Instructions
- Preheat the oven to 350 degrees F and line a 9-inch × 13-inch cake pan with aluminum foil or parchment paper and set aside.
- In a medium bowl, whisk together the flour, cornstarch, baking soda, and salt. Set aside.
- In a large bowl with a hand mixer or in a stand mixer fitted with a paddle attachment, cream together the butter, sugar, brown sugar, and vanilla until light and fluffy.
- Add the eggs one at a time, mixing after each addition for about 10 seconds.
- Add the dry ingredients to the butter mixture and mix just until combined. Fold in the chips, crushed pretzels, chocolate chips, M&Ms, and most of the sprinkles.
- Spread the cookie dough out evenly in the cake pan and top with extra M&Ms, chocolate chips, potato chips, pretzels, and the remaining sprinkles.
- Bake the cookie bars for 22 to 25 minutes until the edges are golden brown. Remove from the oven and place on a wire rack.
- Allow the bars to cool for at least 1 hour in the pan before removing and slicing them into squares.
Notes
- For a gluten-free version, substitute all-purpose flour with a gluten-free flour blend.
- Feel free to adjust the types of mix-ins based on your preferences.
- These bars are best enjoyed fresh but can be stored in an airtight container for up to a week.
- Prep Time: 15 minutes
- Cook Time: 25 minutes
- Category: Dessert
- Method: Baking
- Cuisine: American
Nutrition
- Serving Size: 1 bar
- Calories: 210
- Sugar: 15g
- Sodium: 150mg
- Fat: 10g
- Saturated Fat: 6g
- Unsaturated Fat: 2g
- Trans Fat: 0g
- Carbohydrates: 30g
- Fiber: 1g
- Protein: 2g
- Cholesterol: 30mg